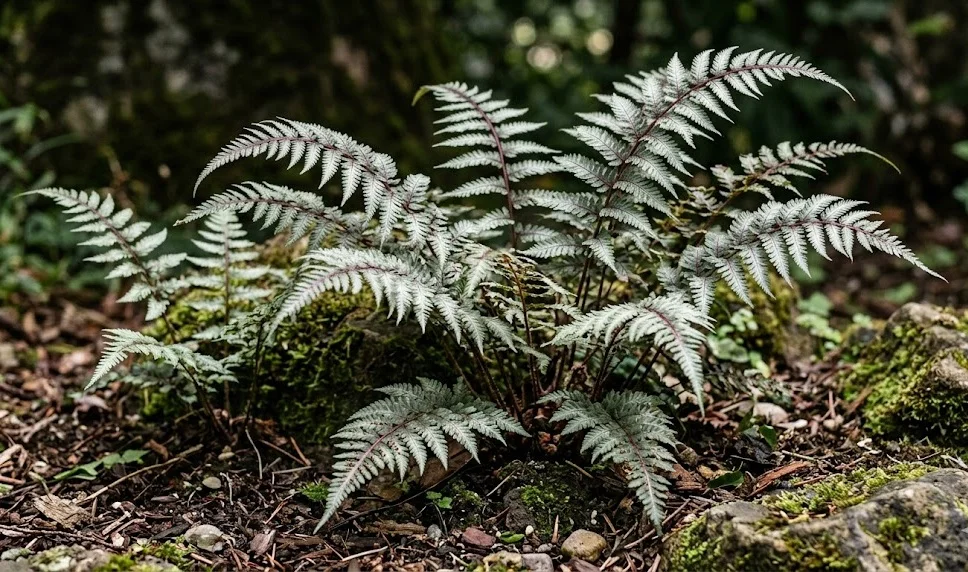
Success in planting the Japanese painted fern begins with the careful selection of a site that mimics its natural forest floor habitat. This species thrives in locations where it can enjoy filtered light and a soil structure that remains consistently moist yet breathable. Before you even dig the first hole, it is essential to prepare the ground by incorporating plenty of organic matter to ensure the right start. A well-planned planting process sets the stage for a plant that will grace your garden with its silvery fronds for many years to come.
The best time to plant this fern is either in the early spring, just as new growth begins, or in the early autumn when the heat of summer has subsided. Planting during these cooler windows allows the root system to establish itself without the stress of extreme temperatures. If you are planting in the spring, ensure that the soil has thawed and is no longer waterlogged from winter snowmelt. Autumn planting provides the benefit of warm soil, which encourages rapid root development before the plant enters winter dormancy.
When you are ready to put the fern in the ground, dig a hole that is twice as wide as the root ball but no deeper than the original container. Placing the plant too deep can lead to crown rot, as the base of the stems needs to be level with or slightly above the soil surface. Gently tease the roots if they have become pot-bound to encourage them to spread outward into the surrounding soil. Once the plant is in place, backfill the hole with a mixture of native soil and compost, tamping it down lightly to remove air pockets.
After the initial planting, a deep and thorough watering is necessary to settle the soil around the roots and eliminate any remaining gaps. Applying a two-inch layer of organic mulch, such as shredded bark or pine needles, will help retain moisture and keep the roots cool. Be careful not to pile the mulch directly against the crown of the fern, as this can trap excess moisture and invite fungal issues. With the right foundation, your new fern will quickly adapt and begin to produce its signature metallic foliage.
Site selection and environmental preparation
Choosing the right location is perhaps the most critical decision when planting the Japanese painted fern. Ideally, you should look for a spot that receives dappled shade or gentle morning sun, as harsh afternoon rays will quickly scorch the delicate leaves. North or east-facing garden beds are often the most successful locations for these plants in the northern hemisphere. The goal is to provide enough light to bring out the silver colors without causing the plant to dehydrate.
More articles on this topic
Soil preparation should focus on creating a rich, loamy environment that holds moisture while allowing excess water to drain away. If your garden has heavy clay soil, you must amend it with organic matter or consider planting in raised beds to ensure proper drainage. Conversely, sandy soils may require the addition of peat moss or compost to improve their water-holding capacity. Testing the soil’s drainage by filling a hole with water and timing how long it takes to empty can provide valuable insights.
Consider the surrounding vegetation when planning your fern garden, as large trees can sometimes compete aggressively for water and nutrients. While ferns love the shade provided by trees, the root systems of some species may dry out the soil too quickly for the fern’s liking. Choosing a spot with less aggressive companions or providing extra irrigation can help mitigate this competition. Spacing is also important; give each fern enough room to reach its mature width of about 18 to 24 inches.
Wind protection is often overlooked but can make a significant difference in the health and appearance of the foliage. Fronds that are constantly buffeted by wind will develop tattered edges and may even break at the base. A location sheltered by a fence, a wall, or a grouping of larger, sturdier plants will provide the calm environment the fern needs. This stillness also helps to maintain a pocket of higher humidity, which the plant finds very beneficial during the dry months of summer.
Propagation through division of rhizomes
Division is the most common and effective method for propagating the Japanese painted fern, allowing you to create new plants that are genetically identical to the parent. This process is best performed in early spring when the plant is just starting to wake up from its winter slumber. By dividing the plant before the fronds fully unfurl, you minimize the risk of damaging the delicate leaves and reduce transplant shock. A mature fern is typically ready for division every three to four years, or when the center of the mound starts to look thin.
More articles on this topic
To begin the division, carefully lift the entire clump from the ground using a garden fork to minimize root damage. Once the plant is out of the soil, shake off any excess dirt so you can clearly see the structure of the rhizomes. You will notice that the plant is composed of several smaller sections, each with its own set of roots and emerging buds. Using a sharp, sterilized knife or a spade, slice through the rhizomes to create sections that contain at least two or three healthy growth points.
Immediately after dividing, the new sections should be replanted at the same depth they were growing previously. If you cannot plant them right away, keep the roots moist by wrapping them in damp burlap or placing them in a temporary container with potting soil. Treat these new divisions with extra care, ensuring they receive consistent moisture until they show signs of new growth. It is normal for divided plants to grow a bit more slowly in their first season as they focus on repairing their root systems.
This method of propagation not only provides you with more plants for your garden but also rejuvenates the original specimen. Over time, ferns can become overcrowded, leading to smaller fronds and a loss of the characteristic arching shape. By thinning out the clump, you provide more space for the remaining rhizomes to expand and access nutrients. Sharing these divisions with fellow gardeners is a time-honored tradition and a great way to spread the beauty of this unique fern.
Growing from spores for the patient gardener
Propagating ferns from spores is a fascinating but more time-consuming process that requires a bit of scientific curiosity. Unlike flowering plants, ferns do not produce seeds; instead, they release microscopic spores from the undersides of their fronds. To collect these, look for mature fronds in late summer that have brown, dusty patches known as sori on their reverse side. Place a healthy frond on a piece of white paper in a draft-free room, and within 24 hours, you should see a “print” of fine dust.
The spores must be sown on a sterile, moist medium, such as a mix of peat moss and perlite that has been treated with boiling water to kill any fungi or algae. Sprinkle the spores thinly over the surface of the medium and do not cover them with soil, as they need light to germinate. Place the container in a clear plastic bag or cover it with a piece of glass to maintain 100% humidity. Keep the setup in a warm spot with bright, indirect light, but never in direct sun which would cook the delicate spores.
The first sign of success is the appearance of a thin green film on the surface of the soil, which eventually develops into small, heart-shaped structures called prothallia. These are the gametophyte stage of the fern’s life cycle, and they require a thin film of water to facilitate fertilization. You can gently mist the surface with distilled water to help the sperm swim to the eggs. Once fertilization occurs, the first tiny true fronds will begin to emerge from the center of the heart-shaped structures.
Raising these “baby” ferns requires a great deal of patience, as it can take a year or more before they are large enough to be moved to individual pots. During this time, it is vital to keep the environment sterile and consistently moist, as the young plants are extremely vulnerable to drying out or being overtaken by mold. Gradually acclimate the young ferns to lower humidity levels by opening the cover for short periods each day. Once they have several sturdy fronds, they can be treated like miniature versions of the mature plants and eventually moved to the garden.
Finalizing the planting and long-term establishment
Once your ferns are in the ground, the first few months are critical for ensuring they become a permanent part of your landscape. Check the soil moisture daily, especially during hot or windy weather, to ensure it doesn’t dry out completely. If the fronds start to wilt, it is a clear sign that the plant needs a deep watering immediately. However, avoid keeping the soil constantly saturated, as this can prevent the roots from getting the oxygen they need to grow.
As the fern begins to establish itself, you will notice the fronds becoming larger and the colors becoming more intense. It is generally best to avoid any heavy fertilization during the first growing season, as you want the plant to focus on root development rather than excessive leaf growth. A light mulch of organic compost is usually enough to provide the basic nutrients needed for establishment. By the second year, the fern should be well-anchored and ready to handle more varied weather conditions.
Mulching remains an ongoing task that should be refreshed every spring to maintain the health of the soil. As the old mulch breaks down, it improves the soil structure and continues to feed the beneficial organisms that live underground. This organic layer also serves to suppress weeds that might compete with the fern for resources. Keeping a clean, mulched area around the base of the plant also makes it easier to spot any potential pest problems early on.
In the long term, the Japanese painted fern is a very low-maintenance plant once it has found its “happy place” in the garden. It does not require frequent staking, deadheading, or complicated pruning routines like many other perennials. Simply providing the basic needs of shade, moisture, and rich soil will result in a spectacular display year after year. Your initial efforts in planting and propagation will be rewarded with a lush, shimmering garden that only gets better with age.