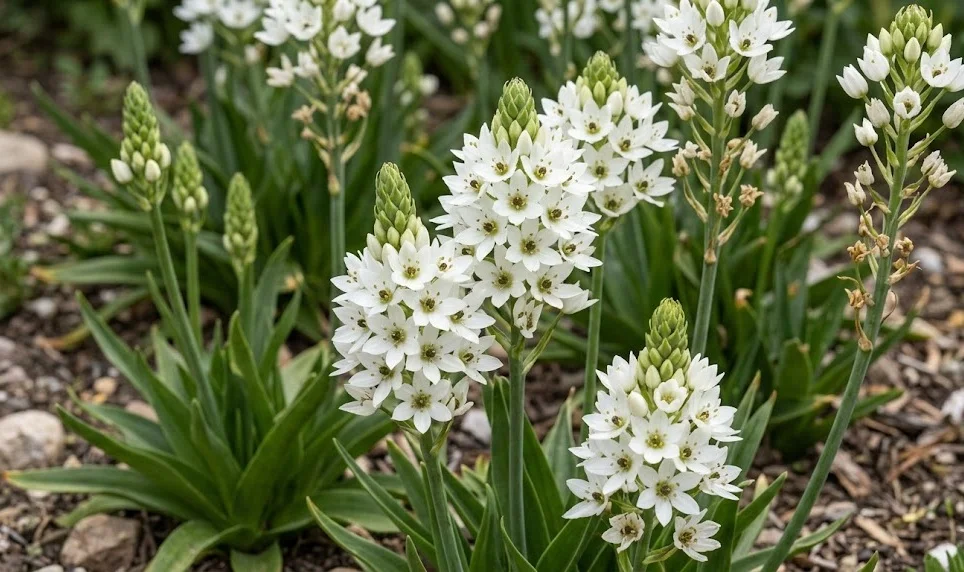
Establishing a thriving population of these elegant flowers requires a systematic approach to planting and understanding their reproductive methods. Propagation can be achieved through both sexual and asexual means, each offering different timelines for reaching the flowering stage. The chincherinchee is known for its ability to produce numerous small bulblets, making it an excellent candidate for naturalizing. By following professional standards for depth and spacing, you ensure that each individual plant has the resources it needs to flourish.
The timing of planting is dictated by your local climate and the specific temperature of the soil in your garden. Generally, these bulbs are planted in the spring after the danger of frost has passed and the ground has begun to warm. Planting too early in cold, wet soil can lead to the bulb rotting before it ever has a chance to sprout. The goal is to align the planting schedule with the natural warming cycle of the environment to trigger rapid growth.
Preparation of the planting site is just as important as the planting process itself to ensure long-term success. You should clear the area of weeds and debris that could compete with the young plants for water and nutrients. Deeply tilling the soil to a depth of about ten inches allows the roots to penetrate easily and improves overall drainage. Incorporating a small amount of bone meal or bulb fertilizer into the bottom of the planting hole provides an initial boost.
When handled correctly, the propagation of this species can be a very rewarding experience for the patient gardener. Whether you are starting from seeds or separating established clumps, the process requires attention to detail and hygiene. Clean tools are essential to prevent the spread of soil-borne diseases between the parent plants and the new offspring. With a little bit of care, a single bulb can eventually turn into a stunning drift of white blossoms.
Choosing the right bulbs and timing
When purchasing bulbs from a nursery, look for specimens that are firm, heavy, and free from any signs of mold or bruising. Large bulbs typically produce more flowers and have a higher chance of blooming in their first year of planting. Avoid any bulbs that feel lightweight or hollow, as these are likely desiccated and will not grow successfully. A healthy bulb is the primary unit of life that contains everything the plant needs to start its journey.
More articles on this topic
The ideal planting window usually opens in late April or early May in most temperate regions of the northern hemisphere. Soil temperatures should ideally be around fifteen degrees Celsius to encourage the dormant bulbs to break their rest. If the spring is particularly cold or wet, you can start the bulbs in pots indoors to give them a head start. This controlled environment allows the root system to establish itself before the plant is moved to its permanent outdoor location.
If you are planting in a region with very mild winters, fall planting may be possible if the soil remains well-drained. However, the risk of excess winter moisture causing rot is always a concern for this specific South African species. Most professional growers recommend spring planting as the safest and most reliable method for ensuring a healthy crop. Consistently monitoring the weather forecast during the planting weeks will help you avoid any sudden cold snaps.
Spacing between the bulbs should be roughly three to four inches to allow for adequate leaf spread and air circulation. Crowding the plants can lead to a lack of resources and increase the risk of disease transmission between neighbors. For a more natural look, you can scatter the bulbs across the planting area and bury them where they land. This “drift” effect is much more visually appealing than planting them in rigid, formal rows.
Propagation from seeds
Starting from seeds is a slower process but allows for the production of a large number of plants at a very low cost. The seeds should be collected from the dried flower pods once they have turned brown and began to split open. You can sow the seeds in a light, sandy compost mix that is kept consistently moist but never truly wet. Germination can be erratic and may take several weeks or even months depending on the ambient temperature.
More articles on this topic
Use shallow trays or small pots to start the seeds, and place them in a bright, warm location away from direct sunlight. The young seedlings look very similar to blades of grass and are quite delicate in their first few months of life. It is crucial to maintain a stable environment and avoid any extremes in temperature or moisture during this sensitive stage. Patience is required, as it may take three to four years for a seed-grown plant to reach flowering size.
As the seedlings grow, they will begin to form tiny bulbs beneath the surface of the soil during their first year. Do not be alarmed if the foliage dies back after a few months, as this is the start of their first dormant period. Allow the soil to dry out during this time to protect the developing mini-bulbs from any potential fungal decay. In the following growing season, the bulbs will re-emerge larger and stronger than they were the year before.
Transplanting seed-grown plants should only be done once the bulbs have reached a manageable size, usually after the second year. Carefully lift the small bulbs during their dormant phase and move them into larger containers or a dedicated nursery bed. Continue to provide them with optimal care and nutrition to accelerate their path toward the flowering stage. This method of propagation is an excellent way to maintain the genetic diversity of your garden collection.
Propagation by bulb offsets
The most common and fastest way to multiply your collection is through the separation of natural bulb offsets. Over time, a mature bulb will produce several smaller “daughter” bulbs around its base as part of its growth. These offsets are genetically identical to the parent plant and will produce the same beautiful white flowers. Lifting and dividing these clumps every few years prevents overcrowding and rejuvenates the older, less productive bulbs.
The best time to perform this division is during the dormant season when the plant has no active foliage. Carefully dig up the entire clump with a garden fork, taking care not to slice through the bulbs themselves. You will see the smaller bulblets attached to the main bulb, often held together by a common root plate. Gently pull them apart by hand, ensuring that each piece has at least a small portion of the basal plate.
Inspect each offset for health and firmness before you decide to replant them in new locations. Smaller offsets may not bloom in their first year, so they are best grown in a separate “nursery” area until they mature. Replant the main bulbs immediately or store them in a dry place if the soil is not yet ready for planting. This simple act of division is one of the easiest ways to expand your garden for free.
When replanting the offsets, follow the same depth and spacing rules as you would for full-sized, mature bulbs. Providing a little bit of extra compost in the new planting holes can help the offsets establish their own root systems quickly. Water them in lightly to settle the soil around the bulbs and remove any large air pockets that might exist. Within a couple of seasons, these small offsets will grow into full-sized plants capable of producing their own blooms.
Professional planting techniques
The depth of the planting hole should be approximately three times the height of the bulb itself. This depth provides enough insulation against temperature fluctuations while allowing the shoot to reach the surface easily. If you plant the bulbs too shallowly, they may be pushed out of the soil by frost heaving or suffer from drying out. Conversely, planting them too deeply can cause the shoots to exhaust their energy before they ever see the sun.
The orientation of the bulb in the soil is a small but critical detail that determines the success of the growth. The pointed end should always face upward, as this is where the primary growth point for the leaves and stems is located. The flatter end with the vestigial roots should face downward to make immediate contact with the soil moisture. If you are unsure which end is which, planting the bulb on its side is a safer bet than planting it upside down.
After placing the bulbs in the holes, backfill with the original soil and press down gently to remove any large air gaps. You do not need to pack the soil too tightly, as the roots need oxygen and room to expand through the medium. A light application of water immediately after planting helps to establish a good connection between the bulb and the earth. If the weather is expected to be very dry, a thin layer of mulch can help retain the initial moisture.
Labeling your planting sites is a professional habit that prevents accidental digging during the dormant season. Use durable garden markers that can withstand the rain and sun throughout the entire year without fading away. This is especially helpful if you have multiple varieties or if you are tracking the age of different propagation batches. Keeping a simple garden map or journal can also help you plan future additions and manage the rotation of your plants.