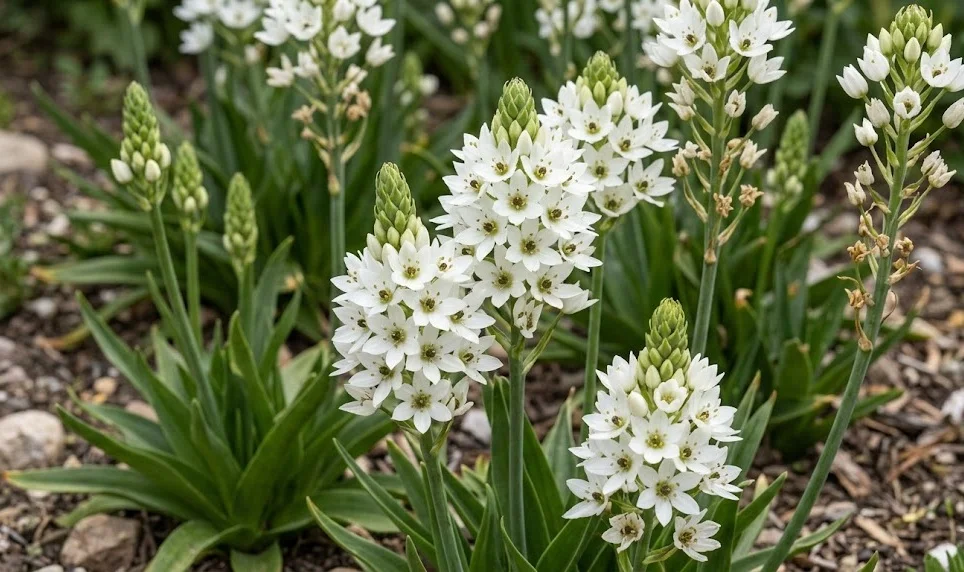
The chincherinchee is a stunning perennial bulbous plant that originates from the coastal and mountainous regions of South Africa. Cultivating this plant requires a nuanced understanding of its natural habitat to ensure it thrives in a garden or indoor setting. Gardeners value this species for its long-lasting, star-shaped white flowers that appear in dense clusters during the late spring and summer months. Successful care involves balancing light, moisture, and soil nutrition to mimic the Mediterranean-like conditions of its homeland.
Maintaining the health of this plant begins with selecting the right microclimate within your garden or home environment. It is essential to provide a location that receives ample sunlight while offering protection from harsh, drying winds. During the active growing season, the plant focuses its energy on developing strong stalks and vibrant floral displays. Consistent monitoring allows for early detection of any physiological stress that might hinder the plant’s development.
The life cycle of the bulb includes a vigorous growth phase followed by a strictly necessary period of total dormancy. Understanding this rhythm is the key to ensuring that the plant returns with renewed vigor every single year. You should observe the foliage closely, as the leaves will signal when the plant is entering its rest phase. Proper care during these transitions ensures the bulb remains plump and full of stored energy for the next season.
While the plant is relatively hardy in temperate climates, it does have specific preferences regarding temperature and humidity levels. Sudden changes in the environment can cause the plant to drop its buds or suffer from yellowing foliage. By maintaining a stable environment, you can extend the blooming period significantly and enjoy the visual beauty for weeks. Knowledgeable gardeners often treat the care process as a seasonal dialogue between the earth and the flora.
Selecting the ideal environment
The foundation of successful cultivation lies in finding a spot that mirrors the sunny plains of the Cape Province. Direct sunlight is the primary driver of photosynthesis for this species, allowing it to produce robust flower spikes. If the plant is kept in a location that is too shaded, the stems will likely become leggy and weak. Aim for at least six hours of bright light to promote the best possible aesthetic results.
More articles on this topic
Soil quality plays a critical role in how the plant interacts with its environment and manages its internal resources. A well-draining medium is non-negotiable because the bulbs are highly susceptible to rotting in waterlogged or heavy clay soils. You can improve existing garden soil by incorporating organic matter or coarse sand to enhance its overall structure. Testing the soil texture before planting helps in avoiding many common growth issues later in the season.
Temperature management is another vital aspect of caring for these South African natives throughout the different seasons. They prefer daytime temperatures that remain consistently warm but not excessively hot or scorching to the touch. Nighttime cooling is acceptable and even beneficial, as it mimics the natural temperature fluctuations of their native habitat. Protecting the plants from late spring frosts is mandatory to prevent irreversible tissue damage to new growth.
Air circulation is often overlooked but remains a major factor in preventing the buildup of stagnant, humid air. Good ventilation reduces the risk of fungal infections that thrive in damp and enclosed garden spaces. When planting in groups, ensure there is enough space between individual bulbs to allow the breeze to pass through. Indoor plants should be placed away from drafty air conditioners or heat vents that can cause rapid dehydration.
Soil and nutrition management
The chemical composition of the soil should ideally be slightly acidic to neutral for optimal nutrient uptake. Using a specialized bulb compost can provide the necessary balance of aeration and moisture retention for the roots. It is important to avoid soils that are overly rich in nitrogen, as this often leads to excessive leaf growth. Instead, focus on a balanced mix that supports both the structural integrity and the reproductive health of the plant.
More articles on this topic
Organic matter serves as a slow-release source of nutrients while also improving the biological activity within the soil. Adding well-rotted leaf mold or compost can help maintain the moisture levels without creating a muddy or saturated environment. This organic layer also helps to regulate soil temperature, keeping the bulbs cool during the peak of summer heat. A healthy soil microbiome is the best defense against many soil-borne pathogens that target bulbous species.
As the plant enters its peak growing phase, its demand for specific minerals such as phosphorus and potassium increases. These elements are crucial for the development of strong cell walls and the production of complex sugars. You can apply a diluted liquid fertilizer once every two weeks during the time the flower buds are forming. Always ensure the soil is moist before applying fertilizer to prevent any potential chemical burning of the delicate root system.
After the flowering period concludes, the plant begins to move nutrients from the leaves back down into the bulb. This process is essential for the following year’s growth and should not be interrupted by premature pruning. Continue to provide minimal nutrition during this stage to help the bulb store as much energy as possible. Once the leaves have completely withered and turned brown, the fertilization process should cease entirely for the season.
Managing the growth cycle
The emergence of the first green shoots in spring is a signal to increase attention and regular monitoring. These early leaves are the primary source of energy for the developing flower spike and must be kept healthy. Protect the young foliage from physical damage and ensure it has clear access to the available sunlight. This initial stage sets the tone for the quality of the blossoms you will see later in the year.
As the flower spike grows taller, it may require some form of subtle support to prevent it from leaning. While the stems are generally sturdy, the weight of the dense flower clusters can become significant after a rain. Using thin bamboo stakes or discreet garden wire can help maintain an upright and elegant presentation in the garden. Check these supports regularly to ensure they are not constricting the natural expansion of the plant stems.
The blooming phase is the highlight of the plant’s life and can last for several weeks if conditions remain stable. Each individual flower in the cluster opens sequentially, starting from the bottom and moving toward the top. This gradual opening process provides a long-lasting display that is highly prized by floral designers and home gardeners. Removing individual spent florets can keep the spike looking fresh and vibrant throughout the entire duration of the bloom.
Transitioning into dormancy is a natural and necessary part of the plant’s biological clock that must be respected. When the flowers fade, the plant stops producing new growth and focuses on internal consolidation of its resources. Reduction in watering should be gradual to match the slowing metabolism of the dormant bulb beneath the surface. Providing a dry environment during this phase is the most important factor in preventing bulb decay during the winter.
Container gardening techniques
Growing this species in pots offers the advantage of mobility and better control over the immediate growing medium. Choose a container with large drainage holes at the bottom to ensure that any excess water can escape. Terracotta pots are often preferred because they allow the soil to breathe and dry out more evenly than plastic. A pot that is too large can hold too much moisture, so choose a size that fits the bulb comfortably.
When potting, use a high-quality potting mix designed for succulents or bulbs to ensure the best possible drainage. You can add a layer of gravel or broken pottery at the bottom of the pot to further enhance the drainage. Place the bulbs at a depth that allows for a few inches of soil coverage above the pointed top. Proper orientation is important, so make sure the root end is facing downward and the tip is pointing up.
Indoor specimens require a very bright windowsill, preferably one that faces the south or the west for maximum light. Rotate the pot a quarter turn every few days to ensure the plant grows straight and does not lean toward the light. If natural light is insufficient, you can supplement with full-spectrum grow lights to maintain the plant’s health. Monitor the indoor humidity levels, as dry household air can sometimes cause the leaf tips to turn brown.
Potted plants dry out much faster than those in the ground, so you must check the moisture levels more frequently. Stick your finger into the soil to a depth of one inch to feel if the medium is dry. Only water when the top layer of soil feels parched to the touch to avoid the risks of overwatering. During the dormant season, potted bulbs can be stored in their containers in a cool, dark, and dry location.
Maximizing floral display
To achieve the most impressive floral show, it is often best to plant the bulbs in tight, strategic clusters. This creates a more dramatic visual impact when multiple flower spikes rise together in a concentrated area of the garden. The white, wax-like texture of the petals reflects the light beautifully, making them stand out against darker foliage. Consider the backdrop of your planting site to ensure the bright flowers are the focal point of the arrangement.
Timing your planting can also help in extending the overall duration of the floral season in your landscape. By planting bulbs in successive waves every two weeks, you can ensure a continuous sequence of blooming flowers. This method is particularly effective for those who want to use the chincherinchee as a reliable source of cut flowers. The staggered growth ensures that as one plant finishes its display, another is just beginning to open its buds.
The longevity of the flowers in a vase is legendary, often lasting up to three or more weeks after being cut. To get the best results, cut the stems when the bottom few buds on the spike have just opened. Use a sharp, clean knife to make a diagonal cut at the base of the stem to maximize water intake. Change the water in the vase every two days and trim a small amount off the stem each time.
Providing the plant with a boost of potassium-rich fertilizer just before the blooming starts can enhance the color and size. Stronger stems are also a result of proper nutrition, which is vital for supporting the heavy weight of the florets. Avoiding high-heat stress during the blooming period will prevent the flowers from wilting prematurely or turning brown at the edges. A little bit of afternoon shade during the hottest days can actually help preserve the delicate petals.
Post-flowering and bulb health
Once the last flower has withered, the plant enters a critical phase of replenishing its internal energy stores. You must resist the urge to cut off the green leaves, even if they begin to look untidy. These leaves are actively performing photosynthesis to create the sugars that the bulb needs for next year. Only when the foliage has turned yellow or brown and becomes brittle should it be removed from the plant.
During this period, the moisture requirements of the plant drop significantly as its active growth comes to a complete halt. Overwatering at this stage is one of the most common mistakes made by enthusiastic gardeners and leads to rot. The soil should be allowed to dry out almost completely between the very infrequent watering sessions that remain. This mimics the dry summer or winter conditions that the plant would experience in its natural South African range.
Bulb health can be assessed by gently feeling the firmness of the bulb through the top layer of the soil. A healthy bulb should feel solid and heavy for its size, indicating that it is well-hydrated and dormant. If the bulb feels soft, mushy, or exceptionally light, it may be suffering from disease or total dehydration. Regular inspections help you decide whether the bulbs need to be lifted for storage or left in the ground.
If you live in a region with cold or wet winters, lifting the bulbs is the safest way to ensure their survival. Clean off any excess soil and let the bulbs dry in a shaded, well-ventilated area for a few days. Once dry, store them in a paper bag or a box filled with dry peat moss or sawdust. Keep the storage container in a cool, frost-free environment until it is time to replant them in the spring.