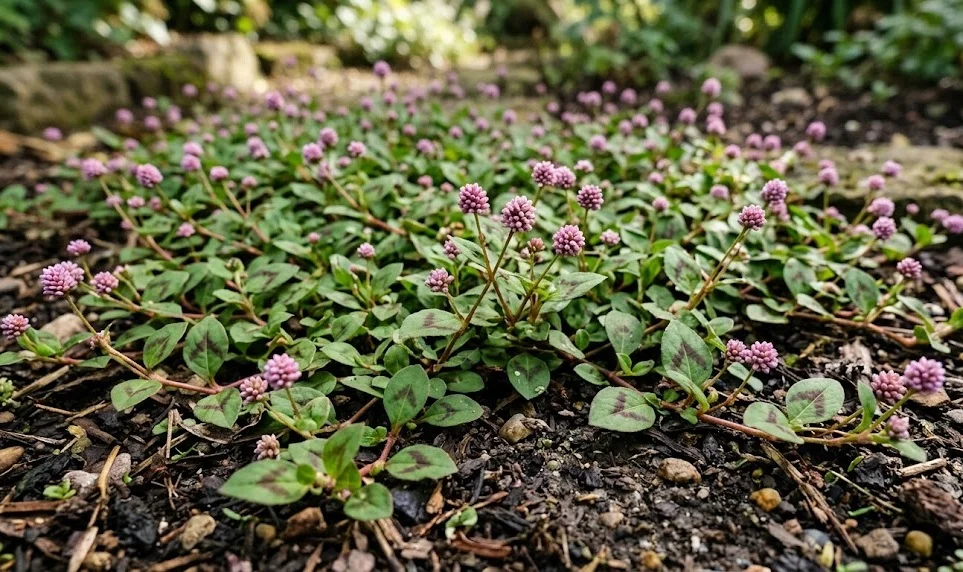
Expanding your collection of pink knotweed is a satisfying process that allows you to cover more ground with this beautiful species. Whether you are starting with a single nursery pot or trying to fill a large area, proper planting techniques are essential for rapid establishment. This plant is exceptionally easy to propagate, making it a favorite for gardeners who like to share plants or expand their landscapes on a budget. Mastering these fundamental skills will ensure that your garden remains lush and vibrant for years to come.
Choosing the perfect location for success
Before you dig your first hole, it is vital to evaluate the environmental conditions of your intended planting site. Pink knotweed is highly adaptable, but it truly excels in spots that receive at least six hours of sunlight per day. While it can survive in partial shade, you will notice that the foliage is less dense and the flowering is significantly reduced. Finding a location with well-draining soil will prevent most of the common issues associated with this species.
Consider the topography of your garden, as this plant is an excellent candidate for stabilizing slopes and embankments. Its creeping roots hold the soil together, preventing runoff during heavy rain events. However, avoid planting it in low spots where water tends to collect and stand for several days. Even though it likes moisture, constant saturation will eventually lead to the decline of the root system and the death of the plant.
Think about the long-term impact of the plant on its neighbors when choosing its permanent home. Because it spreads through surface runners, it is best placed near robust shrubs or in its own dedicated bed. Planting it next to delicate, low-growing alpine plants might result in the knotweed quickly overwhelming them. A clear boundary, such as a paved walkway or a deep lawn edge, can help keep the plant exactly where you want it.
Wind exposure is generally not a major concern for this low-growing species, as it stays close to the protective surface of the ground. However, in very exposed coastal sites, the leaves can sometimes suffer from windburn if the soil is too dry. If you are planting in a particularly windy area, consider adding a temporary windbreak until the plant is well-established. Once it has a solid root system, it becomes remarkably tough and resistant to the elements.
More articles on this topic
Effective planting techniques for rapid establishment
When you are ready to plant, begin by clearing the area of any existing weeds or grass that might compete with the young knotweed. Even though the plant is a strong grower, giving it a clean start will significantly speed up its coverage. Dig a hole that is slightly wider than the root ball but no deeper than the original container. This ensures that the crown of the plant stays at the correct level relative to the soil surface.
Before placing the plant in the hole, gently tease the roots if they have become pot-bound or are circling the container. This encourages them to grow outwards into the surrounding soil rather than continuing to grow in a tight circle. Place the plant in the center and backfill with a mixture of native soil and a small amount of finished compost. Firm the soil down gently with your hands to remove any large air pockets that could dry out the roots.
Immediately after planting, give each specimen a deep watering to help settle the soil and reduce transplant shock. This initial hydration is critical, even if the weather is cool or overcast. You might also consider applying a thin layer of organic mulch around the base of the plant, being careful not to cover the crown itself. The mulch helps maintain moisture levels and suppresses any weed seeds that were stirred up during the planting process.
If you are planting a large area, using a staggered grid pattern is the most efficient way to achieve quick coverage. Space the plants about thirty centimeters apart in every direction to ensure that the runners meet and interlock within the first growing season. If you are on a tighter budget, you can space them further apart, but it will take longer to achieve a solid carpet. Patience is key during the first few months as the plant focuses on building its underground foundation.
More articles on this topic
Division as a primary propagation method
Division is perhaps the easiest and most reliable way to propagate pink knotweed once you have an established patch. This process involves physically separating a portion of the plant, including its roots and top growth, and moving it to a new location. The best time for division is in early spring just as new growth begins to appear, or in early autumn. During these times, the weather is milder, which reduces the stress on the newly moved sections.
To divide the plant, use a sharp spade or a garden fork to lift a section of the mat from the edge of the patch. You will notice that the runners have already formed small root systems wherever they have touched the ground. These “rooted stems” are essentially independent plants waiting to be moved. You can cut these sections away from the parent plant using clean garden shears or a sharp knife.
Once you have your divisions, keep the roots moist and protected from the sun until you are ready to replant them. It is best to have your new planting holes prepared in advance to minimize the time the roots are exposed to the air. Replant the divisions at the same depth they were growing before and water them in thoroughly. They usually settle in very quickly and will begin to produce new leaves within a couple of weeks.
Division not only helps you expand your garden but also serves to rejuvenate older, congested areas of the original plant. By removing sections from the edges, you encourage the remaining plant to produce fresh, vigorous growth. This is a great way to maintain the health and beauty of your groundcover indefinitely. Many professional gardeners perform light divisions every year to keep their landscapes looking their absolute best.
Propagation through stem cuttings and seeds
While division is the most common method, pink knotweed can also be propagated through stem cuttings with great success. This is a useful technique if you want to create a large number of new plants from a small amount of parent material. Take cuttings from healthy, non-flowering stems during the active growing season. Each cutting should be about ten centimeters long and have at least two or three nodes where leaves are attached.
Place the cuttings in a glass of water or a pot filled with a light, moist propagation mix. They root very quickly, often showing new white roots within just seven to ten days. Once the roots are a few centimeters long, you can transplant the cuttings into small individual pots to grow on. Keep them in a protected, bright spot until they have developed a strong enough root system to be planted out in the garden.
Growing pink knotweed from seed is also possible, although it is a slower process than using divisions or cuttings. The seeds are small and can be collected from the dried flower heads in late autumn. Sowing them in a seed tray during late winter will give them enough time to germinate and grow before the spring planting season. Use a fine seed-starting mix and barely cover the seeds with a thin layer of soil or vermiculite.
Keep the seed tray in a warm, bright location and ensure the soil remains consistently moist but not soggy. Germination can be somewhat irregular, so don’t be discouraged if some seeds take longer to sprout than others. Once the seedlings have two sets of true leaves, they can be pricked out and moved into larger containers. By the time the weather warms up, you will have a fresh batch of young plants ready to enhance your garden landscape.