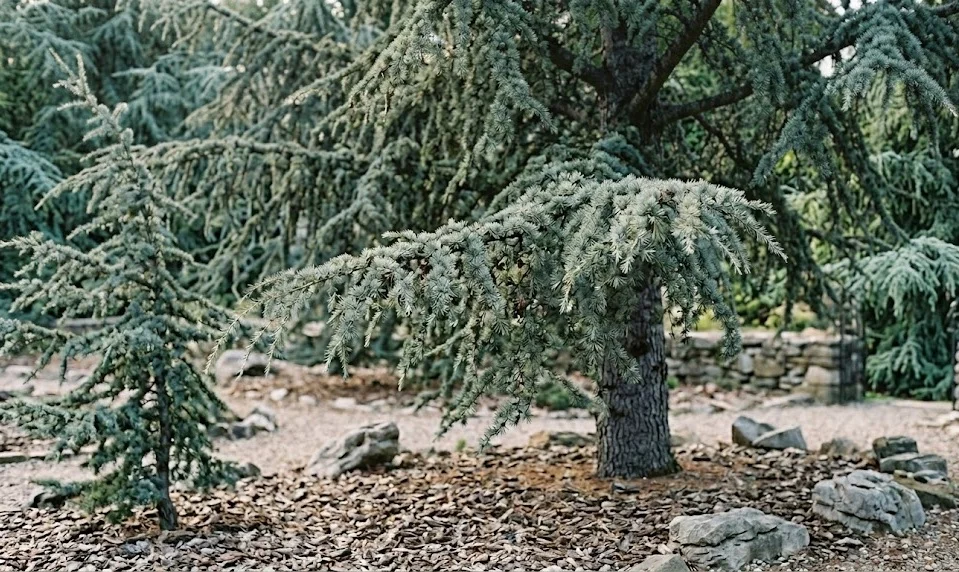
Successfully establishing a Himalayan cedar in your garden begins with a careful planting process that respects the biological needs of the species. You must choose a location that provides enough space for the tree to reach its impressive mature height and spread over many years. The site should offer full sun exposure and well-drained soil to prevent common issues like root rot or stunted growth. Taking the time to prepare the site properly will ensure that your new tree has the best possible start in its new home.
The timing of your planting efforts is crucial for the survival and long-term health of the young cedar tree. You should aim to plant during the dormant season, either in late autumn or early spring, before the new growth begins. This allows the roots to settle into the soil without the immediate stress of supporting a rapidly growing canopy of needles. Avoid planting during the peak of summer heat or when the ground is frozen solid during the winter.
Preparing the planting hole requires more than just digging a space large enough for the root ball to fit inside. You should dig a hole that is at least twice as wide as the root system but no deeper than the original container. Roughening the sides of the hole with a shovel helps the new roots penetrate the surrounding soil more easily. This practice prevents the roots from circling within the hole, which can eventually lead to the tree becoming root-bound and unstable.
When you are ready to place the tree in the hole, you must handle the root ball with extreme care to avoid damage. You should ensure the tree sits at the same depth it was growing at the nursery to prevent stem rot. Once positioned, backfill the hole with the original soil, tamping it down gently to remove any large air pockets. Watering the area thoroughly immediately after planting will help settle the soil and provide essential hydration to the roots.
Site selection and preparation
The specific microclimate of your chosen planting site will determine how well the cedar adapts to its new environment. You should look for an area that is protected from harsh, drying winds that can cause needle burn during the winter months. A spot with deep, fertile soil will provide the necessary nutrients for the tree to grow at its natural, vigorous rate. Consider the proximity to buildings or power lines, as these trees can eventually reach heights of over fifty feet.
More articles on this topic
Soil testing is a step you should never skip when preparing a site for a long-lived ornamental tree like the cedar. You need to know the pH level and the nutrient profile of your ground before you start the planting process. If the soil is too compacted, you might need to use a garden fork to loosen the earth over a wide area. Adding organic matter to the entire planting zone, rather than just the hole, encourages the roots to spread outward.
Drainage is perhaps the most important factor to consider when evaluating a potential site for your new Himalayan cedar. You can test the drainage by digging a small hole, filling it with water, and timing how long it takes to empty. If the water sits for more than a few hours, you should consider building a raised mound or choosing a different location. Poorly drained soil is the leading cause of failure for newly planted conifers in residential landscapes.
Competition from nearby plants can hinder the development of a young tree during its first few years of growth. You should clear a wide circle of grass and weeds around the planting site to reduce competition for water and nutrients. Applying a layer of mulch over this cleared area will help keep the ground clear and improve the soil quality over time. Be sure to keep the mulch a few inches away from the trunk to prevent moisture from trapped against the bark.
Seed propagation techniques
Growing a Himalayan cedar from seed is a rewarding process that requires patience and careful attention to environmental conditions. You should collect seeds from mature cones that have turned brown and started to open their scales naturally. The seeds are winged and designed to be dispersed by the wind, so you must catch them before they fly away. Once collected, you need to remove the wings and store the seeds in a cool, dry place until you are ready.
More articles on this topic
Cold stratification is a necessary step to break the natural dormancy of the seeds and encourage uniform germination. You should place the seeds in a container with moist sand or peat moss and store them in the refrigerator for several weeks. This mimics the natural winter conditions that the seeds would experience in their high-altitude mountain home. After the stratification period is complete, the seeds will be ready to be sown into a prepared seedbed or pots.
Sowing the seeds should be done in a well-draining seed starting mix that is kept consistently moist but never waterlogged. You should place the containers in a bright location but out of direct, scorching sunlight which can dry out the delicate seedlings. Germination can be erratic, so do not be discouraged if some seeds take longer to sprout than others in the same tray. Once the seedlings have developed their first set of true needles, they can be carefully moved to individual containers.
Protecting the young seedlings from pests and extreme weather is vital during their first few months of life. You should keep them in a sheltered area where they can grow slowly and develop a strong root system before being moved outside. Gradually hardening off the plants by exposing them to outdoor conditions for increasing periods will prepare them for permanent planting. This slow transition prevents transplant shock and ensures the young trees are resilient enough to survive in the garden.
Vegetative propagation methods
Propagation through cuttings is another way to create new plants that are genetically identical to the parent tree. You should take semi-hardwood cuttings in late summer or early autumn from the current season’s growth. The cuttings should be about six to eight inches long and taken from healthy, disease-free branches in the upper canopy. Removing the needles from the bottom half of the cutting will prepare it for insertion into the rooting medium.
Using a rooting hormone can significantly increase your success rate when trying to grow new cedars from cuttings. You should dip the wounded end of the cutting into the hormone powder or liquid before placing it into a pot. A mixture of perlite and peat moss provides the ideal balance of aeration and moisture retention for new roots to form. Keeping the cuttings in a humid environment, such as a covered propagator, will prevent them from drying out before they can grow.
Patience is a virtue when waiting for cuttings to develop a functional root system, as it can take several months. You should check for roots by gently tugging on the cutting to see if there is any resistance from below the soil. Avoid the temptation to dig them up frequently, as this can break the fragile new roots that are just beginning to grow. Once the cuttings are firmly rooted, they can be transitioned to a more nutrient-rich potting soil to continue their development.
Grafting is a more advanced technique often used by professionals to propagate specific ornamental cultivars of the Himalayan cedar. You should select a healthy rootstock that is well-adapted to your local soil conditions for the best long-term results. The scion, which is the piece of the desired variety, must be carefully joined to the rootstock using precise cuts and grafting tape. This method allows for the production of trees with unique growth habits or foliage colors that cannot be grown from seed.