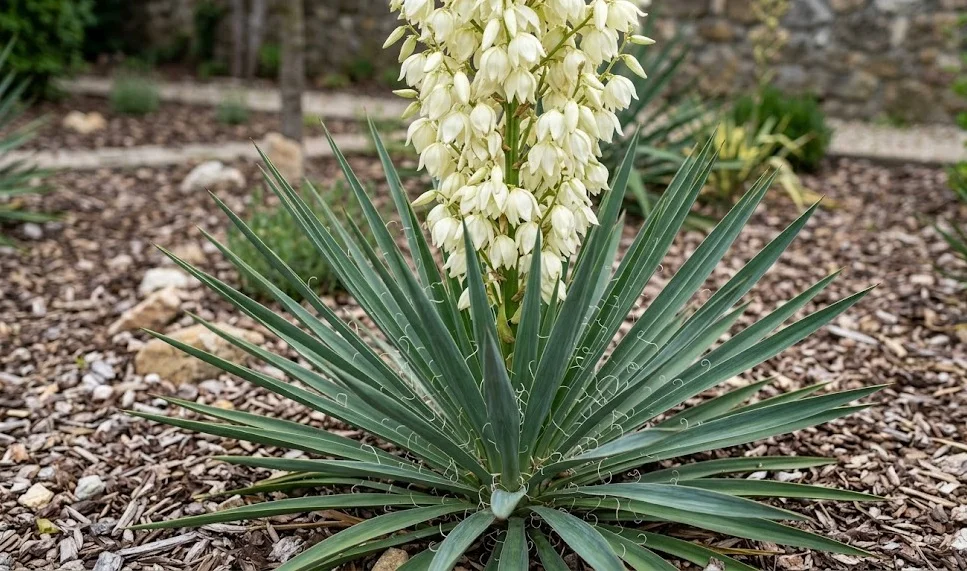
Mastering the art of pruning and cutting back the garden yucca is a key skill for maintaining its architectural beauty and long-term health. Unlike many other garden perennials that require regular shearing, the yucca needs a more surgical and targeted approach. Professional pruning is about removing only what is necessary to enhance the plant’s form and prevent the buildup of dead material. This guide provides expert techniques for cleaning, rejuvenating, and managing the growth of these unique desert-hardy specimens.
The primary goal of pruning a yucca is to maintain its clean, structural lines by removing spent flower stalks and aging foliage. Over time, the lower leaves will naturally die back as part of the plant’s growth cycle, creating a “skirt” of brown, dry material. While some people like this natural look, a professional landscape usually requires these to be removed to keep the plant looking fresh. This simple task not only improves the aesthetics but also eliminates hiding places for garden pests.
Safety is a major consideration when pruning this species due to the sharp, pointed tips and occasionally serrated edges of the leaves. Always wear heavy-duty gloves and long sleeves to protect your skin from scratches and punctures. Some professionals even choose to wear eye protection when working deep inside a large clump of yuccas. By taking the right precautions, you can focus on the precision of your work without the risk of injury.
The timing of your pruning is also important for the plant’s recovery and the overall look of the garden. While minor cleaning can be done at any time of year, major cutting back is best performed in the late spring or early summer. This aligns with the plant’s natural growth spurt, allowing it to quickly hide any pruning scars with new, vibrant foliage. With the right tools and techniques, you can ensure your yucca remains a stunning focal point for years to come.
Removing spent flower stalks
The dramatic flowering period of the yucca is a highlight of the summer, but the stalks that remain afterward can quickly become an eyesore. Once the white bells have fallen and the stalk begins to turn from green to brown, it is no longer providing any benefit to the plant. In fact, leaving it in place can drain energy if the plant attempts to produce seeds. Professional gardeners always remove these stalks as soon as the floral display is over.
More articles on this topic
To remove a flower stalk, follow it down into the center of the foliage as far as you can safely reach. Use a pair of sharp, long-handled loppers or a small garden saw to make a clean, horizontal cut. You want the cut to be hidden by the surrounding leaves so that the plant’s architectural form is not disrupted by a visible “stump.” Be careful not to damage the emerging new leaves in the center of the crown as you make your cut.
Removing the stalk also serves a functional purpose by preventing the plant from becoming top-heavy. In a windy location, a dry, woody flower stalk can act like a sail, putting unnecessary stress on the plant’s root system. By cutting it back, you restore the plant’s center of gravity and ensure it remains stable in the ground. It is a quick and satisfying task that immediately polishes the appearance of the entire garden bed.
If you have a large colony of yuccas, you may find that they bloom at slightly different times. Keeping a regular eye on them throughout the late summer will allow you to remove the stalks as they fade, rather than waiting for all of them to finish. This continuous maintenance keeps the landscape looking professional and prevents the “neglected” look that can occur when dead stalks are left for too long. A proactive approach is the hallmark of expert garden care.
Cleaning up damaged foliage
The lower leaves of a yucca are the oldest and will eventually turn yellow and then brown as they age. This is a natural process of shedding, but the dead leaves can remain attached to the plant for a long time. To remove them, simply pull the leaf downward; if it is completely dry, it will often “snap” off cleanly at the base. If the leaf is still tough and attached, use a pair of bypass pruners to cut it as close to the trunk as possible.
More articles on this topic
Environmental factors like frost, hail, or intense sun can also cause localized damage to the leaves. This usually appears as brown tips or spots that won’t turn green again. You can “groom” these leaves by trimming away the damaged parts with a sharp pair of scissors. To maintain a natural look, try to cut the tip into a point that mimics the original shape of the leaf.
When cleaning a large specimen, work your way from the bottom up and from the outside in. This systematic approach ensures you don’t miss any hidden dead material and allows you to see the true shape of the plant as you go. Removing the old “skirt” of leaves can sometimes reveal a short, woody trunk, which can be quite an attractive feature in older plants. This process also improves airflow around the base, which is vital for preventing fungal issues.
Always sterilize your pruning tools with rubbing alcohol before and after working on your yuccas. This is a professional best practice that prevents the spread of diseases from one plant to another. While yuccas are generally tough, they can still be susceptible to infections if pathogens are introduced through dirty pruning cuts. Taking a few extra seconds to clean your equipment is a small investment that pays off in long-term plant health.
Rejuvenating old specimens
In some cases, a very old garden yucca can become lopsided, overly large, or simply tired-looking. When this happens, a more drastic “rejuvenation pruning” might be necessary to restore the plant’s vigor. This involves cutting the entire plant back to within a few inches of the ground. While this might seem shocking, the yucca has a remarkable ability to regrow from its thick, fleshy root system.
The best time for this type of major intervention is in the early spring, just as the soil begins to warm. After cutting the plant back, you should provide it with a bit of extra water and a light application of balanced fertilizer to support the new growth. Within a few weeks, you will see new, bright green shoots emerging from the base. Over the course of a single growing season, the plant will often rebuild itself into a much tidier and more vibrant specimen.
If your yucca has produced many offsets (pups) and has become a crowded, messy clump, rejuvenation can also involve thinning. Use a sharp spade to remove some of the smaller offsets from around the main plant. This gives the remaining crowns more room to grow and allows for better light penetration and airflow. You can then use these removed pups to start new plants in other parts of your garden or give them to friends.
Managing the size of your yucca through pruning is much better than trying to “force” it into a space that is too small. If you find yourself constantly trimming the healthy leaves because they are blocking a path, it may be better to move the plant or replace it with a smaller variety. Professional gardening is about respecting the natural size and habit of the plant. With the right pruning techniques, you can guide your yucca through many years of healthy and beautiful growth.