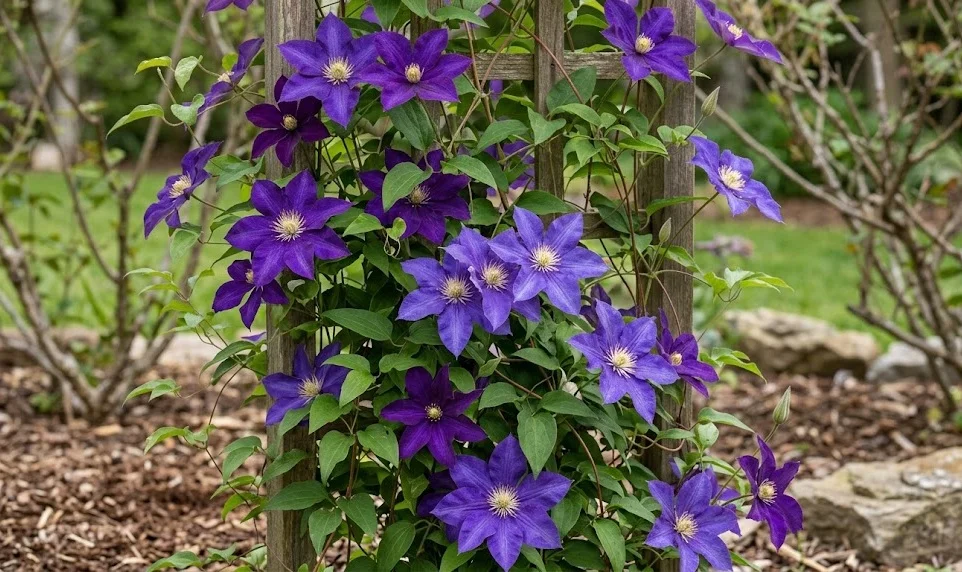
Pruning is often the most intimidating part of clematis care for many gardeners, but it is the key to maintaining a healthy and productive plant. The primary goal of cutting back is to encourage new growth, control the size of the vine, and maximize the number of flowers produced each year. By understanding which pruning group your plant belongs to, you can demystify the process and approach your garden with confidence. A well-pruned clematis is not only more beautiful but also much more resilient to pests and diseases over the long term.
Group 1 pruning rules
Group 1 consists of the early-flowering species that produce their blooms on the wood grown during the previous year. You should only prune these plants immediately after they have finished flowering in the late spring or early summer. If you cut them back in the winter or early spring, you will inadvertently remove all the flower buds for the coming season. This timing is the most critical factor in ensuring that you don’t miss out on their spectacular early display.
The pruning itself should be very light and focused primarily on removing dead or damaged wood and tidy up the overall shape. You should follow the stems back from the tips and cut just above a healthy set of green buds. There is no need for a “hard prune” unless the plant has become massively overgrown or has outgrown its designated space. These varieties are often very vigorous, so a light “haircut” every year is usually enough to keep them in check.
If you do need to perform a major renovation on an old, tangled Group 1 plant, be prepared to lose a year of flowers. You can cut the entire plant back to about three feet from the ground to stimulate fresh growth from the base. This should be done right after the flowering period to give the new stems as much time as possible to mature before the winter. While the plant may look bare for a few months, it will return with much more vigor and a better shape the following year.
Always use sharp, clean bypass pruners to make clean cuts that will heal quickly and resist fungal infections. You should avoid using anvil-style pruners, which can crush the delicate stems rather than cutting them cleanly. Taking a moment to wipe your blades with alcohol between different plants prevents the accidental spread of any hidden diseases. This simple bit of garden hygiene is a hallmark of a professional approach to plant maintenance and care.
More articles on this topic
Group 2 and 3 techniques
Group 2 includes the large-flowered hybrids that bloom in early summer on the previous year’s wood and then again in late summer on new growth. You should prune these twice a year: once lightly in early spring and again after the first flush of flowers has faded. The spring prune involves simply removing dead wood and cutting back any stems that have been damaged by the winter weather. This balanced approach ensures that you get the maximum amount of flowers from both the old and the new wood.
The second prune for Group 2 involves cutting back the spent flower stems to a pair of healthy buds lower down on the vine. This encourages the plant to put its energy into producing the new shoots that will carry the second crop of late-summer blooms. You should be careful not to be too aggressive, as you want to maintain a good structure of older wood for the following year’s early show. It is a more nuanced style of pruning that requires a bit more attention to detail than the other groups.
Group 3 consists of the late-flowering varieties that produce all their blooms on the current season’s growth. These are the easiest to prune because you simply cut the entire plant back to about twelve inches from the ground in the early spring. You should look for the lowest pair of healthy, swelling buds on each stem and make your cut just above them. This “hard prune” ensures that the plant doesn’t become a tangled mess of old, unproductive wood over the years.
Because Group 3 plants grow so much in a single season, this aggressive pruning is necessary to keep the flowers at eye level rather than at the very top of a tall structure. If you forget to prune them, you will eventually end up with a plant that has bare, woody stems at the bottom and all the color far out of reach. Don’t be afraid to be bold with these varieties, as they are incredibly resilient and will quickly grow back to their full height. This annual “reset” is the secret to the massive walls of color that these varieties are famous for.
More articles on this topic
Tools and timing for cutting
Investing in high-quality pruning tools will make the job much easier for you and much better for the health of your clematis. You should have a pair of bypass pruners for general work and a smaller pair of floral snips for the more delicate deadheading tasks. If you have a very old plant with thick, woody base stems, a small pruning saw might also be necessary to make clean cuts. Keeping these tools sharp and well-oiled is a vital part of your garden maintenance routine during the slower months.
The timing of your pruning should be dictated more by the plant’s development and the local weather than by a specific date on the calendar. You should wait for the buds to start swelling in the spring so you can easily see which wood is alive and which is dead. Pruning too early in the winter can expose the soft inner tissues to extreme cold, leading to unnecessary die-back. Conversely, waiting too long in the spring means you might be cutting off valuable new growth that the plant has already spent energy producing.
Always make your cuts at a slight angle, about a quarter-inch above a healthy node where a pair of leaves or buds is emerging. This angle allows rainwater to run off the cut rather than sitting on top and encouraging rot or fungal growth. If you are removing an entire stem, try to cut it as close to the main trunk or the ground as possible without damaging the surrounding tissue. Clean, professional-looking cuts are the sign of a gardener who truly cares about the long-term health of their collection.
Finally, remember to step back and look at the overall shape of the plant as you work to ensure a balanced and pleasing result. You want the stems to be evenly distributed across the support structure to provide full coverage once the leaves emerge. If one side of the plant is much heavier than the other, take the opportunity to prune more aggressively on the stronger side. Pruning is as much an art as it is a science, and your skills will improve with every season you spend in the garden.