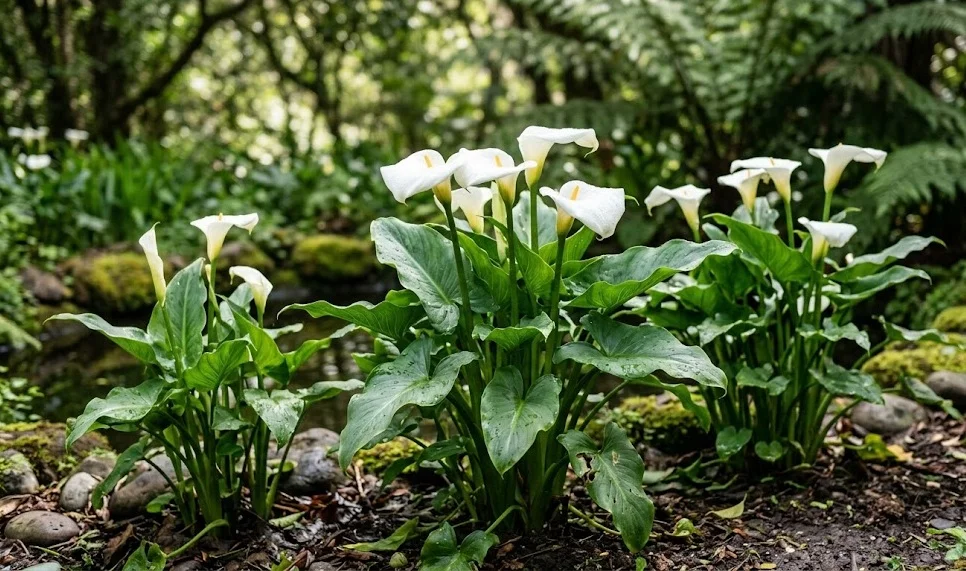
The process of planting and propagating the white calla is a rewarding endeavor that allows gardeners to expand their collection and ensure the continuity of these striking plants. To begin, you must understand that the white calla grows from a fleshy underground stem known as a rhizome, which serves as the plant’s primary energy reservoir. Success in planting starts with selecting high-quality, firm rhizomes that show no signs of soft spots or mold. By following specific techniques for placement and depth, you can set the stage for a successful growing season filled with lush foliage and elegant blooms.
When choosing a site for planting, consider the natural tendencies of the white calla, which enjoys moisture-rich environments often found near ponds or stream banks. In a traditional garden bed, this means you should look for a spot that can be kept consistently damp without becoming a stagnant bog. The soil should be prepared well in advance by digging in plenty of organic matter to create a fertile base. Proper site selection is the first and most crucial step in ensuring your callas have the resources they need to thrive from the moment they are planted.
The timing of planting is also essential, as the rhizomes are sensitive to cold soil and lingering frost. In most temperate regions, the best time to plant is in late spring when the threat of frost has passed and the ground has begun to warm. If you are eager to get a head start, you can plant the rhizomes in pots indoors and move them outside once the weather stabilizes. This early start can lead to a longer flowering period and more robust plants by the time the height of summer arrives.
Propagating your own callas through division is not only cost-effective but also beneficial for the health of older plants. Over time, a single rhizome will produce offsets, which can lead to overcrowding and a decrease in the quality of the flowers. By lifting and dividing these clumps every few years, you rejuvenate the parent plant and create new individuals to plant elsewhere. This cycle of division and replanting is a fundamental part of calla management that ensures your garden remains vibrant and well-stocked.
Techniques for successful planting
When you are ready to put your calla rhizomes in the ground, the depth of planting is a vital detail to get right. Generally, the rhizomes should be placed about 10 centimeters deep in the soil to provide enough protection and stability for the tall stems. If they are planted too shallowly, the stems may lack the support they need to stand upright as they grow. Conversely, planting them too deep can delay sprouting and may increase the risk of the rhizome rotting before it reaches the surface.
More articles on this topic
Spacing is another critical factor that influences how the plants will develop and interact with their neighbors. You should aim to leave at least 30 to 45 centimeters between each rhizome to allow for the broad spread of the mature leaves. This spacing ensures that each plant receives adequate sunlight and that air can circulate freely around the foliage. Good air flow is a natural defense against many fungal diseases that thrive in cramped, humid conditions.
The orientation of the rhizome in the planting hole matters more than many gardeners realize. Look for the small “eyes” or growing points on the surface of the rhizome; these should be facing upwards toward the sky. If you cannot clearly distinguish the growing points, planting the rhizome on its side is a safe bet that allows the shoots to find their way up naturally. Once placed, cover the rhizomes with soil and firm it down gently to remove any large air pockets that could dry out the roots.
Immediately after planting, you should give the area a thorough watering to settle the soil around the rhizomes. This initial hydration jump-starts the root development process and ensures the rhizome has immediate access to moisture. If the weather is particularly dry, you may need to continue watering regularly even before the first shoots appear. A layer of mulch applied over the planting site will help maintain this moisture and protect the soil surface from crusting over.
Methods of propagation and division
Division is the most common and effective way to propagate white callas, usually performed during the dormant season. After the foliage has died back, you can carefully lift the entire clump from the ground using a garden fork to avoid damaging the fleshy roots. Once the clump is out, shake off the excess soil so you can clearly see the structure of the rhizomes. You will notice smaller “daughter” rhizomes attached to the main “mother” rhizome, which are the targets for your propagation efforts.
More articles on this topic
To divide the rhizomes, you should use a sharp, sterilized knife to cut the offsets away from the main body. Ensure that each piece you remove has at least one healthy growing point or “eye” and a portion of the root system. It is a good practice to let the cut surfaces of the rhizomes dry and callous over for a day or two before replanting them. This drying period creates a protective barrier that helps prevent soil-borne pathogens from infecting the fresh wounds.
While division is the standard, growing white callas from seed is another possibility, though it requires much more patience. Seeds are found inside the berries that form on the spadix after the flower has been pollinated and has faded. You must harvest these seeds when the berries are ripe and soft, then clean away the pulp before sowing them in a light seed-starting mix. Be aware that plants grown from seed can take several years to reach maturity and produce their first flowers.
Successfully propagated callas require a bit of extra care during their first season as independent plants. Whether you have divided them or started them from seed, these young plants have smaller energy reserves than established ones. You should monitor their moisture levels closely and provide a balanced, diluted fertilizer to support their early growth. With proper attention, these new additions will soon match the vigor of their parents and become a permanent part of your garden landscape.
Container planting strategies
Growing white callas in containers is an excellent option for those with limited garden space or for adding a touch of elegance to patios and balconies. When selecting a pot, ensure it is large enough to accommodate the rhizomes and has several drainage holes at the bottom. A pot that is at least 30 centimeters in diameter is usually sufficient for a single large rhizome or a few smaller ones. Using a high-quality potting mix that is rich in peat or compost will provide the moisture-retentive yet well-drained environment they need.
In a container, you have more control over the growing medium, which is a significant advantage for managing calla health. You can easily adjust the soil composition to ensure it stays loose and fertile throughout the season. Because pots dry out faster than the ground, you must be more vigilant about watering, especially during the heat of summer. Some gardeners even place calla pots in shallow saucers of water to ensure they never run dry, mimicking their natural bog-like habitats.
Container-grown callas also benefit from regular feeding, as the limited amount of soil means nutrients can be depleted quickly. A liquid fertilizer applied every two weeks during the active growth phase will keep the foliage lush and encourage more flowers. Be careful not to over-fertilize, however, as an excess of nitrogen can lead to a surplus of leaves at the expense of blooms. A balanced approach ensures that the plant remains healthy and aesthetically pleasing within the confines of its pot.
One of the greatest benefits of container planting is the ability to easily manage the dormancy period. When the plant begins to fade in autumn, you can simply move the entire pot to a cool, dry, and dark location like a basement or garage. There is no need to lift the rhizomes unless the pot has become overcrowded. This convenience makes container gardening an attractive choice for many calla enthusiasts, allowing for easy seasonal transitions with minimal effort.
Establishing young plants
Once your newly planted or propagated callas begin to emerge, the focus shifts to helping them establish a strong root system. The first few weeks of growth are critical, as the plant is transitioning from relying on stored energy to producing its own through photosynthesis. You should ensure that the young shoots are protected from strong winds and harsh, direct sunlight that might scorch the tender new leaves. Providing a stable environment during this phase sets the foundation for the plant’s future resilience.
Weed control is particularly important around young callas, as they do not yet have the large canopy required to shade out competitors. Weeds can quickly sap moisture and nutrients from the soil, leaving the young callas struggling to find the resources they need. Hand-pulling weeds is the safest method to avoid damaging the delicate calla roots that are spreading just below the surface. Keeping the area clean allows the young plants to expand their root network without interference.
As the young plants grow, you can gradually increase the intensity of the light they receive and the amount of water you provide. This “hardening off” process, even if they were planted directly in the ground, helps the foliage become more robust and weather-resistant. If you notice the plants leaning toward a light source, rotating your containers or providing temporary support can help them grow straight and strong. Consistent monitoring during the first two months is the key to a successful establishment.
Finally, keep a close watch for any early signs of stress or pests that might target the vulnerable young growth. Aphids and slugs are particularly fond of the succulent new leaves of the white calla. Catching these issues early prevents them from causing significant damage that could stunt the plant’s development for the entire season. By being a proactive and observant gardener, you can ensure that your planting and propagation efforts result in a thriving and beautiful calla display.