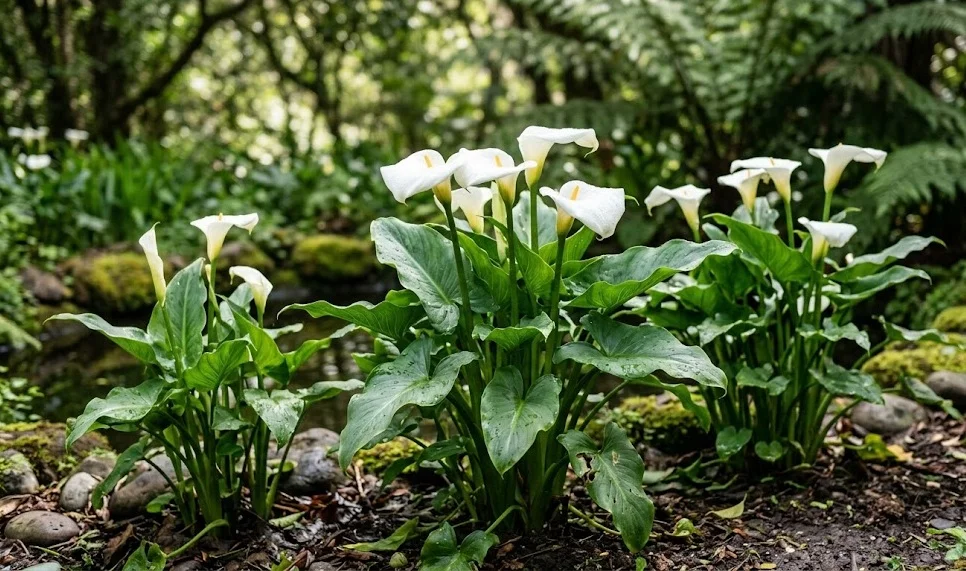
Caring for the white calla requires a deep understanding of its semi-aquatic origins and its specific seasonal rhythms. These elegant plants are not merely decorative additions to a garden but living organisms that demand consistent attention to moisture and temperature levels. Successful cultivation begins with recognizing that their growth cycle is divided into an active flowering period and a necessary dormant phase. By mimicking their natural habitat in South Africa, you can ensure a long-lasting and vibrant display of their iconic waxy blooms.
Maintaining the health of the white calla involves more than just basic watering; it requires a holistic approach to plant wellness. You should regularly inspect the foliage for any signs of yellowing or drooping, which often indicates environmental stress. Air circulation plays a vital role in preventing fungal issues, especially when the plants are grown in clusters or containers. Providing a stable environment without drastic temperature fluctuations will help the plant focus its energy on producing lush green leaves and pristine white spathes throughout the growing season.
The soil environment is the foundation of a healthy white calla, and it must be rich in organic matter to support heavy feeding. These plants prefer a slightly acidic to neutral pH range, which allows for optimal nutrient uptake through their rhizomatous root system. Compaction is the enemy of the calla, so you must ensure the growing medium remains loose and well-aerated while retaining significant moisture. Adding compost or well-rotted manure annually can significantly improve the soil structure and provide a slow-release source of essential minerals.
Finally, long-term care involves understanding when the plant needs to rest to regain its vigor for the following year. As the temperatures drop or the flowering season ends, the white calla naturally begins to slow down its metabolic processes. You must respect this transition by gradually reducing inputs and allowing the foliage to wither naturally. This restorative period is crucial for the rhizome to store carbohydrates, which directly influences the quality and quantity of the blooms you will see in the next cycle.
Essential environmental conditions
Temperature management is perhaps the most critical factor when looking after white callas in a temperate climate. These plants thrive in moderate warmth but are notoriously sensitive to frost, which can turn their succulent stems into mush overnight. Ideally, you should keep them in a location where daytime temperatures stay between 15 and 25 degrees Celsius. If you are growing them in pots, moving them indoors during cold snaps is a mandatory practice for survival.
More articles on this topic
Humidity levels also contribute significantly to the overall appearance and turgidity of the leaves. In dry indoor environments or during hot summer spells, the leaf edges may begin to brown or curl if the air lacks sufficient moisture. You can mitigate this by grouping plants together to create a microclimate or by using a pebble tray filled with water. Consistent humidity helps the plant maintain its structural integrity and prevents the stomata from closing prematurely during the heat of the day.
The location of your callas within the garden or home should be chosen with protection from strong winds in mind. Their tall, fleshy stems are relatively fragile and can easily snap or lean under the pressure of heavy gusts. Placing them near a fence, a hedge, or a sturdy wall provides the necessary mechanical support without restricting air flow. Strategic placement ensures that the aesthetic value of the plant remains intact throughout the entire blooming period.
Soil temperature is an often overlooked aspect of calla care that dictates the speed of early spring growth. Rhizomes planted in cold, waterlogged soil are prone to rotting before they even have a chance to sprout. You should wait until the ground has warmed up significantly before expecting to see new shoots emerging from the earth. Mulching the base of the plant can help regulate soil temperature, keeping it cool in the summer and providing a slight buffer against early autumn chills.
Managing the growth cycle
The growth cycle of the white calla is a predictable sequence that requires different levels of intervention at each stage. In the early spring, your focus should be on encouraging the rhizome to wake up by providing gentle warmth and increasing moisture. This is the time when the plant is most vulnerable to overwatering, as the roots are not yet fully active. Once the first green spikes appear, you can begin a more rigorous care routine to support rapid leaf development.
More articles on this topic
As the plant reaches its peak during the summer months, the demand for nutrients and water reaches its highest point. This is when the white calla produces its distinctive flowers, which are actually modified leaves surrounding a central spadix. You must ensure that the plant never experiences a complete drought during this phase, as this will lead to a premature end to the flowering season. Consistent care during the peak growth period results in larger, more numerous blooms that last longer on the plant.
After the flowering stage concludes, the plant enters a transitional phase where it prepares for dormancy. You will notice the vibrant green leaves starting to lose their luster and eventually turning yellow or brown. It is important not to cut these leaves off while they are still partially green, as they are still conducting photosynthesis. The energy produced during this time is being sent down to the rhizome to ensure it has enough strength for the next year.
The dormant period is a time of total rest where the plant should be kept relatively dry and cool. If you live in a region with harsh winters, this usually involves lifting the rhizomes and storing them in a frost-free environment. For those in milder climates, the rhizomes can stay in the ground if they are protected by a thick layer of mulch. Understanding and respecting this natural rhythm is the secret to maintaining a healthy calla collection for many years.
Optimizing foliage health
The leaves of the white calla are just as ornamental as the flowers, featuring a deep green color and a graceful, arrow-like shape. To keep them looking their best, you should occasionally wipe them down with a damp cloth if they are kept indoors to remove dust. This practice not only improves the plant’s appearance but also ensures that photosynthesis remains efficient by keeping the leaf pores clear. Shiny, clean leaves are a hallmark of a well-maintained and healthy specimen.
Nutrient deficiencies often manifest first in the foliage, making it a reliable indicator of the plant’s internal state. If you notice a general paling of the leaves, it may be a sign that the plant requires more nitrogen to support chlorophyll production. Conversely, dark veins on yellowing leaves might suggest a micronutrient issue like iron or magnesium deficiency. Regular monitoring allows you to adjust your fertilization strategy before the health of the plant is seriously compromised.
Physical damage to the leaves should be addressed promptly to prevent the entry of pathogens. If a leaf is torn by wind or accidentally crushed, it is best to remove it cleanly at the base of the stem using sterilized tools. While a few damaged leaves won’t kill the plant, they can become breeding grounds for bacteria or fungi in humid conditions. Maintaining a clean plant architecture promotes better health and a more professional appearance in the garden.
Crowding can lead to stunted leaf growth and a lack of vibrancy because the plants are competing for the same limited resources. If your white callas have expanded significantly over the years, the center of the clump may become congested with smaller, weaker leaves. Thinning out the foliage or dividing the rhizomes every few years ensures that each leaf has enough space to expand fully. Proper spacing allows for maximum light penetration and better overall vitality for the entire plant.
Supporting the flowering process
To achieve the best possible floral display, you must provide the white calla with the right balance of light and nutrients. While they can grow in partial shade, a lack of sufficient light often results in tall, leggy stems and very few actual flowers. The energy required to produce a large, waxy spathe is considerable, and the plant must be well-nourished to meet this demand. High-potassium fertilizers are particularly useful once the flower buds begin to form at the base of the plant.
The duration of the flowering season can be extended by carefully managing the environment around the blooms. Excessively high temperatures can cause the flowers to wilt or turn brown prematurely, so providing some afternoon shade during heatwaves is beneficial. Keeping the soil consistently moist during the blooming phase is also vital for maintaining the turgidity of the flower stems. A well-hydrated plant will always hold its flowers higher and longer than one that is struggling for water.
Deadheading is a simple but effective technique to keep the white calla looking tidy and to prevent the plant from wasting energy on seed production. Once a flower begins to fade and turn green or brown, you should follow the stem down to the base and remove it. This directs the plant’s resources back into the rhizome or toward the development of remaining buds. While white callas don’t re-bloom as prolifically as some other perennials, deadheading keeps the plant focused on growth rather than reproduction.
The quality of the water you use can also impact the appearance of the flowers, especially in areas with very hard water. Mineral deposits can sometimes leave unsightly spots on the white spathes if they are overhead watered during the heat of the day. It is always better to water at the base of the plant to keep the delicate floral structures dry and clean. This attention to detail ensures that each flower remains a pristine focal point in your garden or floral arrangements.
Enhancing soil quality
The success of your white callas is deeply rooted in the quality of the soil they inhabit throughout the year. Because these plants are heavy feeders, the soil must contain a high percentage of decomposed organic matter to provide a steady supply of nutrients. Incorporating leaf mold, compost, or aged manure before the growing season begins can transform average soil into an ideal growing medium. This organic material also helps the soil retain the high levels of moisture that callas crave.
Soil structure is equally important, as it must allow for the expansion of the rhizomes while providing adequate drainage. In heavy clay soils, you may find that the rhizomes struggle to grow or are prone to rot due to stagnant water. Amending such soils with coarse sand or perlite can improve the internal drainage and create a more hospitable environment for the roots. A balanced soil structure ensures that water reaches the roots but doesn’t sit around them for extended periods.
Monitoring the pH of your soil can provide insights into why a plant might not be thriving despite your best efforts. White callas generally prefer a pH between 6.0 and 6.5, where most essential nutrients are readily available for uptake. If your soil is too alkaline, the plant may suffer from chlorosis, characterized by yellowing leaves with green veins. Correcting the pH with sulfur or organic amendments can restore the plant’s ability to process the nutrients already present in the ground.
Mulching is a final, essential step in soil management that provides multiple benefits for the white calla. A thick layer of organic mulch, such as bark chips or straw, helps to keep the soil moisture levels consistent and suppresses weed growth. As the mulch breaks down over time, it further enriches the soil with organic matter, continuing the cycle of nutrient replenishment. Mulching also acts as an insulator, protecting the sensitive rhizomes from extreme temperature changes during the height of summer.
Seasonal transition and longevity
As the growing season draws to a close, your care routine must shift to prepare the white calla for its long rest. This transition should be gradual, mirroring the natural change in weather patterns and day length. You will notice the plant’s water needs decreasing as it stops producing new leaves and the existing ones begin to age. Reducing the frequency of watering at this stage signals to the plant that it is time to move its energy into the underground rhizome.
For those growing white callas in containers, the end of the season provides an opportunity to inspect the root system. If the pot has become completely filled with rhizomes, the plant may become root-bound, leading to diminished health in the future. This is the ideal time to plan for division or to move the plant into a larger vessel for the next season. Ensuring the plant has enough space to grow is a key factor in maintaining its longevity and vigor over many years.
Longevity in white callas is also a product of consistency in care and the avoidance of extreme stress. Plants that are repeatedly allowed to dry out or are exposed to freezing temperatures will have a much shorter lifespan than those in stable conditions. By providing a reliable routine of watering, feeding, and seasonal protection, you can enjoy the same calla specimens for a decade or more. They are resilient plants, but they reward the disciplined gardener with exceptional beauty and reliability.
Ultimately, the goal of white calla care is to foster a plant that is strong enough to resist pests and diseases naturally. A healthy plant in the right environment is much less likely to fall victim to common garden ailments. By focusing on the fundamental needs of the plant—moisture, nutrients, and rest—you create a sustainable cycle of growth. The white calla remains a classic choice for the garden precisely because of its ability to thrive when its basic requirements are met with expert care.