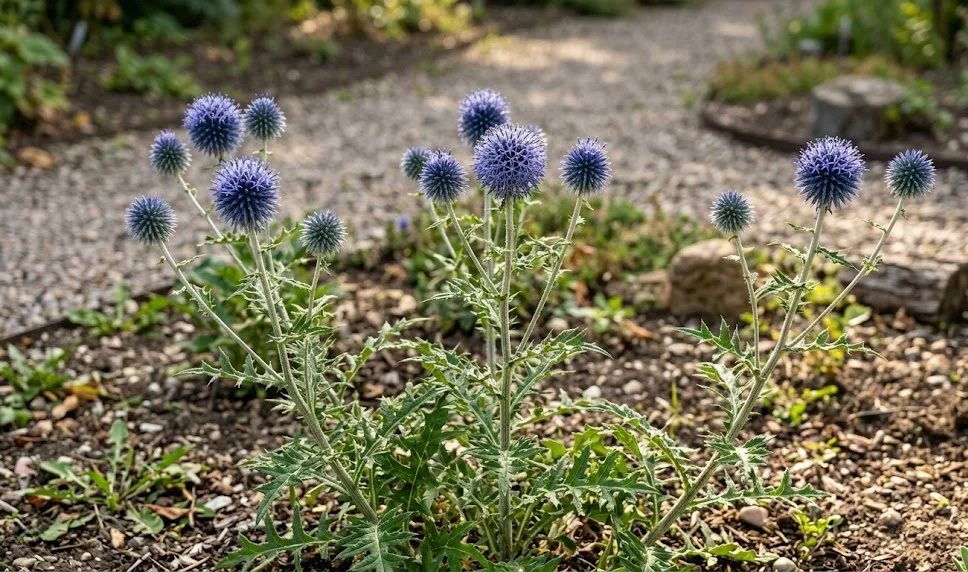
Establishing a successful stand of blue globe thistle requires careful planning during the initial planting and propagation phases of development. Whether you are starting from seed or using vegetative methods, the timing must align with the local climate patterns. High germination rates are typically achieved when the substrate provides adequate drainage and a stable temperature range. Growers often find that taking the time to prepare the soil properly pays dividends in the plant’s future vigor.
Sowing seeds directly into the garden is a popular method for those who want to cover a large area efficiently. The best time for this is usually in the late spring after the danger of a hard frost has completely passed. You should press the seeds gently into the soil but avoid covering them too deeply with heavy earth. Light can often assist in the germination process for many wild-type perennials like this one.
If you prefer to start seeds indoors, you should begin the process about six to eight weeks before the last frost date. Use a high-quality seed starting mix that is light and allows for easy root penetration as the seedlings grow. Keeping the trays in a bright, warm spot will encourage steady growth and prevent the young plants from becoming leggy. Once the seedlings have developed a few sets of true leaves, they can be hardened off for outdoor life.
Hardening off is a critical step that prepares indoor seedlings for the harsh realities of the outdoor environment. Start by placing the trays outside in a shaded, protected area for a few hours each day during the afternoon. Gradually increase their exposure to direct sunlight and wind over a period of about ten days to two weeks. This process toughens the plant tissues and reduces the risk of transplant shock when they are finally moved to their permanent home.
Propagation through root cuttings
Taking root cuttings is one of the most reliable ways to create new plants that are genetically identical to the parent. This procedure is best performed in the late autumn or early winter when the plant is entering its dormant phase. You will need to carefully dig around the base to find a few healthy, thick roots to remove. Taking only a small percentage of the root mass ensures that the parent plant remains healthy and undisturbed.
More articles on this topic
The collected roots should be cut into sections approximately five to ten centimeters in length using a very sharp, clean knife. It is helpful to make a straight cut at the top and a slanted cut at the bottom to remember the orientation. Planting the cuttings in a mix of sand and compost will provide the right balance of moisture and aeration. Place the containers in a cold frame or a protected outdoor spot where they can develop over the winter.
By the time spring arrives, you should see new shoots emerging from the top of the root cuttings in the pots. These young plants will have a head start compared to those grown from seed because they already have a significant energy reserve. Once the root system has filled the small pot, they are ready to be transplanted into their final positions. This method is highly effective for expanding your collection of specific cultivars that you particularly enjoy.
Many professional nurseries prefer this method because it bypasses the variability that can sometimes occur with seed propagation. It allows for a more uniform crop of plants that will all bloom at the same time and reach a similar height. For the home gardener, it is a cost-effective way to fill large borders without having to purchase many individual plants. Understanding the anatomy of the root system is the key to mastering this particular propagation technique.
Selecting the ideal planting site
The success of your planting effort depends heavily on the physical characteristics of the chosen site in your garden. Blue globe thistles require full sun to develop the strong stems and vibrant colors they are known for. If the site is too shady, the plants will lean toward the light and may require extensive staking to stay upright. Evaluating the sun patterns throughout the day will help you identify the most productive spots for these sun-loving perennials.
More articles on this topic
Soil structure is another vital consideration that you must address before the first plant goes into the ground. These plants are native to rocky and dry regions, so they do not tolerate heavy, wet clay for very long. If your garden has heavy soil, you should consider planting on a slope or creating a raised bed to improve drainage. Adding grit or coarse sand to the planting hole can also help create the right environment for the roots.
Competition from existing trees and large shrubs can limit the growth potential of your new thistle plants. Large root systems from nearby trees can quickly sap the moisture and nutrients from the soil, leaving the thistle struggling. Try to maintain a distance of at least a few meters from large woody plants to ensure your perennials have their own space. This separation also allows for better air circulation, which is important for preventing leaf diseases in the summer.
Accessibility for maintenance is a practical factor that many gardeners overlook during the initial planting phase. You will need to reach the plants for weeding, deadheading, and eventual cutting back in the autumn or spring. Leaving small paths or adequate spacing between groups of plants makes these tasks much easier and more enjoyable. A well-planned garden layout considers both the aesthetic appeal and the practical needs of the gardener.
Division of established clumps
Dividing mature clumps is a traditional gardening technique that helps rejuvenate older plants while providing new ones for the garden. While the blue globe thistle has a deep taproot, it can still be divided if the process is handled with care and precision. The best time for division is in the early spring just as the first signs of green growth appear. This timing allows the new sections to establish their roots before the heat of summer arrives.
Using a sharp spade, you should lift the entire clump out of the ground, trying to keep as much of the root ball intact as possible. Carefully shake off the excess soil so you can see where the natural divisions occur in the crown of the plant. You can then use a knife or the spade to separate the clump into smaller sections, each with a healthy portion of roots and shoots. Each new piece is a complete plant ready to begin its own independent life.
Replanting the divisions immediately is important to prevent the roots from drying out and causing unnecessary stress. Prepare the new planting holes in advance and water the divisions thoroughly after they are settled into the ground. You might notice some initial wilting, but the plants should recover quickly as the roots begin to grow into the new soil. This process is a great way to maintain the vigor of your garden and share plants with friends.
Many experts recommend dividing the plants every four to five years to prevent the center from becoming too woody and unproductive. This regular maintenance keeps the foliage looking fresh and ensures a high density of flower heads across the entire border. It also gives you an opportunity to improve the soil in the original planting spot before putting a division back in. Consistent renewal is the secret to a garden that remains beautiful and healthy decade after decade.