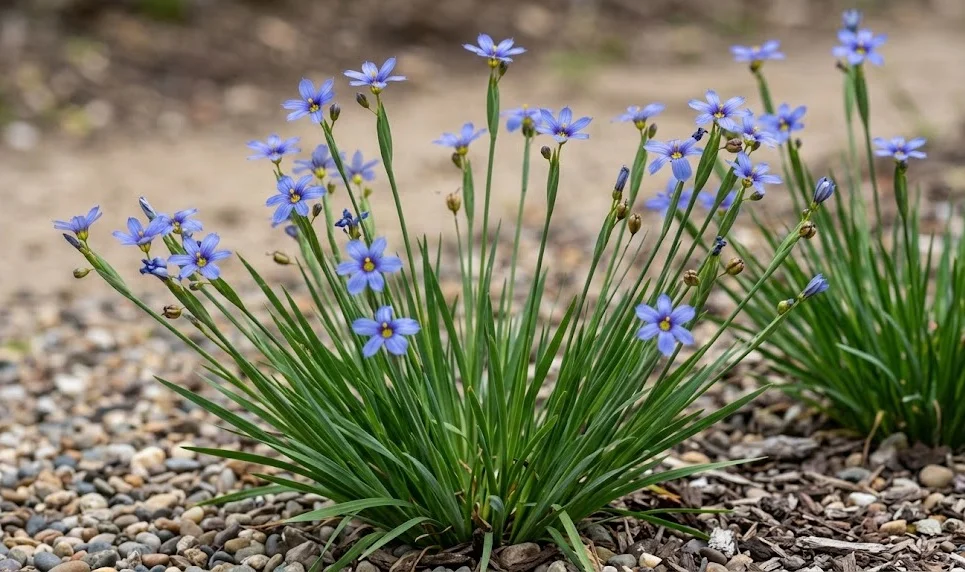
Planting and propagating the narrow-leaf blue-eyed grass requires a blend of patience and technical precision to ensure successful establishment. This species is remarkably rewarding for those who understand its preference for specific environmental cues and soil conditions. Whether you are starting from seed or dividing existing clumps, the process begins with a clear plan and the right timing. Professionals value this plant for its ability to naturalize beautifully when given the proper start in its permanent home.
Site selection and soil preparation protocols
The first step in a successful planting project is identifying a location that mirrors the plant’s natural ecological preferences. It thrives in areas that receive full sun to partial shade, with a strong preference for the morning light. A site that is too dark will result in sparse flowering and weak, leggy foliage that lacks structural integrity. Conversely, a spot with punishing afternoon sun in a dry climate might lead to scorched leaves and premature dormancy.
Soil preparation is the next critical phase, as the plant requires a medium that is both moisture-retentive and well-draining. Before the actual planting occurs, the area should be cleared of aggressive weeds and competitive grass species that might crowd out the young plants. Incorporating a layer of well-rotted organic compost can improve the soil structure and provide an initial nutrient boost. If the native soil is heavy clay, adding a small amount of coarse sand or perlite can significantly improve the long-term drainage.
Testing the soil pH is a professional standard that should not be overlooked during the site preparation phase. The narrow-leaf blue-eyed grass prefers a slightly acidic to neutral range, which allows for optimal nutrient uptake. If the test reveals highly alkaline conditions, sulfur-based amendments can be applied to gradually lower the pH level. It is much easier to adjust the soil chemistry before the plants are in the ground than to attempt corrections later.
Finally, consider the topography of the planting site to manage water flow and prevent standing pools. While the species enjoys moisture, it will not survive in a bog-like environment where the roots are constantly submerged. Creating a slight mound or ensuring a gentle slope can help manage excess runoff during heavy spring rains. Proper site engineering at the beginning prevents common failures related to root rot and soil-borne pathogens later in the plant’s life.
More articles on this topic
Sowing seeds and managing germination
Growing this species from seed is a cost-effective way to cover larger areas, though it requires an understanding of seed dormancy. The seeds often benefit from a period of cold stratification, which mimics the natural winter cycle they would experience in the wild. This can be achieved by sowing the seeds outdoors in the late autumn or by using a refrigerator for a controlled cold period. Without this thermal cue, germination rates can be frustratingly low and inconsistent.
When sowing directly into the garden, the seeds should be pressed lightly into the soil surface rather than buried deeply. Light is often a secondary trigger for germination, and a thick layer of soil can prevent the tiny seedlings from reaching the surface. A light dusting of fine vermiculite or a very thin layer of sand can help hold the seeds in place without blocking the sun. Watering should be done with a fine mist to avoid washing the seeds away or burying them under displaced soil.
In a nursery or greenhouse setting, the use of a high-quality seed-starting mix is essential for professional results. Maintaining a consistent temperature and moisture level will lead to a more uniform emergence of seedlings across the trays. Once the seedlings have developed their first two or three true leaves, they can be transitioned to larger pots to strengthen their root systems. This intermediate step ensures that the young plants are robust enough to survive the transition to the outdoor environment.
Patience is a virtue when waiting for these seeds to sprout, as they do not always follow a strict timeline. Some seeds may germinate within a few weeks, while others in the same batch might wait until the following season. This staggered germination is a natural survival strategy but can be challenging for those used to uniform commercial crops. Keep the area moist and free of weeds during this entire window to give every potential seedling the best possible chance.
More articles on this topic
Techniques for dividing established clumps
Division is the most reliable method for propagating specific cultivars and for rejuvenating older, less productive plants. The best time for this procedure is in the early spring, just as the new green shoots begin to emerge from the crown. At this stage, the plant’s energy is focused on growth, allowing the divisions to recover quickly and establish new roots. Dividing during the heat of summer is generally avoided as it places extreme stress on the foliage and root system.
To begin the process, the entire clump should be carefully lifted from the ground using a sharp spade or garden fork. Care must be taken to dig wide enough to capture as much of the root mass as possible without causing unnecessary damage. Once the plant is out of the ground, shake off any excess soil to get a clear view of the crown and root structure. You will notice that the clump is made up of several individual fans or “units” that can be separated.
Using a sharp, sanitized knife or by gently prying with your fingers, separate the clump into smaller sections, each with a healthy set of leaves and roots. For a professional finish, ensure that each new division has at least three to five fans to provide a substantial presence in the new location. Any dead or decaying sections from the center of the old clump should be discarded at this stage. This selective process ensures that only the most vigorous material is used for the new plantings.
Replanting the divisions should happen immediately to prevent the delicate roots from drying out in the air. Place each division at the same depth it was previously growing, as planting too deep can cause the crown to rot. Firm the soil around the base to remove any large air pockets and water the area thoroughly to settle the ground. With proper care, these divisions will often bloom in their first year, providing an instant impact in the landscape.
Post planting establishment and early care
The first few weeks after planting are the most critical for the long-term success of the narrow-leaf blue-eyed grass. Consistent moisture is necessary during this establishment phase to help the roots anchor into the surrounding soil. Even if the species is considered somewhat drought-tolerant once mature, young plants do not yet have the reservoir capacity to survive extended dry spells. A regular watering schedule should be maintained until new growth is clearly visible.
Applying a thin layer of organic mulch around the base of the new plants can help regulate soil temperature and moisture. Be careful not to pile the mulch directly against the crown, as this can trap moisture and lead to fungal issues. A one-inch layer of finely shredded bark or leaf mold is usually sufficient to provide the benefits without the risks. This mulch will also help suppress weed seeds that might compete for nutrients and light.
Monitoring for pests and environmental stress is an ongoing task for the professional gardener during the first season. Young plants are more attractive to slugs and snails, which can quickly decimate the tender new foliage. If you notice irregular holes or slime trails, taking immediate action with organic controls can prevent a minor issue from becoming a disaster. Additionally, keep an eye on the weather; if an unexpected heatwave occurs, temporary shading might be necessary to protect the unestablished root systems.
By the end of the first growing season, the plants should have developed a strong enough foundation to survive the winter. Avoid heavy fertilization during this first year, as you want the plant to focus on structural integrity rather than excessive top growth. If the plants were started from seed, they might not bloom in the first year, which is perfectly normal. Focus on the health of the foliage, and the floral rewards will follow in the subsequent seasons.