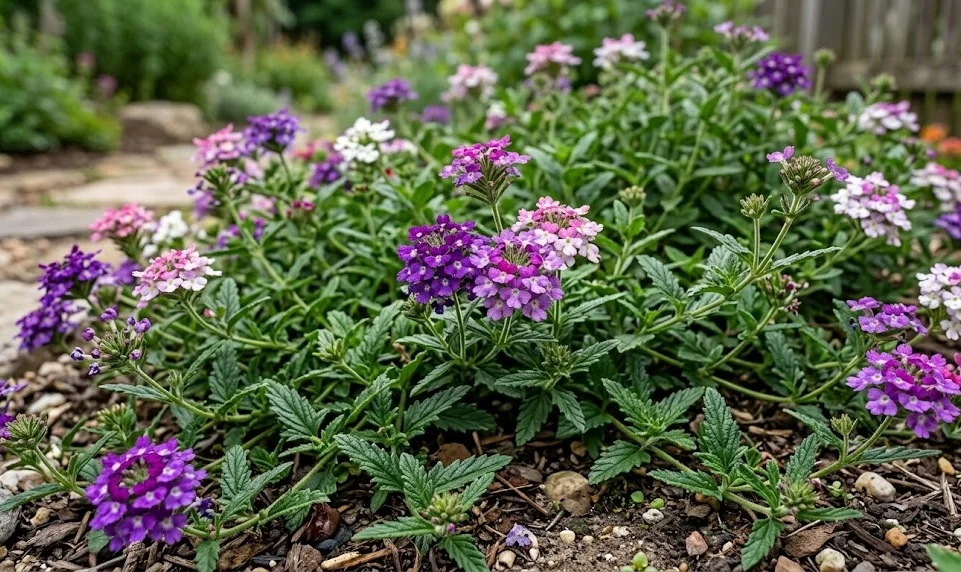
Successful establishment of garden verbena begins with a comprehensive understanding of the environmental conditions required for initial root development and long-term vigor. These plants are remarkably versatile, but they demand specific attention during the planting phase to ensure they transition smoothly from the nursery to the garden bed. Whether you are starting from purchased transplants or your own propagated stock, the quality of the planting process determines the future health of the specimen. By applying expert techniques during this critical stage, you lay the foundation for a spectacular display of color and growth.
The timing of planting is one of the most influential factors in the success of this species, especially in regions with unpredictable spring weather. You must wait until all danger of frost has passed and the soil temperature has reached a consistent level that supports root activity. Planting too early into cold, wet soil can lead to root rot or a significant setback in the plant’s overall development. Observations of local phenological indicators, such as the blooming of certain native shrubs, can often provide a better guide than a calendar date alone.
Site preparation should be completed well in advance of the actual planting day to allow the soil to settle and integrate any added amendments. You should clear the area of all weeds and debris that could compete with the young verbena for light, water, and nutrients. Digging a hole that is twice as wide as the root ball but no deeper ensures that the roots can expand easily into the surrounding soil. This professional approach to site preparation minimizes transplant shock and encourages rapid establishment in the new location.
Acclimatization, or hardening off, is a mandatory step for any plants that have been grown in a greenhouse or indoor environment. You should gradually expose the young plants to increasing amounts of direct sunlight and outdoor temperatures over a period of seven to ten days. This process allows the leaf cuticle to thicken and the plant’s internal systems to adjust to the higher UV levels and wind exposure. Skipping this step often results in scorched leaves and a weakened plant that will take weeks to recover its original vitality.
Techniques for successful garden planting
When it comes to the actual act of placing the plant into the ground, the depth of the root ball is of paramount importance. You must ensure that the top of the root system is level with the surrounding soil surface to avoid stem rot or desiccation. Planting too deeply can suffocate the roots and lead to a slow decline, while planting too shallow can expose sensitive roots to the air. Gently firming the soil around the plant removes large air pockets without compacting the medium too much for the tender roots.
More articles on this topic
The use of a high-quality starter solution or a diluted organic fertilizer can provide a gentle boost to the plant during its first few days in the ground. This initial dose of nutrients helps the plant overcome the stress of moving and encourages the development of a broad, healthy root network. You should water the plant thoroughly immediately after planting to ensure good soil-to-root contact and to settle the earth. This immediate hydration is critical for maintaining the turgor pressure of the cells and preventing wilt during the first afternoon of sun exposure.
Spacing should be calculated based on the ultimate spread of the specific verbena cultivar to prevent overcrowding as the season progresses. You can use a staggered planting pattern to create a more natural, filled-in look that covers the soil surface more effectively than straight rows. This technique not only improves the aesthetic appeal but also creates a living mulch that keeps the soil cooler and suppresses weed growth. A professional layout takes into account the three-dimensional growth of the plant over several months of active expansion.
After the initial planting is complete, applying a thin layer of organic mulch around the base of the plant can provide numerous benefits. Mulch helps to retain soil moisture, suppress competing weeds, and prevent soil-borne diseases from splashing onto the foliage during rain. You should keep the mulch a few inches away from the main stem to prevent excess moisture from causing rot at the base of the plant. This final touch in the planting process demonstrates a commitment to long-term plant health and professional garden management.
Propagation through seed germination
Starting garden verbena from seeds is a rewarding process that allows for the cultivation of a wide variety of unique colors and forms. To achieve professional results, you should start the seeds indoors approximately eight to ten weeks before the last expected frost in your area. Use a sterile, fine-textured seed-starting mix that provides the perfect balance of moisture retention and aeration for the delicate seedlings. Sowing the seeds thinly and covering them with a very light dusting of soil or vermiculite is generally recommended for optimal germination.
More articles on this topic
Temperature control is a critical factor during the germination phase, as verbena seeds require a consistent warmth to break dormancy. You might use a heated propagation mat to maintain a soil temperature between 21 and 24 degrees Celsius until the first green shoots appear. It is equally important to provide high light intensity as soon as the seedlings emerge to prevent them from becoming leggy and weak. A professional setup often includes adjustable LED or fluorescent grow lights positioned just a few inches above the canopy of the young plants.
Moisture management for seedlings requires a delicate touch to avoid the dreaded “damping off” fungal disease that can wipe out a crop overnight. You should water from the bottom by placing the seed trays in a shallow basin of water, allowing the moisture to wick up through the substrate. This keeps the surface of the soil relatively dry and prevents the stems from being sitting in a damp environment. Thinning out the seedlings once they have their first set of true leaves ensures that the strongest individuals have enough space to develop a robust structure.
Transplanting the seedlings into larger individual pots is the next step in the professional propagation process. This move allows the root system to expand and gives you the opportunity to begin a light fertilization routine with a balanced, water-soluble formula. You should handle the young plants by their leaves rather than their sensitive stems to avoid causing permanent damage. By the time they are ready for the garden, these home-grown plants will often be more vigorous and better adapted than those mass-produced in commercial facilities.
Propagation through stem cuttings
For those who wish to replicate a specific favorite plant exactly, propagation by stem cuttings is the most effective and reliable professional method. You should select healthy, non-flowering shoots from the parent plant during the peak of the growing season when the sap is flowing vigorously. Each cutting should be approximately three to four inches long and include at least two or three nodes where leaves are attached. Using a sharp, sterilized blade is essential to ensure a clean cut that will heal quickly and initiate new root growth.
Preparing the cutting involves removing the lower leaves to expose the nodes that will be inserted into the rooting medium. You can dip the cut end into a rooting hormone powder or gel to speed up the development of adventitious roots and protect against pathogens. Insert the cutting into a moist, well-draining substrate such as a mix of peat and perlite or a dedicated propagation plug. Maintaining a high-humidity environment around the cuttings by using a plastic dome or a misting system prevents the foliage from wilting before roots have formed.
Rooting typically takes place within two to three weeks, depending on the ambient temperature and the health of the original cutting. You can check for success by giving the cutting a very gentle tug; if you feel resistance, it means the new roots have begun to anchor into the medium. Once the roots are established, you should gradually reduce the humidity and begin to expose the new plants to more ambient air. This transition phase is critical for hardening the young clones and preparing them for their first potting up.
The final step in the cutting propagation process is moving the established young plants into their own containers with high-quality potting soil. This allows them to build up a strong root system and a healthy crown before they are introduced into the landscape. This method is particularly useful for rare cultivars or for creating a large number of uniform plants for a specific design project. A professional gardener utilizes these techniques to maintain the genetic integrity of their most prized specimens across multiple seasons.