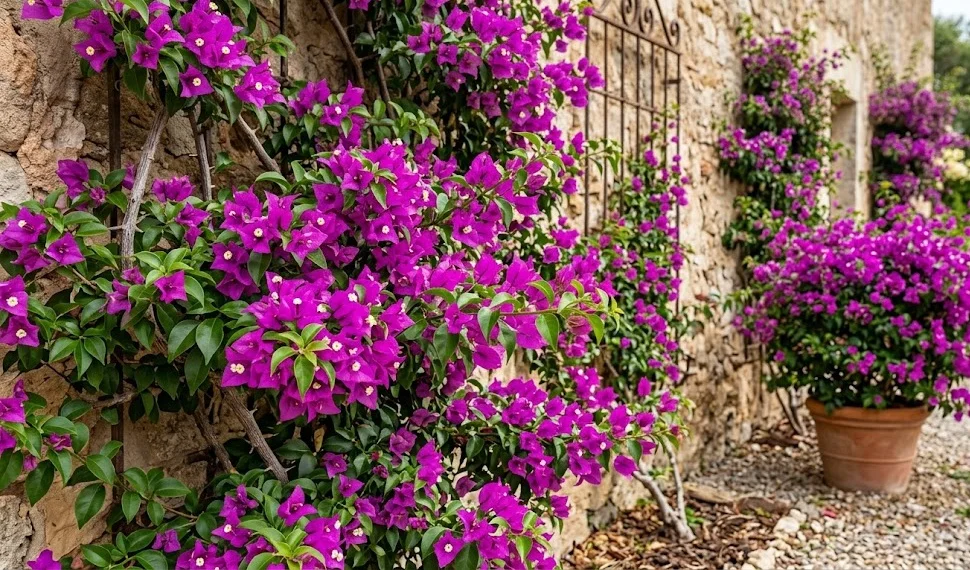
Preserving a bougainvillea through the cold winter months requires early, strategic preparation before the first autumn frost arrives. These tropical natives possess absolutely zero tolerance for freezing temperatures, and even a light frost can cause severe wood damage or complete plant death. Monitoring local weather forecasts as autumn progresses is an essential responsibility for any serious grower looking to protect their investment. The preparation process must begin several weeks before the actual relocation or insulation work takes place.
The first step in winter preparation involves systematically phasing out all fertilizer applications by mid-to-late summer. This deliberate cessation prevents the vine from producing soft, succulent new shoots that are highly susceptible to cold shock. Any tender green growth present in late autumn will easily freeze, turn black, and provide a direct pathway for rot pathogens to enter the main trunk. Allowing the existing wood to naturally harden and mature during the cooling autumn days significantly increases winter survival rates.
Hydration practices must also be scaled back progressively as the natural daylight hours begin to shorten. Allowing the soil to dry out deeper and remain dry for longer periods signals to the plant’s internal clock that dormancy is approaching. This controlled moisture restriction helps slow down the plant’s metabolic rate, preparing its cells to withstand cooler ambient temperatures. The goal is to keep the root ball barely moist, avoiding the dangerous combination of cold temperatures and saturated soil.
Before moving container-grown plants indoors or wrapping ground-planted specimens, conduct a thorough pest inspection and clean-up. Prune away any dead, damaged, or crossing branches to streamline the structural canopy and save space. Spray the entire vine down with a gentle insecticidal soap or neem oil solution to eliminate any hidden pests or eggs. Cleaning up the plant ensures that you do not accidentally introduce aphids, mealybugs, or spider mites into your clean indoor overwintering space.
Establishing the ideal indoor overwintering environment
For regions that experience true winter freezes, moving container specimens into a controlled indoor environment is the only way to guarantee survival. The selected overwintering location does not need to be a fully heated living room, as a cool, bright space is actually much better. Unheated verandas, frost-free garages with windows, or bright basements where temperatures stay between 5 and 12 degrees Celsius are ideal. This cool temperature range keeps the plant in a state of restful semi-dormancy without freezing the delicate roots.
More articles on this topic
Light availability remains a critical factor even when the plant enters its winter resting phase. Situate the container near a south- or west-facing window where it can receive as much natural indirect sunlight as possible. If natural light is insufficient in your chosen storage area, supplementing with basic LED grow lights on a simple timer can prevent total starvation. While the plant will likely shed many of its leaves during this period, keeping some light access supports low-level metabolic functions.
Air circulation within the indoor overwintering space must be managed carefully to prevent the development of stagnant, humid air pockets. Trapped moisture combined with cool temperatures creates the perfect environment for destructive grey mold (Botrytis) to colonize the stems. Placing a small electric fan on its lowest setting to keep air moving gently around the room can prevent these fungal issues. Avoid positioning the container directly in front of heating vents or drafty doorways, as sudden temperature shifts can shock the plant.
If you are overwintering mature vines in a fully heated home, be prepared for the challenges of extremely low indoor humidity. Dry indoor air can cause a rapid outbreak of spider mites, which thrive in dusty, moisture-depleted environments. Placing the pot on a large tray filled with pebbles and water helps raise the localized humidity immediately around the foliage without saturating the soil. Periodically wiping down the remaining leaves with a damp cloth keeps them clean and allows you to monitor for any hidden pests.
Care and maintenance routines during dormancy
Once the vine settles into its winter dormancy, your primary task shifts from active cultivation to minimalist preservation. It is completely normal for a bougainvillea to drop a significant portion, or even all, of its leaves upon moving indoors. This defoliation is a natural defensive response to reduced light and changing humidity, allowing the plant to conserve internal moisture. Do not panic and assume the plant is dying, and resist the urge to flood it with water or fertilizer to force new leaves.
More articles on this topic
Watering during deep dormancy must be cut down to an absolute minimum, often only requiring attention once every three to four weeks. Always check the soil manually by inserting your finger deep into the pot before adding any moisture. The soil should feel dry almost all the way through the root ball before you apply a small amount of lukewarm water. The goal is to prevent the roots from drying out completely and shriveling, while ensuring they never sit in stagnant water.
Winter Dormancy Watering Checklist:
- Soil dry at least 3 inches deep? -> YES
- Ambient temperature above freezing? -> YES
- Apply small amount of lukewarm water directly to soil.
- Ensure no water collects in the drainage saucer.
Never apply any type of fertilizer while the plant is dormant or missing its green leaves. Because the roots are inactive, they cannot absorb nutrients, meaning any added salts will simply build up in the soil and burn the root tips. Keep the surface of the potting soil clean by promptly removing any dropped leaves or dried flower bracts that collect there. This simple tidying routine eliminates potential hiding spots for pests and prevents surface molds from gaining a foothold.
Monitor the ambient temperature of your overwintering space regularly, especially during extreme outdoor cold snaps. If temperatures threaten to drop below freezing inside your garage or porch, add extra protection around the container. Wrapping the pot in layers of burlap, bubble wrap, or old blankets helps insulate the soil mass and preserves root warmth. Keeping the container elevated off freezing concrete floors by placing it on a wooden pallet or rolling cart also provides excellent thermal isolation.
Transitioning the vine back to spring growth
As winter draws to a close and the outdoor days begin to lengthen, the vine will naturally show signs of awakening. You may notice tiny, pale green buds beginning to swell along the grey woody branches in response to increasing solar radiation. This initial awakening marks the perfect time to perform a light structural pruning to shape the vine and remove any winter dieback. Cut back any dry, brittle tips until you reach healthy, green wood just above a strong leaf node.
Begin increasing your watering frequency very gradually as the new shoots start to expand and unfold their leaves. Avoid shifting immediately to a heavy summer watering routine, as the root system needs time to rebuild its fine feeder roots. Keep the soil lightly moist but still allow the surface to dry out between applications to encourage healthy root expansion. Moving the container to the absolute brightest window available helps ensure that the new growth develops short, sturdy internodes.
Once all danger of spring frost has completely passed and night temperatures stay consistently above 10 degrees Celsius, outdoor acclimation can begin. This transition must be handled gradually over a period of seven to ten days through a process called hardening off. Place the plant in a sheltered, shady outdoor spot for a few hours each day, slowly increasing its exposure to direct sun and wind. Rushing this process can lead to severe sunburn on the tender indoor leaves, causing them to bleach white and drop.
After the hardening-off phase is complete, return the vine to its permanent, sun-drenched summer location. Apply a fresh top-dressing of organic compost or a balanced, slow-release fertilizer to supply the nutrients needed for the upcoming growing season. Secure the main canes back to their support structures and give the entire root zone a deep, welcoming hydration. With your disciplined winter care behind you, the plant is now primed to deliver another spectacular, color-filled display all summer long.