Starting your journey with the garden photinia begins with a solid understanding of how to properly introduce this plant into your landscape. Success in the garden is rarely a matter of luck; it is the result of careful planning and the execution of specific horticultural techniques. Whether you are aiming to create a lush, red-tipped hedge or a standalone focal point, the early stages of planting are the most critical. By following a professional approach to both planting and propagation, you can ensure your greenery thrives from the very first day it touches the soil.
Selecting the right planting site
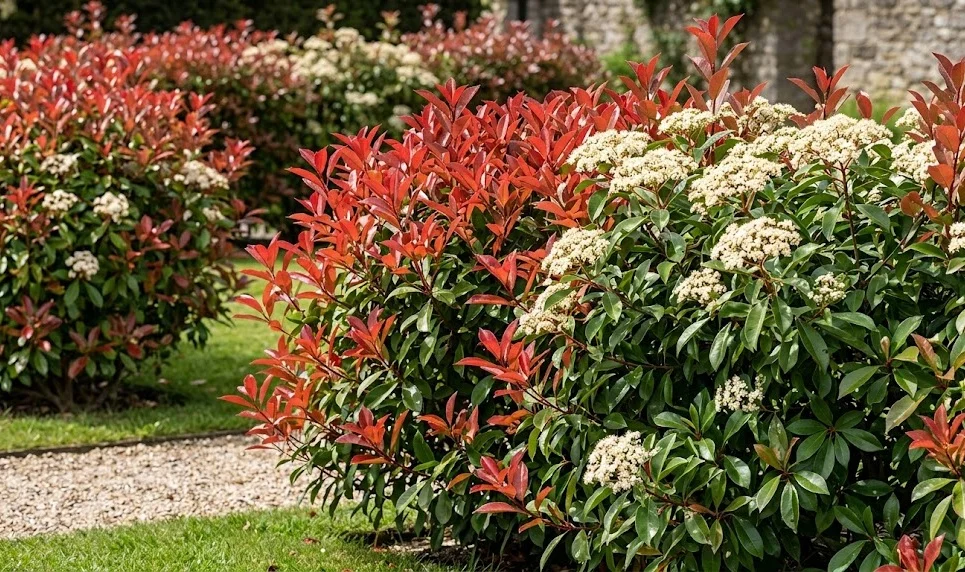
Choosing the perfect location is the first and most important step in the planting process for any shrub. You need to find a spot that offers a good balance of sunlight and protection from the harshest elements of the weather. Ideally, the site should receive at least six hours of direct sunlight each day to ensure that the new leaves develop their signature bright red color. While the plant can survive in more shaded areas, you will likely find that the foliage remains green and the growth is much slower.
The condition of the soil at the chosen site must be evaluated carefully before you even pick up a shovel. This plant prefers well-draining soil that is rich in organic matter, as it does not perform well in heavy, compacted clay. If your garden has drainage issues, you might consider planting on a slight mound or installing a drainage system to prevent water from pooling. Testing the pH of the soil is also a wise move, as a slightly acidic to neutral environment is the most beneficial for nutrient uptake.
Space is another critical consideration that gardeners often underestimate when planting young shrubs. You must research the mature size of the photinia variety you have chosen and leave enough room for it to expand without crowding its neighbors. Planting too closely can lead to poor air circulation, which increases the risk of fungal diseases that can ruin the appearance of the leaves. A professional layout allows each plant to breathe and receive equal amounts of sunlight as they grow toward maturity.
Finally, think about the functional role the plant will play in your overall garden design and how that affects the site selection. If you are building a privacy screen, you need to ensure the line is straight and the spacing is consistent for a uniform look. If it is a specimen plant, choose a spot where it can be admired from the house or a patio without being blocked by other features. Taking the time to visualize the future growth of the plant will help you avoid the need for difficult relocations later on.
More articles on this topic
The planting process step by step
Once you have selected the site, the actual planting process should be handled with care to minimize transplant shock. Start by digging a hole that is twice as wide as the root ball but no deeper than the container the plant came in. This extra width allows you to backfill with loose, enriched soil, making it easier for the new roots to spread out and establish themselves. Avoid digging too deep, as planting the shrub lower than its original soil level can lead to stem rot.
Before placing the plant in the hole, gently loosen the roots if they have become “pot-bound” or are circling the edges of the container. Use your fingers to tease the roots outward so they are ready to grow into the surrounding soil immediately after planting. Place the shrub in the center of the hole and check that it is standing straight and at the correct height relative to the ground level. This careful positioning is essential for the long-term stability and structural health of the mature plant.
Backfill the hole with a mixture of the original soil and high-quality compost to provide an initial boost of nutrients. As you fill the hole, firm the soil down gently with your hands or feet to remove any large air pockets that could dry out the roots. Be careful not to pack the soil too tightly, as this can impede water penetration and restrict root growth in the coming months. Once the hole is filled, create a small basin of soil around the base to help direct water toward the root zone.
The final step of the planting process is a thorough watering to help settle the soil and hydrate the plant. Apply water slowly so it can soak deep into the ground rather than running off the surface of the soil. You should also apply a layer of organic mulch around the base of the plant to help retain this moisture and regulate the soil temperature. With the initial planting complete, the focus shifts to monitoring the young shrub as it begins its life in your garden.
More articles on this topic
Propagation via stem cuttings
Propagating your own plants is a rewarding way to expand your garden or share your favorite shrubs with friends and family. The most common and successful method for this species is taking semi-hardwood cuttings during the mid-to-late summer months. This is when the new growth of the current season has started to firm up but is still flexible enough to root easily. Choosing healthy, disease-free stems for your cuttings is the best way to ensure a high success rate in your propagation efforts.
To take a cutting, use a sharp, sterilized knife or shears to remove a section of a stem about four to six inches long. Make the cut just below a leaf node, which is the point where a leaf attaches to the main stem of the plant. Remove the leaves from the bottom half of the cutting to prevent them from rotting when they are placed in the rooting medium. You should also trim any large leaves at the top in half to reduce moisture loss while the cutting is trying to form roots.
Using a rooting hormone can significantly increase your chances of success, although it is not strictly necessary for this hardy shrub. Dip the cut end of the stem into the hormone powder or gel before inserting it into a pot filled with a well-draining propagation mix. A blend of peat and perlite or coarse sand works well because it holds moisture while still allowing for plenty of air around the developing roots. Place the pots in a warm, bright spot but away from direct sunlight, which could scorch the tender cuttings.
Maintaining high humidity around the cuttings is essential for preventing them from drying out before they can take up water through their own roots. You can cover the pots with a clear plastic bag or place them in a specialized propagation dome to trap the moisture. Check the cuttings regularly and mist them with water if the environment feels dry, but be careful not to overwater the soil itself. Within six to ten weeks, you should see new growth and feel resistance when you gently tug on the cuttings, indicating that roots have formed.
Young plant establishment and care
After your cuttings have developed a strong root system, they need to be transitioned carefully into larger pots or their final garden positions. This process, known as “hardening off,” involves gradually exposing the young plants to the outdoor environment over a period of a few weeks. Start by placing them outside in a sheltered spot for a few hours a day and slowly increase their time in the sun and wind. This helps the young foliage toughen up and prevents the shock that can occur if they are moved too abruptly.
The first year of a young plant’s life in the garden is the most demanding in terms of care and attention. Their root systems are still small and shallow, which makes them much more vulnerable to drought and extreme temperatures than established specimens. You must ensure they receive regular, consistent watering, especially during the first summer when the heat can be intense. Mulching is particularly beneficial for young plants as it provides a stable environment for those delicate new roots to grow.
Avoid the temptation to apply heavy amounts of fertilizer to very young plants, as this can burn the tender roots and lead to weak, leggy growth. Instead, focus on building healthy soil and providing a light application of balanced organic fertilizer once the plant shows signs of active growth. The goal in the first year is to encourage a strong root system and a solid framework rather than forcing rapid top growth. A patient approach during the establishment phase will pay off with a much more resilient and beautiful plant in the long run.
Pruning should also be kept to a minimum during the first year, focusing only on removing any dead or damaged stems. Once the plant is established and growing vigorously, you can begin to shape it according to your garden’s design and functional needs. Watching a plant you propagated yourself grow into a magnificent garden feature is one of the most satisfying experiences in horticulture. By following these professional steps, you are well on your way to a garden filled with vibrant, healthy photinias.