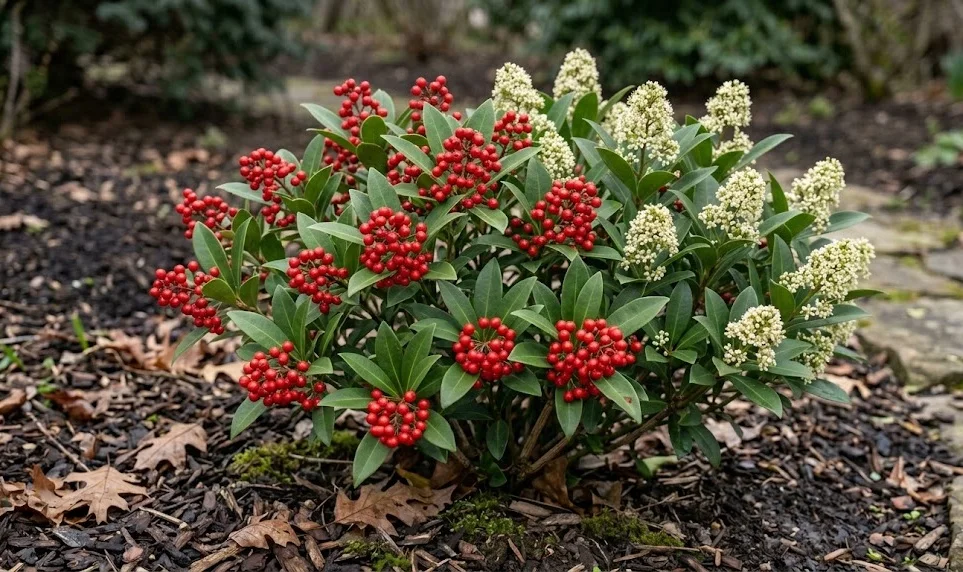
Successfully establishing Japanese skimmia in a landscape starts with a precise planting technique and an understanding of its natural reproduction. This evergreen shrub is highly sought after for its ability to thrive in shaded areas where other ornamental plants might struggle to survive. Whether you are starting with a nursery-bought specimen or attempting to create new plants from existing ones, attention to detail is paramount. By following professional guidelines, you can ensure that your plants develop a robust root system and maintain their vigor throughout their long lifespan.
The best time to plant this shrub is either in the early autumn or the late spring when the weather is mild. Planting in the autumn allows the root system to settle into the soil before the onset of the winter dormancy period. Conversely, spring planting provides the shrub with an entire growing season to establish itself before facing the challenges of winter. You should avoid planting during the height of summer, as the intense heat and potential drought can place excessive stress on the young plant.
Selecting the right site is the first and most important step in the planting process. These plants require a location that offers partial to full shade, as direct afternoon sunlight can quickly scorch their leathery leaves. The soil must be rich in organic matter and have a consistently acidic pH level to facilitate proper nutrient uptake. Before you dig the hole, clear the area of any aggressive weeds or large stones that might interfere with the initial root development.
When you are ready to plant, dig a hole that is twice as wide as the current root ball but no deeper than the container it came in. It is essential not to plant the shrub too deeply, as this can lead to stem rot and poor oxygen exchange for the roots. Mix the excavated soil with some ericaceous compost to give the plant an acidic boost right from the start. Once the plant is in position, backfill the hole gently and firm the soil with your hands to remove any large air pockets.
Techniques for successful propagation from cuttings
Propagating Japanese skimmia is most effectively achieved through semi-ripe cuttings taken during the late summer or early autumn months. This method involves selecting stems that are firm at the base but still flexible and green at the tips. You should look for healthy, pest-free branches that have not produced flowers or berries in the current season. Using a sharp, sterilized knife or pruning shears is necessary to ensure clean cuts that heal quickly and resist infection.
More articles on this topic
Each cutting should be approximately ten to fifteen centimeters long and taken just below a leaf node. Remove the leaves from the bottom half of the cutting to reduce moisture loss and expose the area where roots will eventually form. Some professionals recommend wounding the base of the cutting by removing a small sliver of bark to encourage more vigorous rooting. Dipping the base into a rooting hormone powder can further increase your chances of success, although it is not strictly required.
Place the prepared cuttings into a pot filled with a specialized propagation mix consisting of peat-free ericaceous compost and perlite. The perlite is crucial because it ensures the medium remains well-aerated and drains quickly, preventing the cuttings from rotting. You can fit several cuttings into a single large pot, provided they are not touching each other and have enough space for air to circulate. Water the medium lightly to settle the cuttings in place and maintain a humid environment around the foliage.
To maintain the necessary humidity, you should cover the pot with a clear plastic bag or place it in a specialized propagation frame. Keep the cuttings in a bright spot that receives indirect light, but never place them in direct sunlight which would overheat the enclosure. It can take several months for roots to develop, so patience is required during this stage of the process. Once you see new growth and the cuttings resist a gentle tug, they are ready to be potted into individual containers.
Growing skimmia from seeds and layering
While cuttings are the most common method, growing this shrub from seeds is a rewarding challenge for patient gardeners. You must harvest the ripe red berries in late autumn or early winter when they are soft and fully colored. The seeds are located inside the fleshy fruit and must be cleaned thoroughly to remove any pulp that could inhibit germination. It is best to sow the seeds immediately after cleaning, as they lose their viability if they are allowed to dry out completely.
More articles on this topic
Sow the seeds in a tray filled with acidic seed compost and cover them with a very thin layer of fine grit or compost. The tray should be placed in a cold frame or an unheated greenhouse where it can experience the natural temperature fluctuations of winter. This period of cold, known as stratification, is often necessary to break the seed’s dormancy and trigger growth in the spring. Keep the compost consistently moist but never waterlogged, as the seeds can easily rot before they have a chance to sprout.
Air layering is another professional technique that can be used to propagate larger specimens with a high success rate. This involves choosing a healthy branch and making a small upward cut about halfway through the stem while it is still attached to the parent plant. You then prop the cut open with a toothpick and wrap the area in damp sphagnum moss and clear plastic. Over time, roots will form at the site of the cut, and once they are visible through the plastic, you can sever the branch.
The main advantage of layering is that the new plant continues to receive nutrients and water from the parent shrub while it develops its own roots. This significantly reduces the risk of failure compared to traditional cuttings which are entirely dependent on their internal reserves. Once the new root system is well-established, the new plant can be potted up and treated as an independent specimen. This method is particularly useful for creating a new, mature-looking plant in a relatively short amount of time.
Post-propagation care and hardening off
Once your young plants have developed a sufficient root system, they require a period of transition before being moved to their final garden location. This process, known as hardening off, involves gradually exposing the plants to outdoor conditions over the course of two weeks. Start by placing them outside in a sheltered, shady spot for a few hours during the warmest part of the day. Slowly increase the amount of time they spend outside until they can remain there overnight without any signs of stress.
During this transitional phase, it is vital to keep a close watch on the moisture levels of the small pots. Young plants have limited root volume and can dry out incredibly fast, especially if there is a light breeze. You should also protect them from sudden heavy rain showers that could wash away the potting soil or damage the tender new leaves. Applying a very diluted liquid ericaceous fertilizer can provide the young plants with the energy they need to continue growing.
When the plants have been fully hardened off and show strong, healthy growth, they are ready to be transplanted into the garden. Choose a day with overcast skies or light rain to perform the transplanting, as this minimizes the risk of transplant shock. Follow the same planting procedures as you would for a larger nursery specimen, ensuring the soil is acidic and well-drained. Mulching around the base of the new plant will help protect its delicate roots during its first season in the ground.
Maintaining a consistent care routine for these young shrubs will pay dividends as they mature into beautiful landscape features. They may not produce flowers or berries in their first year or two, but this is perfectly normal for such a slow-growing species. Focus on structural development and ensuring the plant remains free from pests and diseases during its formative years. With a little patience and the right propagation techniques, you can successfully expand your collection of these versatile evergreen shrubs.