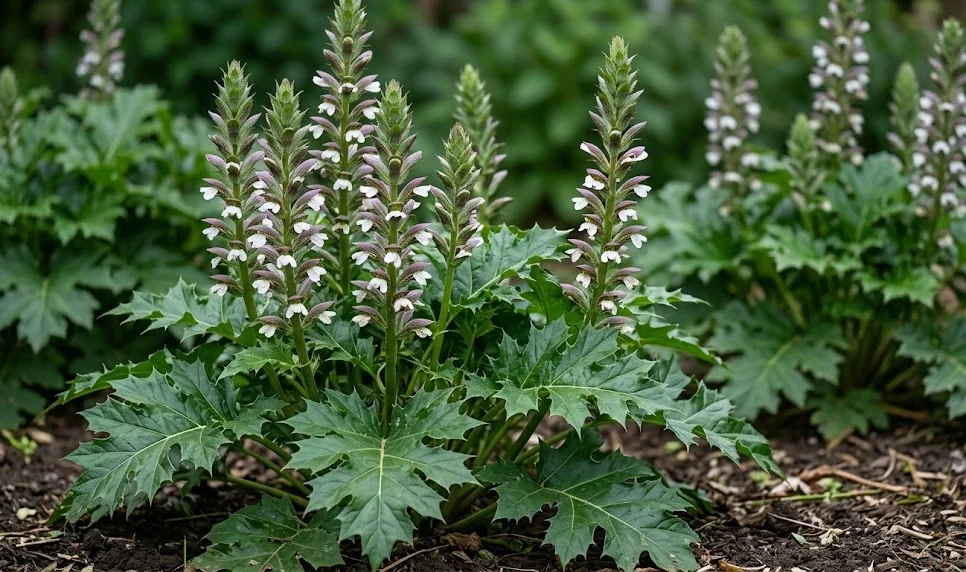
Establishing this magnificent perennial in the garden requires a thoughtful approach to both its initial placement and the methods used for its expansion. Because of its deep-rooting nature and vigorous growth habit, the decisions made during the planting phase will influence the plant’s health for many years to come. Propagation offers several pathways for the dedicated gardener, ranging from simple root cuttings to more patient endeavors with seeds. Understanding the biological requirements of the species is the first step toward successful establishment and long-term garden performance.
Choosing the perfect location is the most critical factor when preparing to plant a new specimen in the landscape. This plant thrives in positions that offer a balance of sunlight and protection from the most intense afternoon heat. The soil must be prepared deeply, as the fleshy roots will eventually penetrate far below the surface to seek out moisture and stability. Areas with poor drainage should be avoided at all cost, as stagnant water is the primary enemy of the dormant root system.
The timing of planting is equally important to ensure the root system has enough time to anchor itself before facing extreme weather. Ideally, planting should occur in the spring or early autumn when the soil temperatures are moderate and natural rainfall is more frequent. This allows the plant to focus its energy on subterranean development without the stress of high summer evaporation or winter freezes. A well-timed planting leads to a much higher success rate and a more rapid display of the characteristic architectural foliage.
Before the plant ever touches the ground, the gardener should consider the surrounding plant community and the eventual size of the mature specimen. Giving this plant enough space to spread its large leaves is essential for both its health and the aesthetic balance of the garden. Crowding can lead to poor air circulation, which may invite issues that are easily avoided with proper spacing. Planning for a diameter of at least three to four feet will allow the plant to reach its full majestic potential without interference.
Planting techniques and soil preparation
Preparing the planting hole is a task that deserves a significant amount of effort to ensure the best possible start. The hole should be dug significantly wider and deeper than the current root ball to allow for the addition of soil amendments. Mixing well-rotted organic matter into the backfill soil provides a slow-release source of nutrients that will support the plant through its first growing season. If the native soil is particularly heavy, adding a generous amount of sharp sand or fine gravel will enhance the drainage and aeration around the roots.
More articles on this topic
When placing the plant in the hole, it is vital to maintain the same depth at which it was growing in its previous container. Burying the crown too deeply can lead to rot, while planting it too high may expose the sensitive upper roots to drying winds and temperature swings. Once positioned, the soil should be firmed down gently with the hands to remove any large air pockets without compacting the medium too much. A thorough watering immediately after planting helps to settle the soil and ensures the roots make direct contact with their new environment.
Applying a layer of mulch around the base of the newly planted specimen is a professional touch that yields significant benefits. This mulch helps to regulate soil temperature, which is especially important for young plants that are still developing their resilience. It also keeps the soil consistently moist, reducing the frequency of supplemental watering required during the establishment phase. Care should be taken to keep the mulch a few inches away from the main stems to prevent any moisture-related crown issues.
Initial aftercare involves regular monitoring of the plant’s hydration levels for the first few months. Even if the species is known for its drought tolerance once established, a new planting is vulnerable until its roots have expanded into the surrounding soil. If the leaves show signs of drooping during the day, it may be necessary to provide extra water in the early morning hours. Consistent care during this first season builds the foundation for a plant that will eventually require very little intervention.
Propagation through root cuttings
One of the most effective and fascinating ways to propagate this species is through the use of root cuttings. This method takes advantage of the plant’s natural ability to regenerate from small fragments of its fleshy, nutrient-rich roots. The best time to collect these cuttings is during the late autumn or early winter when the plant is entering its dormant phase. By carefully excavating a portion of the root system, a gardener can obtain the material needed to create several new plants.
More articles on this topic
To take a successful cutting, select healthy, vigorous roots that are roughly the thickness of a pencil. These should be cut into sections approximately three to four inches long, making sure to keep track of which end was closest to the plant’s crown. A straight cut at the top and a slanted cut at the bottom is a common professional trick to help identify the correct orientation for planting. This orientation is crucial because the new shoots will always emerge from the end that was originally nearest the surface.
The root sections should be placed into a tray filled with a well-draining potting mix, either horizontally or vertically depending on the gardener’s preference. If planting vertically, the top of the cutting should be just below the surface of the soil, while horizontal cuttings are typically covered with an inch of medium. The tray should be kept in a cool but frost-free environment, such as a cold frame or an unheated greenhouse, until new growth appears. Keeping the soil slightly damp but never saturated is the key to preventing the cuttings from rotting before they can sprout.
By the following spring, small leaves should begin to emerge from the soil, indicating that the root cuttings have successfully developed their own independent systems. These young plants should be allowed to grow in their containers for a full season to build up enough strength for transplanting. This method is highly reliable and allows for the production of many genetically identical plants from a single parent specimen. It is a favorite technique among professional nurserymen for its efficiency and high success rate.
Division and seed propagation
Dividing an established clump is another common method of propagation, though it requires a bit more physical effort due to the plant’s tough root system. This task is best performed in early spring as soon as the first hints of new growth appear above the soil line. Using a sharp spade or a garden fork, the gardener must carefully lift the entire root mass or slice off a portion from the edge of the clump. Each division must have at least one healthy growth bud and a substantial piece of the root system to survive the transition.
Once the division has been separated, it should be replanted immediately into its new location to minimize the amount of time the roots are exposed to the air. The soil preparation for these new sections should be just as thorough as it was for the original plant to ensure a quick recovery. Because division involves a significant amount of stress, the newly moved plants will require extra attention and regular watering for the remainder of the season. This method is an excellent way to rejuvenate an older plant that may have become too dense or less productive.
Propagating from seed is a slower process that requires a bit more patience but can be very rewarding for those who enjoy watching the entire life cycle. The seeds should be collected once the pods have turned brown and started to split open, usually in late summer or autumn. They can be sown immediately in a seedbed or stored in a cool, dry place for spring planting. Since the seeds have a relatively hard coat, soaking them in water for twenty-four hours before sowing can help to speed up the germination process.
Seedlings should be grown in a protected environment until they are large enough to handle without risk of damage. They typically produce a small rosette of leaves in their first year and may take several more years before they are mature enough to produce flower spikes. While seed-grown plants may show some slight variations in leaf shape or flower color, they are generally true to the parent species. This method is ideal for those who want to produce a large number of plants for a meadow-style garden or a naturalized area.
Managing the spread and location
Once established, this plant is known for its persistence and its ability to slowly expand its footprint through its rhizomatous roots. While it is not usually considered an invasive species in the traditional sense, its deep roots make it very difficult to remove once it has taken hold. This characteristic means that propagation, whether intentional or accidental, should be managed with an eye toward the future layout of the garden. Any root fragments left in the soil after a plant is moved are likely to grow into new specimens within a year or two.
Professional gardeners often use physical barriers if they want to keep the plant strictly confined to a specific area within a formal design. Sinking a deep plastic or metal edging into the ground can prevent the rhizomes from creeping into neighboring beds or lawn areas. This approach allows the gardener to enjoy the architectural beauty of the plant without worrying about it encroaching on other more delicate species. It is a proactive way to manage the plant’s natural vigor while maintaining the integrity of the garden design.
If the plant does begin to appear in unwanted locations, the best course of action is to remove the new sprouts as soon as they are noticed. Simply cutting the foliage back will not be enough, as the energy stored in the roots will quickly produce new leaves. The root fragment must be carefully excavated and removed entirely to prevent further growth in that spot. Constant vigilance for a season or two is usually enough to eliminate any accidental propagation from disturbed soil.
Ultimately, the goal of planting and propagation is to harness the plant’s natural strength to create a beautiful and enduring garden feature. Whether starting from a purchased specimen or growing new plants from cuttings or seeds, the process is a journey into the life of a truly remarkable perennial. With the right techniques and a bit of patience, anyone can enjoy the classical elegance and structural power of this species. It remains one of the most rewarding plants for those who appreciate bold forms and historical horticultural significance.