Proper hydration and nutrient management are the cornerstones of maintaining a healthy and vibrant coral berry bromeliad. This species has evolved unique biological mechanisms to thrive in environments where traditional soil-based resources are scarce. By understanding how to utilize the plant’s central reservoir and its specialized leaf structures, you can ensure it receives exactly what it needs to flourish. A professional approach to watering and feeding will not only improve the plant’s appearance but also significantly extend its lifespan in an indoor setting.
The mechanics of the central tank
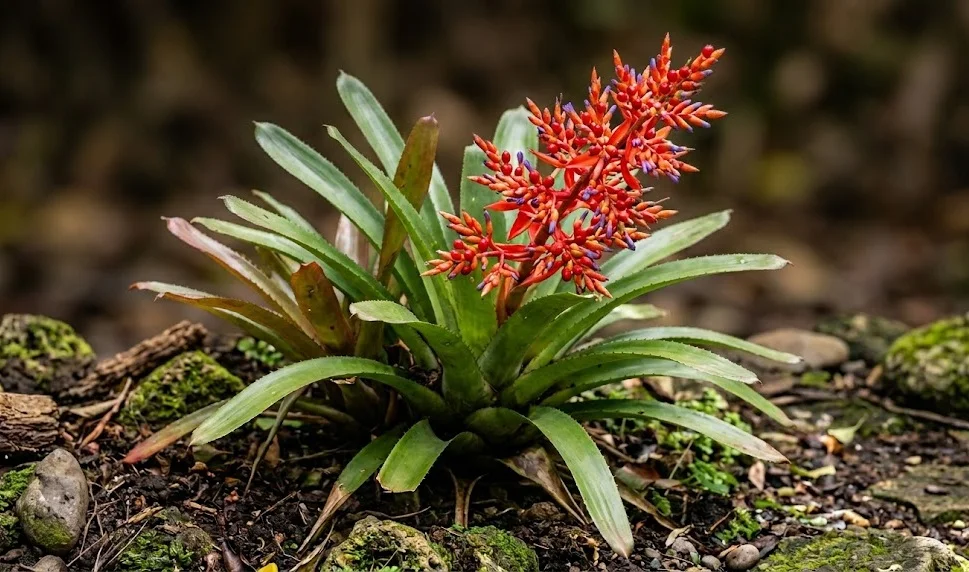
The defining feature of the coral berry bromeliad is the “tank” or “cup” formed by the tightly overlapping bases of its leaves. In its natural habitat, this reservoir collects rainwater, falling organic debris, and even small organisms that provide a constant source of hydration and nutrients. For the indoor gardener, keeping this cup filled with water is the most important part of the daily or weekly routine. The water in the tank is the primary way the plant stays turgid, especially during periods of low humidity or dry soil.
It is not enough to simply add water; the quality and freshness of the liquid in the tank are of paramount importance. Stagnant water can become a breeding ground for bacteria, mosquito larvae, or foul-smelling algae that can eventually harm the plant’s core. To prevent this, you should flush the tank at least once every two weeks by pouring fresh water into the center until the old water overflows. Alternatively, you can tip the plant upside down to empty the reservoir completely before refilling it with a fresh supply.
The level of water in the tank should be monitored closely, especially during the warm summer months when evaporation is high. Generally, keeping the cup about half to three-quarters full is ideal for providing consistent hydration without encouraging rot at the very base of the leaves. If you notice the water level dropping rapidly, it may be a sign that the air is too dry or the temperature is too high. Conversely, in the winter, you may choose to keep the water level slightly lower to account for the plant’s slower metabolism and reduced evaporation.
Using the right type of water for the central tank will prevent many aesthetic and physiological issues over time. Rainwater is the gold standard, as it is naturally soft and mimics the conditions the plant has adapted to over millennia. If rainwater is unavailable, distilled water or reverse osmosis water are excellent alternatives that won’t leave unsightly mineral deposits on the leaves. Avoid using softened water, as the high salt content can be toxic to bromeliads and will quickly lead to the decline of the specimen.
More articles on this topic
Soil moisture management
While the central tank is the primary hydration source, the roots of the coral berry bromeliad still require a specific moisture balance in the substrate. The roots primarily serve as an anchor, but they also absorb a portion of the plant’s water and nutrient requirements from the surrounding medium. The goal is to keep the potting mix “barely damp,” which means it should feel moist to the touch but no water should be visible if you squeeze a handful. Over-watering the soil is one of the quickest ways to cause root rot, which is often fatal for epiphytic species.
To determine when to water the soil, use the “finger test” by inserting your index finger about an inch into the potting medium. If the top layer feels dry, it is usually safe to apply a small amount of water to the base of the plant. During the active growing season, you may find yourself doing this once or twice a week depending on the ambient humidity and light. In the winter, the soil may stay damp for several weeks, and you should wait until it is nearly dry before adding more moisture.
The method of applying water to the soil is just as important as the frequency of the application. Always pour the water directly onto the substrate and avoid getting excessive amounts on the base of the outer leaves where it might sit and cause rot. Allow any excess water to drain freely out of the bottom of the pot, and never let the container sit in a saucer filled with standing water. This “drench and drain” technique ensures that the roots receive a fresh supply of oxygen along with the moisture they need.
If you are using a very porous, bark-heavy mix, the water may run through the pot so quickly that the medium doesn’t have time to absorb any moisture. In these cases, you can briefly soak the entire pot in a basin of water for about ten minutes to ensure the organic components are properly rehydrated. This is especially helpful if the plant has been accidentally neglected and the substrate has become hydrophobic. After soaking, let the pot drain thoroughly for at least thirty minutes before returning it to its decorative saucer or shelf.
More articles on this topic
Understanding nutrient requirements
The coral berry bromeliad is a “light feeder,” meaning it does not require the heavy fertilization schedules that many other tropical houseplants demand. In nature, it survives on the very diluted nutrients found in rainwater and decaying leaf litter that washes into its central cup. Over-fertilizing can lead to a variety of problems, including leaf tip burn, loss of vibrant color, and even the inhibition of flowering. A professional approach involves providing very low concentrations of nutrients only during the periods of active growth.
When choosing a fertilizer, a balanced, water-soluble formula (such as a 10-10-10 or 20-20-20 NPK ratio) is generally the safest and most effective option. However, it is vital to dilute the fertilizer to at least one-quarter or even one-eighth of the strength recommended on the product label. Bromeliads have very sensitive tissues, and what would be a normal dose for a philodendron could be a lethal overdose for an Aechmea. Using a specific “bromeliad and orchid” fertilizer can also be helpful, as these are often formulated with the needs of epiphytes in mind.
There are two main ways to apply fertilizer: through the central tank or directly to the soil and roots. Many experts prefer to apply a very dilute foliar spray or add a few drops of liquid fertilizer to the water in the tank once a month. This mimics the way the plant naturally receives nutrients through its leaves and the organic soup in its reservoir. If you choose to fertilize the soil, ensure the potting mix is already damp to prevent the concentrated salts from burning the sensitive root hairs.
During the late autumn and throughout the winter, you should stop all fertilization entirely to respect the plant’s natural dormancy period. Providing nutrients when the plant isn’t actively growing can lead to a buildup of mineral salts that will eventually damage the plant when growth resumes in the spring. As the days lengthen and temperatures rise in March or April, you can gradually reintroduce a light feeding schedule. Consistency and moderation are the keys to using fertilizer to enhance the plant’s natural beauty without causing accidental harm.
Signs of over-hydration and mineral salt buildup
Learning to read the plant’s physical cues will help you adjust your watering and fertilization routines before serious damage occurs. One of the most common signs of over-watering is the appearance of soft, dark brown or black spots at the very base of the leaves. This indicates that rot has started to set in, often due to water sitting in the leaf axils for too long or the soil being too saturated. If you catch this early, you can sometimes save the plant by drying it out and improving the air circulation around the base.
Mineral salt buildup is another common issue that arises from using tap water or over-applying fertilizer over a long period. You may notice white, crusty deposits forming on the edges of the leaves or around the rim of the potting container. These salts can physically block the plant’s ability to absorb water and can eventually cause the leaf tips to turn brown and brittle. To remedy this, you should flush the soil thoroughly with a large amount of distilled water to wash away the accumulated minerals.
The appearance of the leaves can also tell you if the plant is receiving too much or too little of specific nutrients. For example, if the leaves are becoming excessively dark green and the plant is growing very quickly but seems weak, you may be providing too much nitrogen. On the other hand, a lack of essential minerals might result in pale, yellowish leaves or a complete failure to produce a flower spike. Adjusting your fertilization levels based on these visual indicators allows for a more personalized and effective care strategy for each individual plant.
If you suspect that the central tank has become toxic due to fertilizer buildup or bacterial growth, a complete “reset” is often the best course of action. Empty the tank completely, rinse it out with fresh distilled water several times, and then leave it empty for a day to allow the core to breathe. When you refill it, use only pure rainwater or distilled water and refrain from adding any fertilizer for several months. This gives the plant a chance to process any excess nutrients and recover its physiological balance in a clean environment.
Water quality and the role of humidity
The coral berry bromeliad is highly sensitive to the chemical additives often found in municipal tap water supplies. Chlorine, fluoride, and various minerals used to treat water can accumulate in the plant’s tissues over time, leading to chronic stress and poor growth. Many professional growers keep a dedicated container for collecting rainwater, which is the most natural and beneficial hydration source for all bromeliads. If you must use tap water, let it sit in an open container for 24 hours to allow some of the chlorine to dissipate before using it on your plants.
Humidity is essentially “aerial watering” and plays a significant role in how much liquid the plant needs to take in through its tank and roots. In an environment with high humidity (above 60 percent), the plant loses less moisture through transpiration and remains naturally hydrated for longer. In dry indoor air, the plant will “drink” more from its reservoir, and the soil will dry out much faster than in a greenhouse. Understanding this relationship allows you to adjust your manual watering frequency based on the current atmospheric conditions in your home.
Using a fine mist sprayer can help supplement humidity, but it should be done carefully to avoid creating a permanent film of water on the leaves. Misting is most effective when done in the early morning, allowing the moisture to evaporate as the day warms up and light levels increase. If you mist late in the evening, the water may sit on the foliage overnight, which significantly increases the risk of fungal infections. Always use distilled water for misting to avoid leaving white mineral spots that can dull the glossy finish of the leaves.
Finally, consider the temperature of the water you are using, as cold water from a tap can shock the tropical vascular system of the bromeliad. Always aim for “room temperature” water, which is around 20 to 22 degrees Celsius, for both the tank and the soil. Using water that is too cold can cause the plant to drop its flowers prematurely or lead to unsightly spotting on the foliage. Taking the time to ensure the water is the right quality and temperature is a small detail that makes a massive difference in professional plant care.