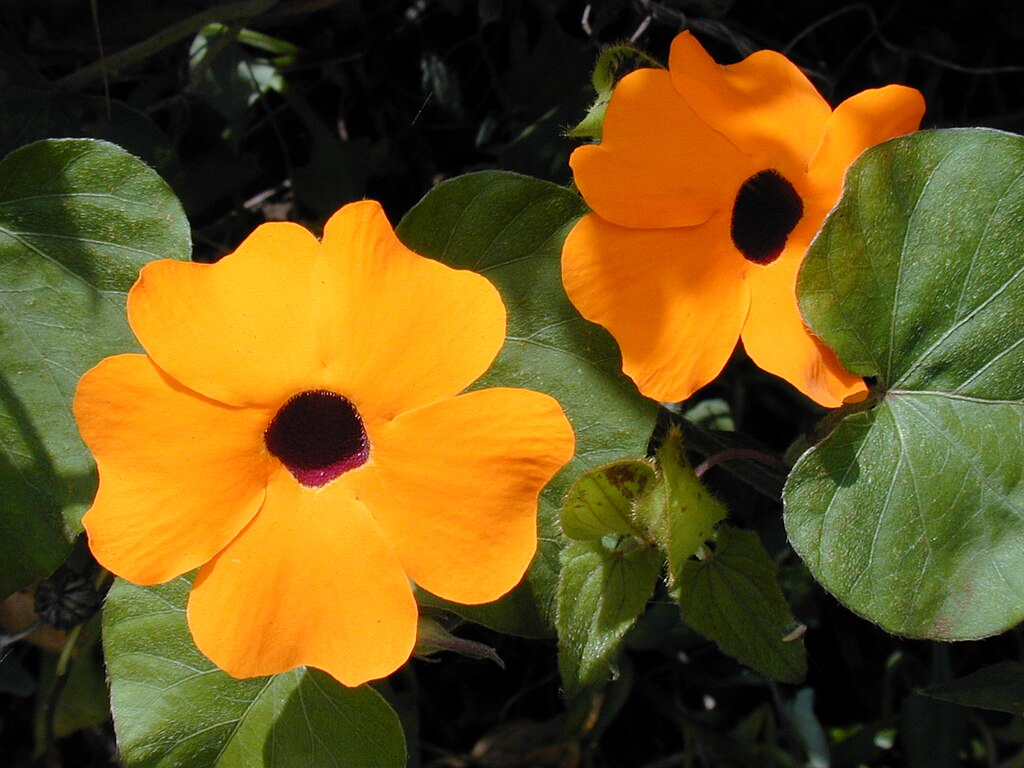
The successful cultivation of the black-eyed susan vine begins with proper planting techniques and an understanding of its propagation methods. Whether starting from seeds or young nursery plants, the initial steps taken will significantly influence the plant’s vigour and future performance. This vine is known for its rapid growth, making it a rewarding choice for gardeners seeking quick results, but this very characteristic demands careful planning regarding its placement and support. Propagation is remarkably straightforward, offering an easy and economical way to produce numerous plants for extensive garden displays or to share with others.
Planting is a critical stage that sets the foundation for the entire growing season. The timing of planting is paramount, as Thunbergia alata is a tender plant that cannot tolerate frost. It should only be planted outdoors after all danger of frost has passed and the soil has had a chance to warm up. Planting too early in cold, damp soil can lead to stunted growth, root rot, and a general failure to thrive. Providing the right soil conditions from the outset is equally important for establishing a strong and healthy root system.
Propagation offers a path to multiplying the plant stock, primarily through seed sowing or taking stem cuttings. Growing from seed is the most common method and allows for a large number of plants to be started indoors before the last frost, giving them a head start on the season. This method is particularly cost-effective for creating large-scale plantings. Stem cuttings, on the other hand, provide a way to create genetically identical clones of a parent plant, which is useful for preserving the specific characteristics of a particular cultivar.
Regardless of the starting method, the transition to the garden requires attention to detail. Young plants, whether grown from seed or purchased, must be properly hardened off to acclimate them to outdoor conditions. This gradual process reduces the shock of transplantation and helps ensure a seamless transition to their final growing location. Once planted, providing immediate support for their climbing habit is essential to manage their enthusiastic growth and create an attractive display.
Starting from seed
Growing Thunbergia alata from seed is a highly effective and popular method of propagation. To get a jump on the growing season, it is best to start the seeds indoors approximately six to eight weeks before the last expected frost date in your region. This early start allows the seedlings to become well-established and ready for vigorous growth once they are transplanted outdoors into the warm spring soil. Starting them directly in the garden is possible in long-season climates, but indoor sowing is generally recommended for better results.
More articles on this topic
Before sowing, it is beneficial to prepare the seeds to improve germination rates. The seeds have a hard outer coat, and soaking them in warm water for 24 to 48 hours can help to soften this coat and speed up the sprouting process. After soaking, sow the seeds about half a centimeter deep in a quality seed-starting mix. Use small pots, cell packs, or seed trays with good drainage to prevent waterlogging, which can cause the seeds to rot.
Maintain a warm and consistently moist environment for the seeds to germinate. A soil temperature of around 21 to 24 degrees Celsius is ideal for germination, which typically occurs within 10 to 20 days. Placing the seed tray on a heat mat can help maintain the optimal temperature, and covering the tray with a plastic dome or plastic wrap will help retain humidity. Once the seedlings emerge, remove the cover and place them in a location with bright, indirect light, such as a south-facing window.
As the seedlings grow, it is crucial to provide them with adequate light to prevent them from becoming weak and leggy. If natural light is insufficient, supplementing with a grow light is highly recommended. Keep the soil consistently moist but not saturated. Once the seedlings have developed their first set of true leaves, they can be thinned to one strong seedling per pot or cell. When they have several sets of leaves and a robust root system, they are ready to be prepared for transplanting outdoors.
Transplanting seedlings outdoors
The process of moving the tender, indoor-grown seedlings to their permanent location in the garden must be done with care to avoid transplant shock. This is achieved through a process called hardening off, which gradually acclimates the young plants to the harsher outdoor conditions of direct sun, wind, and fluctuating temperatures. This process should begin about one to two weeks before the planned planting date, which itself must be after all risk of frost has passed.
More articles on this topic
Begin the hardening-off process by placing the seedlings in a sheltered, shady spot outdoors for just a few hours on the first day. Over the next week or two, gradually increase the amount of time they spend outside and slowly introduce them to more direct sunlight. Bring them back indoors or provide protection if nighttime temperatures are expected to drop significantly or if the weather is particularly harsh. This gradual exposure toughens the plant’s tissues and prepares it for life in the garden.
When selecting the final planting spot, ensure it meets the vine’s requirements for full sun and well-draining, rich soil. Prepare the planting hole to be slightly larger than the root ball of the seedling. Carefully remove the seedling from its pot, making sure to keep the root ball as intact as possible to minimize disturbance. If the plant is root-bound, gently tease the roots apart at the bottom to encourage them to grow outwards into the new soil.
Place the seedling in the prepared hole at the same depth it was growing in its pot. Backfill the hole with the amended garden soil, gently firming it around the root ball to eliminate air pockets. Water the newly transplanted seedling thoroughly to help settle the soil and provide immediate hydration. It is also the ideal time to put its support structure, such as a trellis or obelisk, in place so the vine can begin to climb as it grows.
Propagation from stem cuttings
Propagating the black-eyed susan vine from stem cuttings is an excellent way to create new plants that are exact replicas of the parent. This method is particularly useful for overwintering the plant in colder climates or for propagating a favorite cultivar. The best time to take cuttings is in late spring or summer when the plant is in a state of active growth. Look for healthy, vigorous stems that are free from any signs of pests or disease.
Using a clean, sharp pair of pruning shears or a knife, take cuttings that are approximately 10 to 15 centimeters long. Make the cut just below a leaf node, which is the point on the stem where a leaf emerges. Remove the leaves from the lower half of the cutting, as this is the portion that will be inserted into the rooting medium, and leaving leaves below the surface could lead to rot. It is also wise to remove any flowers or flower buds from the cutting, as this encourages the plant to direct its energy into root production rather than flowering.
To increase the chances of successful rooting, the base of the cutting can be dipped into a rooting hormone powder or gel. While not strictly necessary for this easy-to-root plant, it can speed up the process and lead to a more robust root system. Plant the prepared cutting into a small pot filled with a sterile, lightweight rooting medium, such as a mix of perlite and peat moss or a commercial seed-starting mix. Insert the cutting deep enough so that at least one or two leafless nodes are below the surface.
To create a humid environment conducive to rooting, cover the pot with a plastic bag or place it in a propagator. Position the cutting in a warm location with bright, indirect light. Keep the rooting medium consistently moist but not waterlogged. Roots should begin to form within a few weeks. A gentle tug on the cutting can be used to check for rooting; if there is resistance, roots have formed. Once a healthy root system has developed, the new plant can be cared for like a mature specimen.
Division of established plants
In regions where Thunbergia alata is grown as a perennial, division is a viable method of propagation. This process involves separating an established, mature plant into smaller sections, each with its own set of roots and stems, which can then be planted as new, independent plants. Division is best performed in the spring as new growth begins to emerge. This timing allows the newly divided sections the entire growing season to establish themselves before the next dormant period.
The process begins by carefully digging up the entire clump of the plant. Use a garden fork or spade to gently lift the root ball from the ground, taking care to damage as few roots as possible. Once the plant is out of the ground, gently shake or wash off the excess soil so that the root structure and crowns are clearly visible. This will make it easier to identify the best places to make the divisions.
Using a sharp, clean knife or spade, or in some cases by gently pulling the clump apart by hand, separate the plant into smaller sections. Ensure that each new division has a healthy portion of the root system and at least one or two growing points or shoots. The size of the divisions can vary, but sections that are too small may struggle to establish themselves. Discard any parts of the plant that appear dead, woody, or diseased.
Replant the newly created divisions immediately to prevent the roots from drying out. Plant them at the same depth they were previously growing, in a well-prepared site with rich, well-draining soil. Water the divisions thoroughly after planting to settle the soil and provide essential moisture. It is important to keep the soil consistently moist for the first few weeks while the new plants are establishing their root systems and recovering from the stress of the division process.
Thunbergia alata is one of the most rewarding vines for quick coverage, but its success starts with a warm germination environment. I’ve found that soaking the seeds in lukewarm water for about 12 hours before sowing can significantly improve the germination rate. I start mine indoors in early March, using a heat mat to maintain a consistent temperature of around 20-25°C. Once the seedlings have their first set of true leaves, I transplant them into larger pots to allow for further root development. I wait until all danger of frost has passed before moving them outside, as they are very sensitive to the cold. Providing a sturdy trellis or support from the very beginning is also crucial, as they will start to climb almost as soon as they emerge. It’s a fast-growing plant that will quickly reward you with a profusion of beautiful flowers.
The soaking tip is a great one, James; I’ll definitely try that next year! I’ve also had good success propagating the black-eyed susan vine from stem cuttings taken in late summer. I choose a healthy, non-flowering stem and place it in a jar of water on a sunny windowsill. It usually takes about two to three weeks for roots to appear, at which point I transplant it into a small pot with some good quality potting mix. It’s a very easy and effective way to increase your collection of these beautiful vines. I’ve even managed to overwinter some of these cuttings indoors to get an even earlier start the following spring.
When planting out your black-eyed susan vines, it’s important to choose a spot with rich, well-draining soil. I like to incorporate some well-rotted compost or manure into the planting area to provide a good source of nutrients for the growing plants. I also make sure to space them at least 30-40 cm apart to allow for their rapid growth and to ensure good air circulation. This will help prevent any potential fungal issues and ensure that each plant has enough space to thrive. If you’re growing them in containers, make sure to use a large enough pot and to provide a trellis or other support for them to climb. They look fantastic cascading over the sides of a hanging basket or climbing up a porch pillar.
The spacing advice is very important, Elena; I’ve seen many people make the mistake of planting them too closely together. This can lead to a tangled mess of stems and can make it much harder to manage any potential pest or disease issues. I also find that a regular application of a balanced liquid fertilizer during the growing season helps keep the plants vigorous and blooming profusely. I use a formula that is slightly higher in phosphorus to encourage plenty of flowers. It’s a simple routine that will ensure your black-eyed susan vines are the stars of your garden all summer long.
I’ve found that the ‘Susie’ series of black-eyed susan vines is particularly reliable and produces a wide range of beautiful flower colors. I’ve had great success with the orange and yellow varieties, which always seem to attract plenty of bees and butterflies to my garden. I’ve also tried some of the more unusual colors like white and even a pale pink, which are also very lovely. I find that they look best when planted in groups of three or five to create a really impactful display. It’s a very versatile and easy-to-grow vine that I would recommend to any gardener.
One thing to keep in mind is that the black-eyed susan vine can be quite invasive in some climates, so it’s important to monitor its growth and prune it back if it starts to get out of control. I’ve seen it quickly take over entire trellises and even start to climb into nearby trees if it’s not kept in check. I usually give mine a light pruning every few weeks to keep it tidy and to encourage more flowers. It’s also a good idea to remove any spent blooms to prevent the plant from self-seeding too much. With a little bit of care, you can enjoy the beauty of this vine without it becoming a problem in your garden.
I just started my first batch of black-eyed susan vine seeds today! I followed the advice about soaking them in warm water and I’m really hoping for a good germination rate. I’ve already set up a heat mat and I’m keeping a close eye on the temperature. It’s always such an exciting time to start new plants for the garden. I’m planning to grow them on a large trellis against my fence, where I’m hoping they’ll provide a beautiful and colorful screen. I can’t wait to see them start to grow!