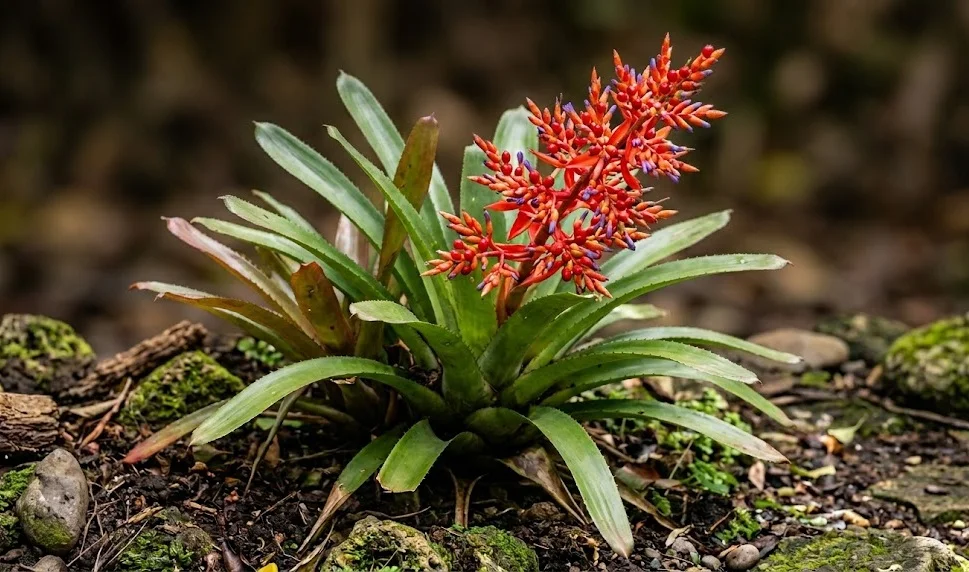
Successful establishment of the coral berry bromeliad depends heavily on the initial planting technique and the selection of an appropriate substrate. Unlike typical terrestrial plants, this species thrives in a medium that prioritizes drainage and aeration over moisture retention and nutrient density. Propagation offers an exciting opportunity to expand a collection, primarily through the removal of basal offsets that appear after the flowering cycle. Mastering these fundamental tasks ensures a continuous cycle of healthy, vibrant plants for the dedicated enthusiast.
Selecting the right substrate and container
The most common mistake made when planting a coral berry bromeliad is using standard potting soil, which is far too dense and heavy. These plants require a porous mix that allows oxygen to reach the roots while allowing excess water to drain away instantly. A professional-grade mixture often includes components like orchid bark, perlite, coarse sand, and a small amount of peat moss or coco coir. This combination mimics the airy, organic debris found in the crooks of tree branches where these plants naturally reside.
Choosing the correct container is just as important as the soil mix itself to ensure long-term root health. Plastic pots are excellent for retaining a bit of moisture in dry environments, while terracotta pots offer superior breathability but dry out much faster. Regardless of the material, the pot must have multiple drainage holes at the bottom to prevent water from pooling around the roots. For a coral berry bromeliad, a smaller pot is usually better than one that is too large, as they have relatively small root systems and enjoy being slightly root-bound.
Before planting, it is essential to ensure that both the pot and any tools being used are thoroughly cleaned and sterilized. This prevents the introduction of soil-borne pathogens or fungal spores that could compromise the health of the young plant or offset. A simple solution of one part bleach to nine parts water is effective for disinfecting containers and pruning shears. Starting with a sterile environment gives the bromeliad the best possible chance to establish itself without facing immediate biological threats.
When placing the plant in its new container, position it so that the base of the leaves sits just above the soil line. Deep planting can lead to moisture being trapped against the lower stem, which quickly leads to base rot and the death of the specimen. Gently firm the substrate around the roots to provide stability, but avoid packing it down so tightly that you crush the delicate air pockets. A properly planted bromeliad should feel secure in its pot but should still be in a medium that feels light and springy to the touch.
More articles on this topic
Propagation through basal offsets
The most reliable and common method of propagating the coral berry bromeliad is by removing the “pups” that grow from the base of the mother plant. These offsets usually begin to appear after the main plant has finished its flowering cycle and has started its natural decline. It is best to wait until the pup has reached at least one-third to one-half the size of the mother plant before attempting removal. At this stage, the young plant has likely developed its own rudimentary root system and is strong enough to survive independently.
To remove a pup, you must first take the entire plant out of its pot to clearly see where the offset is attached to the parent. Use a sharp, sterile knife to make a clean, vertical cut as close to the mother plant’s stem as possible without damaging it. Try to ensure that the pup comes away with some of its own roots already attached, as this will significantly speed up the establishment process. If the pup has no roots yet, it can still be propagated, but it will require more careful monitoring and high humidity to encourage root growth.
After removal, it is a good professional practice to let the cut surface of the pup dry and callous for a few hours or even a day. This reduces the risk of rot-causing organisms entering the fresh wound once the young plant is placed into the potting medium. Some growers choose to dip the cut end in a rooting hormone or a dusting of cinnamon, which acts as a natural fungicide. These extra steps provide a safety net that increases the success rate of your propagation efforts, especially with valuable or rare specimens.
Once the pup is ready, plant it in a small pot using the same well-draining substrate recommended for mature plants. Stake the young plant if necessary to keep it upright until its roots can firmly anchor it in the new medium. Keep the soil slightly more moist than usual for the first few weeks and provide bright, indirect light to stimulate growth. Avoid filling the central tank of the pup with too much water until you see signs of new leaf growth, as the lack of roots makes it more susceptible to over-hydration issues.
More articles on this topic
Seed propagation techniques
While much slower and more demanding than using offsets, growing coral berry bromeliads from seed is a rewarding challenge for the advanced hobbyist. The seeds are produced within the colorful berries that follow the bloom, but they must be harvested at the peak of ripeness to be viable. Once the berries become soft and the color is intense, you can harvest them and carefully extract the small, often sticky seeds from the pulp. Cleaning the seeds thoroughly is essential, as any remaining sugary pulp can encourage the growth of mold and fungus during germination.
The sowing medium for bromeliad seeds should be very fine and sterile, such as finely chopped sphagnum moss or a mix of vermiculite and peat. Spread the seeds evenly across the surface of the moist medium, but do not bury them, as they require light to trigger the germination process. Placing the seed tray in a clear plastic bag or under a humidity dome will maintain the consistent moisture levels necessary for these tiny organisms. Keep the tray in a warm spot with bright, indirect light, but avoid direct sun which could overheat the enclosed environment.
Germination can take anywhere from a few weeks to several months, and the process requires immense patience and constant monitoring. You must ensure the medium stays damp but never waterlogged, and you should occasionally vent the humidity dome to allow for fresh air exchange. Once the tiny green seedlings appear, they are extremely delicate and should not be disturbed or moved until they have developed several true leaves. Providing a very dilute, weak liquid fertilizer can help the seedlings gain strength once they are a few months old.
Transplanting the seedlings into individual containers is a high-risk task that should only be done when they are large enough to handle safely. Use a small pair of tweezers or a dedicated dibber tool to carefully lift each seedling with its tiny root ball intact. Move them into small “plug” trays or 2-inch pots filled with a fine-textured version of the adult potting mix. It may take several years for a seed-grown coral berry bromeliad to reach flowering size, but the satisfaction of growing a plant from scratch is unparalleled.
Ensuring successful establishment
After planting or repotting, the first month is the most critical period for the coral berry bromeliad’s long-term health. During this time, the plant is focusing its energy on repairing damaged roots and anchoring itself into the new substrate. You should keep the plant in a stable environment with no sudden changes in light, temperature, or humidity. Resist the urge to move the pot frequently, as this can disturb the fine root hairs that are trying to penetrate the new medium.
Watering during the establishment phase should be handled with precision to avoid any risk of root rot. Keep the central cup filled with a small amount of water, but ensure the potting mix is only lightly damp to the touch. If the soil remains too wet, the compromised roots will be unable to breathe and will quickly succumb to decay. It is often better to err on the side of underwatering the soil during the first two weeks than to risk over-saturating the new environment.
Signs of successful establishment include the appearance of new, bright green growth from the center of the rosette or the hardening of the leaf tissues. You may also notice the plant becoming more stable and difficult to wiggle in the pot, indicating that the roots are taking hold. Once these signs are evident, you can gradually transition the plant back to its standard care routine and regular fertilization schedule. If the plant shows signs of distress, such as wilting or color loss, re-evaluate the moisture levels and light exposure immediately.
Finally, remember that the mother plant will eventually die back after it has finished producing offsets. This is not a failure of care but a natural progression of the bromeliad’s life cycle. You can continue to care for the mother plant as long as she is producing pups, as she provides vital nutrients and energy to her offspring. Once the pups are removed or the mother plant becomes unsightly, you can discard the old rosette and focus your energy on the new generation you have successfully started.