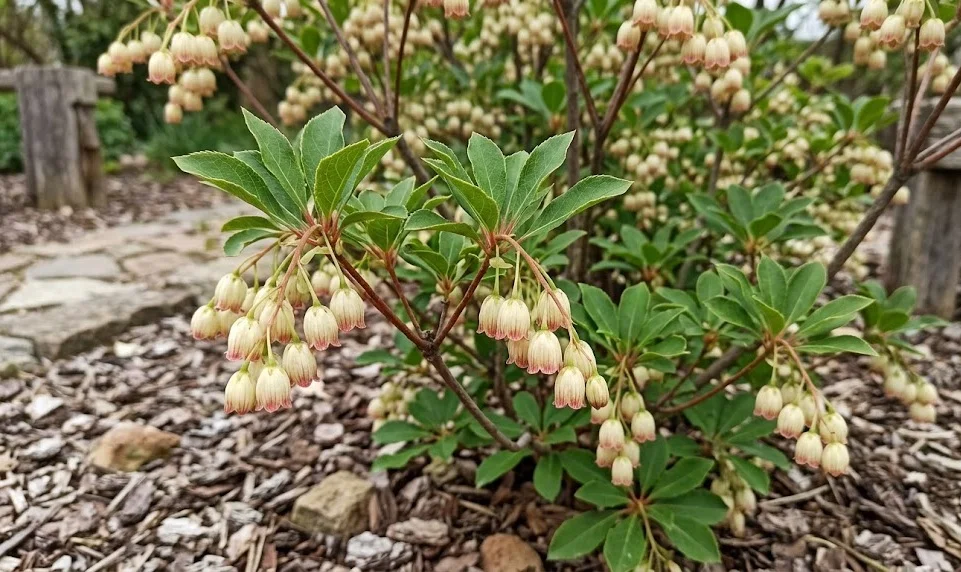
Planting a redvein enkianthus is a rewarding endeavor that requires careful timing and preparation to ensure success. This elegant shrub belongs to the Ericaceae family, meaning it shares many characteristics with blueberries and rhododendrons. Choosing the right moment to introduce it to your garden will determine how quickly it establishes its roots. A well-planned planting process sets the stage for a healthy, long-lived specimen that will thrive for years.
The best time to plant this shrub is either in the early spring before growth begins or in the autumn. Spring planting allows the root system to establish itself before the heat of summer arrives. Autumn planting is also effective because the soil is still warm, which encourages root growth even as the top becomes dormant. Avoid planting during the peak of summer or when the ground is frozen during winter.
When selecting a specimen from a nursery, look for one with healthy, vibrant stems and no signs of pests. A plant that is slightly root-bound in its container is often easier to handle than one with very loose soil. Check the undersides of the leaves for any hidden insects or fungal spots before bringing it home. Starting with a vigorous, high-quality plant significantly increases the chances of a successful transplant.
Before you start digging, make sure you have all the necessary soil amendments ready at the site. Having peat moss, organic compost, and mulch on hand makes the process much smoother and more efficient. The transition from a nursery pot to the garden soil is a stressful time for any plant. Being prepared allows you to minimize the time the roots are exposed to the air.
Site and soil preparation
The first step in preparation is to conduct a thorough test of the soil’s acidity level. If the pH is above 6.0, you must work to lower it well before you intend to plant. Mixing elemental sulfur or aluminum sulfate into the soil can achieve this, but it takes time to react. Preparing the bed several months in advance is the professional way to handle alkaline soil conditions.
More articles on this topic
Dig a hole that is at least twice as wide as the root ball but no deeper than the container. The wide hole allows the roots to spread out into loosened soil more easily as they grow. If the surrounding soil is heavy clay, you should mix in some coarse sand or grit to improve drainage. A well-dprepared hole provides the perfect foundation for the shallow, fibrous root system.
Enriching the soil with organic matter is essential for providing the nutrients the young plant needs. Mix a generous amount of sphagnum peat moss into the backfill soil to increase moisture retention and acidity. Well-rotted leaf mold is another excellent additive that mimics the natural forest environment. Avoid using fresh manure or high-nitrogen fertilizers at this early stage of development.
Check the drainage of the site by filling the hole with water and seeing how fast it disappears. If the water sits for more than an hour, you may need to choose a different location or build a raised bed. Poor drainage is the primary cause of failure for newly planted shrubs in residential landscapes. Ensuring a free-draining environment is the best gift you can give to your new enkianthus.
The planting process
Carefully remove the shrub from its container by supporting the main stem and tapping the sides of the pot. If the roots are circling the ball, gently tease them outward with your fingers to encourage outward growth. Be very careful not to break the main root structure, as the plant can be sensitive to root damage. Position the plant in the center of the hole, making sure it is standing perfectly upright.
More articles on this topic
Adjust the depth so that the top of the root ball is level with or slightly above the soil line. It is a common mistake to bury the stem, which can lead to fungal infections and decay. Once the height is correct, begin filling the hole with your prepared soil mix. Lightly firm the soil with your hands as you go to remove any large air pockets.
Water the plant thoroughly immediately after planting to settle the soil around the roots. This initial watering is crucial for eliminating any remaining air gaps and hydrating the root ball. You may see the soil settle slightly, in which case you can add a little more backfill as needed. Do not pack the soil down with your feet, as this can compress the delicate roots.
Finish the job by applying a two-inch layer of organic mulch around the base of the plant. Keep the mulch a few inches away from the trunk to prevent moisture buildup against the bark. This mulch will protect the new roots from temperature extremes and keep the soil moist. Label the plant if you have several varieties to keep track of your garden collection.
Propagation by seeds
Growing this species from seed is a slow process but can be very satisfying for dedicated gardeners. The seeds are contained in small capsules that develop after the flowers fade in the summer. Harvest the capsules in late autumn when they turn brown and begin to split open. Store the tiny seeds in a cool, dry place until you are ready to sow them in late winter.
Sowing should take place in a mixture of peat moss and perlite to provide a sterile and acidic medium. The seeds are very small and should only be lightly pressed into the surface of the moist soil. They require light to germinate, so do not cover them with a thick layer of compost. Place the seed tray in a bright spot but out of direct, burning sunlight.
Germination can be erratic and may take several weeks or even months to occur. Maintaining a consistent temperature and high humidity is essential during this delicate phase. Using a clear plastic dome over the tray can help keep the moisture levels stable. Once the seedlings have several sets of true leaves, they can be carefully moved to individual pots.
Young seedlings are very fragile and need protection from extreme weather for at least their first two years. They should be grown in containers where their environment can be strictly controlled before being planted out. It may take five years or more before a seed-grown plant is large enough to produce its first flowers. This method requires patience but allows for the production of many plants at a low cost.
Propagation by cuttings and layering
Taking softwood cuttings in early summer is the most common way to propagate this shrub vegetatively. Select healthy, non-flowering shoots from the current season’s growth that are about four inches long. Remove the lower leaves and dip the cut end into a rooting hormone powder to stimulate growth. Plant the cuttings in a moist, well-draining medium and keep them under a plastic cover.
Cuttings need a humid environment and bright, indirect light to successfully develop their own roots. It often takes six to eight weeks for roots to form, during which time the soil must stay moist. You can check for success by gently tugging on the cutting to see if there is any resistance. Once rooted, the young plants should be hardened off slowly before being moved to larger containers.
Semi-ripe cuttings can also be taken in late summer if the spring window was missed. These cuttings are slightly firmer and may take a little longer to root than the soft green ones. The process is essentially the same, but the success rate might be slightly lower depending on the variety. Winter protection is vital for these young plants during their first year of life.
Layering is another effective method that involves bending a low-growing branch down to the ground. Wound the underside of the branch slightly and pin it into the soil, covering the area with mulch. Over the course of a year, the branch will grow its own roots at the point of contact. Once a strong root system has formed, the new plant can be severed from the parent and moved.