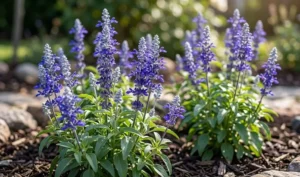
Choosing the correct location is the most critical first step when you decide to add garden primroses to your landscape. These plants are naturally adapted to the dappled shade of forest edges, meaning they require protection from intense afternoon sun. A spot that offers cool, moist conditions will significantly increase the survival rate of your new plantings. Before you even dig a hole, observe how the light moves across your garden throughout the day.
The soil preparation phase is where the long-term health of your primroses is truly determined. You must ensure the ground is loose, friable, and rich in organic matter to accommodate their delicate root systems. Incorporating a generous amount of well-rotted leaf mold or garden compost will improve the soil’s moisture-holding capacity. Avoid areas where water tends to stand after a heavy rain, as constant saturation will quickly lead to root decay.
Testing the soil fertility can provide valuable insights into what amendments might be necessary before planting. While primroses are not overly demanding, they do best in soil that has a balanced supply of essential nutrients. If your soil is particularly heavy in clay, adding some coarse grit or sharp sand can help improve the internal drainage. A well-prepared bed allows the roots to spread easily and establish the plant quickly in its new home.
Clear the planting area of all perennial weeds, as these will compete with your young primroses for water and nutrients. It is much easier to eliminate invasive grasses and weeds before the primroses are in the ground than afterward. Rake the surface level and remove any large stones or debris that might interfere with the planting process. Taking these preparatory steps ensures that your plants have the best possible start in their new environment.
Professional planting techniques
When you are ready to plant your garden primroses, timing is an essential factor to consider for the best results. The ideal windows for planting are in the early spring or the early autumn when the temperatures are mild. This allows the root system to become established without the stress of extreme heat or freezing ground. If you are planting in the spring, try to get them in the ground before the first major flush of growth.
More articles on this topic
The depth at which you set the plant is vital for preventing crown rot or dehydration of the roots. You should dig a hole that is slightly wider than the root ball but no deeper than the container the plant came in. Place the primrose in the hole so that the crown—where the leaves meet the roots—is level with the soil surface. Setting it too deep will trap moisture against the stem, while planting too shallow can expose the roots to drying air.
Once the plant is in position, backfill the hole with the prepared soil and firm it gently with your hands. Avoid using your feet to compact the soil, as this can squeeze out the air pockets that the roots need to breathe. After planting, water the area thoroughly to settle the soil around the root system and eliminate any large air gaps. This initial watering is crucial for reducing transplant shock and helping the plant settle in.
Space your primroses approximately twenty to thirty centimeters apart to allow for future growth and adequate air circulation. Overcrowding can lead to a higher incidence of fungal diseases and competition for resources as the plants mature. If you are planting in groups, a staggered pattern often creates a more natural and visually appealing display. Proper spacing ensures that each individual plant has the room it needs to develop into a healthy, full-grown specimen.
Propagation by division
Division is the most reliable and common method for propagating established garden primroses in a domestic or professional setting. This process involves lifting an older, large clump and separating it into several smaller, more vigorous units. Not only does this provide you with new plants for free, but it also rejuvenates the original parent plant. Most experts recommend dividing your primroses every three years to maintain their overall health and flowering potential.
More articles on this topic
The best time to perform this task is immediately after the plant has finished flowering in the late spring. At this stage, the plant is still in an active growth phase and will recover quickly from the disturbance. Carefully lift the entire clump from the ground using a garden fork, being sure to get as much of the root system as possible. Shake off the excess soil so you can clearly see where the individual rosettes and root sections are connected.
You can often pull the plant apart by hand, but for older, tougher clumps, a sharp knife may be necessary. Ensure that each new division has a healthy set of roots and at least one strong crown of leaves. Discard the older, woody center of the original clump, as this part of the plant is usually the least productive. Keeping only the youngest and most vigorous sections will result in the best performance for your new plantings.
Replant the divisions immediately into prepared soil, following the same planting guidelines as you would for new nursery stock. Keep the newly divided plants well-watered for several weeks until you see signs of new growth. It is helpful to trim back the outer leaves of the divisions to reduce the amount of moisture lost through transpiration. This simple technique is one of the most rewarding aspects of gardening with primroses, allowing you to expand your collection easily.
Sowing from seed
Growing garden primroses from seed is a more challenging but deeply satisfying way to introduce a wide variety of colors to your garden. Many professional growers prefer this method because it allows them to produce a large number of plants at a relatively low cost. It is important to remember that primrose seeds often require a period of cold stratification to break their dormancy. This mimics the natural winter conditions the seeds would experience in the wild before germinating in the spring.
The seeds should be sown on the surface of a fine, seed-starting compost that has been pre-moistened. Because primrose seeds are quite small and often require light to germinate, you should not cover them with a thick layer of soil. A very light dusting of fine vermiculite can help retain moisture around the seeds without blocking out the light. Place the seed tray in a cool, bright location but away from direct, harsh sunlight which can overheat the delicate seedlings.
Germination can be slow and erratic, so patience is a necessary virtue for any gardener attempting to grow primroses from seed. It can take anywhere from three weeks to several months for the first green shoots to appear above the soil. Once the seedlings have developed two sets of true leaves, they are ready to be “pricked out” into individual pots. Handle the young plants very carefully by their leaves rather than their stems to avoid crushing the delicate vascular tissue.
Grow the young plants on in a sheltered spot, ensuring they never dry out but are also not kept in standing water. They will need a full growing season to become large enough to be planted out into their permanent positions in the garden. Most seed-grown primroses will flower in their second year, rewarding your patience with a spectacular display of color. This method is the best way to discover unique color variations that might not be available at your local garden center.