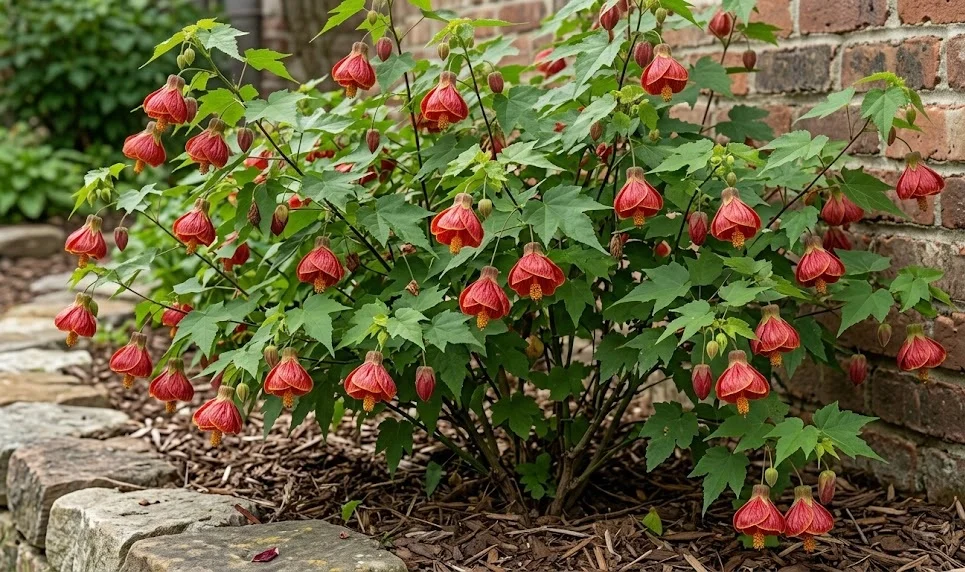
The journey of growing a garden flowering maple begins with the careful execution of planting and the strategic use of propagation techniques. Whether you are starting with a young nursery plant or attempting to create new specimens from an existing one, the initial steps are crucial for future success. This species responds well to attentive handling, but it requires specific conditions to transition from a vulnerable cutting or seedling into a robust garden shrub. By mastering these foundational tasks, you can expand your collection and ensure that each new plant has the best possible start in its environment.
Site selection and soil preparation
Choosing the right location for your new plant is a decision that will impact its health and growth for the rest of its life. You must find a spot that offers a delicate balance of light, specifically one that provides bright, filtered sunshine rather than direct, scorching heat. A location that is sheltered from the prevailing winds will prevent the fragile branches from snapping and the large leaves from drying out prematurely. Observing your garden throughout the day will help you identify the microclimates that best match these specific requirements.
The soil in your chosen spot must be prepared with care to ensure it provides the necessary drainage and nutrient density. Most garden soils benefit from the addition of high-quality compost or aged manure, which improves the structure and increases biological activity. If your soil is naturally heavy or prone to compaction, adding some coarse sand or perlite can help create the airy environment the roots crave. Thoroughly digging the area and breaking up any large clumps of earth will allow the young roots to penetrate the soil more easily.
Drainage is perhaps the most important physical characteristic of the soil when it comes to the long-term survival of this species. You can test the drainage of your site by digging a small hole, filling it with water, and timing how long it takes to empty completely. If the water sits for several hours, you may need to consider planting in a raised bed or improving the soil further with drainage-enhancing materials. Roots that are forced to sit in stagnant water will quickly succumb to rot, leading to a rapid and often irreversible decline of the entire plant.
Finally, consider the long-term spatial requirements of the plant before you commit to a specific planting site. This shrub can grow quite quickly, and it needs enough room to expand without being crowded by neighboring plants or structures. Allowing for at least a few feet of space on all sides ensures that the plant will have adequate air circulation as it matures. Planning for the future size of the specimen now will save you the trouble of having to relocate or severely prune the plant later on.
More articles on this topic
The process of planting out
Once the site is prepared and the weather is favorable, the actual process of planting should be done with minimal disturbance to the plant. Dig a hole that is approximately twice as wide as the current root ball but no deeper than the pot the plant is currently in. This wide hole allows you to backfill with loose, enriched soil, providing an easy path for the new roots to explore. Keeping the depth consistent ensures that the stem is not buried too deeply, which can lead to crown rot and other moisture-related issues.
Carefully remove the plant from its container, taking care not to pull on the stems or damage the sensitive root hairs. If the roots have become circled or “pot-bound,” you can gently loosen the outer layer to encourage them to grow outward into the new soil. Place the plant in the center of the hole and check that it is sitting at the correct height relative to the surrounding ground level. Taking this extra moment to ensure proper placement is a small step that makes a huge difference in the plant’s establishment phase.
Fill the space around the root ball with your prepared soil mix, firming it down gently with your hands to remove any large air pockets. You want the soil to be snug against the roots but not so compressed that it prevents water and air from moving freely. Once the hole is filled, create a small depression or “saucer” around the base of the plant to help direct water toward the root zone during irrigation. This simple grading technique ensures that every drop of water is used efficiently as the plant begins its transition.
Immediately after planting, give the specimen a thorough watering to settle the soil and provide the roots with much-needed hydration. Adding a layer of organic mulch around the base, keeping it a few inches away from the main stem, will help retain moisture and suppress weeds. During the first few weeks, monitor the plant closely for any signs of transplant shock, such as wilting or leaf drop. With consistent moisture and a bit of shade during the hottest parts of the day, most plants will settle in and show new growth within a month.
More articles on this topic
Propagation from stem cuttings
Creating new plants from stem cuttings is one of the most effective and rewarding ways to multiply your collection of flowering maples. The best time to take cuttings is during the late spring or early summer when the plant is in a state of active, vigorous growth. Look for healthy, non-flowering shoots that are firm but still flexible, often referred to as semi-hardwood cuttings. Using a sharp, sterilized blade, take a cutting that is about four to six inches long, making the cut just below a leaf node.
Prepare the cutting by removing the lower leaves, leaving only a few at the top to provide energy through photosynthesis. If the remaining leaves are particularly large, you can cut them in half to reduce moisture loss through transpiration while the cutting has no roots. Some gardeners find success using a rooting hormone to speed up the process, although this species often roots quite well on its own in the right conditions. The goal is to keep the cutting hydrated and stable until it can support itself with a new root system.
Insert the prepared cutting into a pot filled with a light, well-draining propagation mix, such as a combination of peat and perlite. Place the pot in a warm, bright location out of direct sunlight and consider covering it with a clear plastic bag or a dome to maintain high humidity. It is essential to keep the medium consistently moist but never soggy, as excess water will cause the base of the cutting to rot before roots can form. Within three to six weeks, you should notice resistance when gently tugging on the cutting, indicating that roots have begun to develop.
Once the new plant has established a healthy root system, it can be gradually transitioned to normal garden conditions. This process, known as hardening off, involves slowly increasing the plant’s exposure to lower humidity and direct light over the course of a week or two. Once it is robust enough, it can be repotted into a larger container or planted directly into a sheltered spot in the garden. Propagating your own plants not only saves money but also ensures you have a backup if the original specimen faces any challenges.
Alternative propagation and growing from seed
While stem cuttings are the most popular method, it is also possible to grow the garden flowering maple from seeds harvested from mature pods. This method is fascinating because the offspring may not be identical to the parent plant, leading to unexpected variations in flower color or leaf shape. Collect the seeds when the pods have turned brown and began to crack open, indicating that they are fully ripe and ready for dispersal. Sowing them in a sterile seed-starting mix under warm, bright conditions will usually result in germination within a couple of weeks.
Young seedlings are quite delicate and require careful management of light and moisture to prevent “damping off” or other fungal issues. As they grow their first set of true leaves, you can begin to provide a very dilute liquid fertilizer to support their development. It is important to move them into individual pots once they are large enough to handle, giving each seedling the space it needs to develop a strong root system. While it takes longer to reach flowering size compared to cuttings, growing from seed offers a unique sense of accomplishment.
Another less common but effective technique for propagation is air layering, which allows a new root system to form while the branch is still attached to the parent. This involves making a small wound on a healthy stem, applying rooting hormone, and wrapping the area in moist sphagnum moss and plastic. After several weeks, roots will fill the moss, at which point the branch can be cut away and potted up as an independent plant. This method is particularly useful for creating a larger specimen more quickly than you could with a traditional cutting.
Regardless of the propagation method you choose, the key to success is patience and attention to detail. Every new plant you create is an opportunity to learn more about the specific needs and behaviors of this beautiful species. Sharing these new plants with fellow gardeners is also a great way to spread the joy of gardening and ensure the variety remains popular in your community. With a little practice, you will find that the garden flowering maple is one of the most rewarding plants to multiply and grow from scratch.