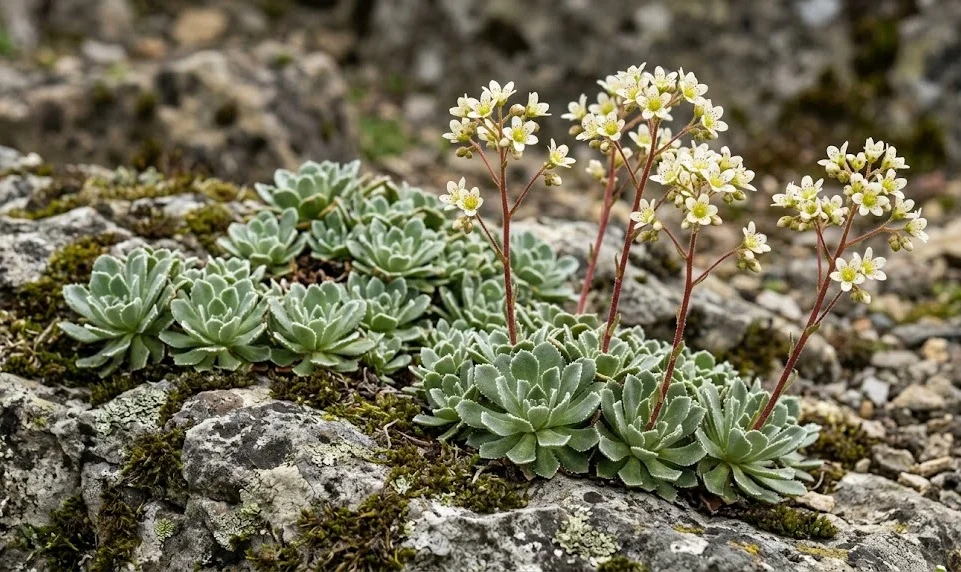
Establishing a successful colony of lifelong saxifrage begins with a precise planting technique that respects the plant’s alpine origins. These hardy perennials are best settled into their permanent homes during the early spring or autumn when the temperatures are mild and moisture is naturally available. Because they are adapted to growing in thin layers of soil between rocks, they require specific substrate preparation to thrive. A well-planted saxifrage can live for decades, slowly expanding its silver-edged rosettes across the garden landscape.
Choosing the perfect site is the first and most critical step in the planting process for any alpine enthusiast. These plants demand a location that mimics the cool, well-drained crevices of their native mountain ranges. A spot with morning sun and afternoon shade is often ideal, as it prevents the delicate foliage from drying out during the peak of summer. Avoid low-lying areas in the garden where water might collect, as this will inevitably lead to the death of the root system.
Before the plant ever touches the ground, the soil must be modified to ensure maximum aeration and mineral content. A standard garden soil is usually too heavy and nutrient-rich, which can cause the plant to grow too quickly and lose its compact form. Mixing in a significant amount of limestone grit or crushed stone creates the skeletal soil structure that these plants crave. This preparation ensures that the roots can penetrate deeply into the cool, moist gaps between the stones.
When placing the plant into its new home, it is important to set the crown slightly above the surrounding soil level. This elevated position prevents water from pooling around the base of the rosettes, which is the most common cause of rot. Gently firm the substrate around the roots to remove any large air pockets, but be careful not to crush the delicate rosettes themselves. Finishing the job with a thick layer of stone mulch provides the necessary protection and a professional look.
Master techniques for site selection and preparation
The microclimate of your rock garden will dictate the success of your lifelong saxifrage more than any other factor. Take the time to observe how the sun moves across your yard and where the wind tends to blow most strongly. Ideally, you want a spot that stays relatively cool during the day but remains protected from the harshest winter gusts. A north or east-facing slope often provides the best balance of light and temperature for these specific alpines.
More articles on this topic
The physical structure of the planting site should ideally incorporate large, stable rocks that can act as thermal sinks. These stones absorb heat during the day and release it slowly at night, helping to stabilize the temperature around the plant’s roots. Furthermore, planting in the narrow gaps between rocks provides the restricted root space that keeps the rosettes tight and healthy. If you are building a new rockery, plan these gaps specifically for your saxifrage collection.
Soil preparation should focus on a “lean and mean” philosophy that prioritizes minerals over organic matter. While a small amount of decomposed leaf mold can help retain a tiny bit of moisture, the bulk of the mix should be inorganic. Professionals often use a ratio of two parts grit to one part loam to achieve the perfect balance of drainage and support. Testing the pH of your soil is also recommended, as these plants will always perform better in slightly alkaline conditions.
In addition to the soil mix, consider the drainage capacity of the entire planting area, not just the hole itself. If the underlying garden soil is heavy clay, you may need to install a drainage layer of coarse gravel several inches below the surface. This “safety net” ensures that even during heavy spring rains, the water has a place to go without saturating the root zone. A professional approach to site preparation is the only way to guarantee the long-term health of these mountain dwellers.
Practical steps for successful planting and establishment
Once the site is prepared, carefully remove the saxifrage from its nursery pot and inspect the roots for health. If the roots are tightly bound, gently tease them out to encourage them to grow into the new substrate. It is better to do this carefully by hand rather than using tools that might tear the fine root hairs. Healthy roots should look firm and creamy-white, indicating that the plant is ready to establish itself in its new environment.
More articles on this topic
Position the plant so that the rosettes are sitting comfortably on top of the soil rather than being buried. Burying the foliage will trap moisture against the leaves and lead to immediate fungal issues. If you are planting in a vertical crevice, use small stones to wedge the root ball into place before filling the gaps with grit. This mimics the way the plant grows in the wild, hanging off cliff faces with its roots tucked deep into the cool stone.
After planting, give the colony a gentle watering to help settle the soil around the roots and eliminate any remaining air gaps. Use a watering can with a fine rose to avoid displacing the grit or damaging the tender leaves. This initial watering is crucial, but you must resist the urge to keep the soil constantly wet in the following days. Let the surface dry out between waterings to encourage the roots to grow deeper in search of moisture.
Monitoring the plant in the first few weeks after installation will help you determine if it is settling in well. Look for signs of new growth in the center of the rosettes, which is a clear indicator of successful establishment. If the leaves start to turn yellow or look exceptionally limp, check the drainage immediately to ensure the plant isn’t sitting in water. Patience is key during this phase, as alpines often take a full season to truly anchor themselves into the rockery.
Propagation methods using offsets and divisions
The most common and reliable way to propagate lifelong saxifrage is through the removal of individual offsets, or “pups.” These are the smaller rosettes that naturally form around the perimeter of the main mother plant as it matures. The best time for this procedure is in the early spring, just as the plant is waking up from its winter dormancy. Using a sharp, sterile knife or a pair of fine snips ensures a clean cut that heals quickly and minimizes stress.
When selecting an offset for propagation, look for one that has already started to develop its own tiny roots at the base. Gently detach the offset from the main clump, ensuring that you keep as much of its emerging root system intact as possible. If the offset has no roots, it can still be treated as a cutting and rooted in a very gritty, moist medium. These small pieces are incredibly resilient and will usually take hold if kept in a humid but well-ventilated environment.
Pot these new divisions into small containers filled with a specialized alpine mix consisting mostly of grit and sand. Keep them in a shaded spot away from direct sunlight for the first few weeks to allow the roots to strengthen. A cold frame is an excellent place for these young plants, as it provides protection while still exposing them to the natural temperature cycles. Once they show vigorous new growth, they can be moved into their permanent positions in the rock garden.
Dividing larger, older cushions is another way to rejuvenate a colony that has become too dense or started to die out in the center. Carefully lift the entire mat and pull it apart into smaller sections, making sure each piece has a healthy set of roots and foliage. This process not only provides you with more plants but also helps maintain the health and vigor of the original specimen. Regular division every few years keeps the saxifrage looking its best and prevents the buildup of old, woody material.
Growing from seed for genetic diversity
While propagation by offsets is faster, growing lifelong saxifrage from seed is a rewarding challenge for dedicated gardeners. Seeds should be collected from the dried flower heads in late summer and stored in a cool, dry place until winter. This species often requires a period of cold stratification, which mimics the natural winter conditions they would experience in the mountains. Sowing the seeds in late autumn and leaving them outdoors is a natural way to trigger the germination process.
Use a very fine, well-draining seed compost and sow the tiny seeds on the surface without covering them too deeply. They need light to germinate, so a very thin dusting of fine grit is all that is required to keep them in place. Place the seed trays in a protected outdoor area where they can experience the winter frost and snow. As the temperatures rise in the spring, the seeds will begin to sprout, appearing as tiny green dots on the surface of the grit.
The seedlings are very small and grow slowly at first, so they require careful attention to prevent them from drying out or being overwhelmed by moss. Once they have developed a few sets of true leaves, they can be pricked out into individual small pots. Use a toothpick or a small dibber to move them carefully, as their root systems are extremely delicate at this stage. It may take two or more years for a seedling to grow into a rosette large enough to be planted out in the garden.
Growing from seed allows for the possibility of discovering unique variations in leaf shape, color, or flower form within your own garden. It also helps build a more resilient population of plants that are perfectly adapted to your specific local climate and conditions. While it takes more time and patience than using offsets, the sense of accomplishment is much greater. For the true connoisseur, raising a colony of saxifrage from seed is the ultimate expression of horticultural skill.