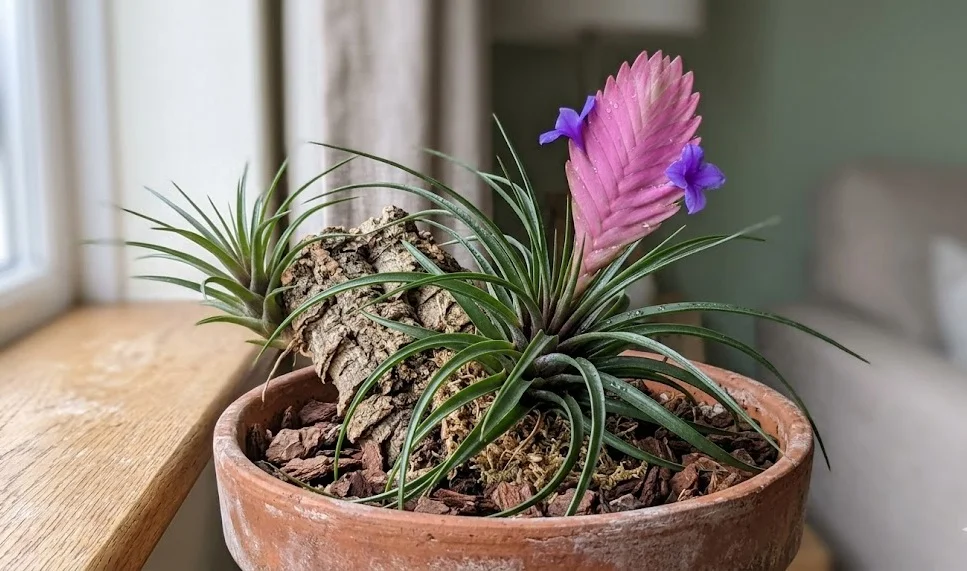
The journey of successfully cultivating this vibrant bromeliad begins with a deep understanding of its unique structural and biological requirements. Unlike many common houseplants that rely heavily on soil for stability and nutrients, this species is an epiphyte designed to live on other surfaces. This fundamental characteristic influences every decision you make, from the initial planting method to the specialized techniques used for propagation. Mastering these early stages ensures that your plant will develop the strength needed to produce its iconic pink bract.
When you first bring home a new specimen, the choice between mounting it on a surface or planting it in a pot is yours to make. Mounting the plant on a piece of cork bark or driftwood provides the most natural appearance and allows for excellent air circulation. This method requires securing the plant with fishing line or floral wire until its small roots can grab onto the texture of the wood. It creates a stunning visual piece that mimics how the plant would grow in the wild tropical forests.
If you prefer the convenience of a traditional container, selecting the right potting medium is the most important step in the process. Avoid standard garden soil at all costs, as its density will trap water and quickly rot the plant’s base. Instead, use a very loose and airy mix of orchid bark, perlite, and coarse charcoal to provide the necessary drainage. This combination allows oxygen to reach the roots while still holding onto just enough moisture to keep the plant hydrated between waterings.
The planting depth is another crucial factor that many beginners get wrong, often leading to crown rot and plant failure. The base of the leaves should sit right at the surface of the medium, never buried deep within the pot. If the plant feels unstable, you can use small stakes or stones to support it until the roots establish themselves. Over-burying the plant prevents the lower leaves from drying out and creates a breeding ground for harmful bacteria and fungi.
Propagation through seed collection
Propagating from seed is a task that requires a significant amount of patience and a very controlled environment for success. After the violet flowers have been pollinated, seed pods may form along the edges of the pink bract as it matures. These pods must be allowed to ripen fully on the plant until they split open to reveal the tiny, feathery seeds inside. Collecting these seeds is a delicate process, as they are very light and can be easily blown away by a stray breeze.
More articles on this topic
To sow the seeds, you need a shallow tray filled with a moist and sterile medium like finely chopped sphagnum moss. Scatter the seeds evenly across the surface, but do not cover them, as they require light to initiate the germination process. Place the tray in a warm, bright spot with high humidity, often achieved by covering it with a clear plastic dome. Consistent moisture is vital during this stage, so use a fine mister to keep the surface damp without displacing the seeds.
Germination can take anywhere from a few weeks to several months depending on the temperature and the freshness of the seeds. You will first notice tiny green specks appearing on the surface of the moss, which will slowly develop into miniature rosettes. During this time, it is essential to prevent any mold growth by providing occasional ventilation while maintaining high humidity. These seedlings are extremely fragile and should not be handled until they have developed several leaves and a visible base.
As the young plants grow, they will eventually need to be thinned out to provide more room for their individual leaf systems to expand. Transitioning them to their own small pots or mounting them on small pieces of wood is a delicate operation that should be done with care. It may take several years for a plant grown from seed to reach maturity and produce its first flowering bract. This slow process is a labor of love that rewards the dedicated gardener with a unique and rewarding experience.
Division of offsets and pups
The most common and efficient way to propagate this species is by dividing the offsets, which are commonly referred to as pups. These clones begin to grow at the base of the mother plant either during or immediately after the flowering cycle. They are already partially developed and often have their own small root systems, making them much more resilient than seedlings. This method allows you to quickly expand your collection with plants that are already adapted to your specific home environment.
More articles on this topic
Knowing exactly when to remove the pups is the key to ensuring their survival and long-term health as independent plants. As a general rule, wait until the offset is at least one-third the size of the parent plant before attempting to separate them. This ensures that the pup has enough stored energy and leaf surface area to support its own metabolic needs. If you remove them too early, they may struggle to grow or simply wither away due to a lack of resources.
To separate a pup, you should use a very sharp and sterilized knife to make a clean cut at the point where it joins the mother. Try to include some of the existing root structure if possible, though it is not strictly necessary for the pup’s survival. Once removed, let the cut surface dry for a day in a shaded spot to form a protective callus that prevents infection. This simple step significantly reduces the risk of rot when the young plant is finally placed in its own medium.
After the callus has formed, you can treat the pup like a mature plant, either mounting it or potting it in a suitable mix. Place it in a spot with high humidity and bright, filtered light to encourage rapid growth and root development. Avoid fertilizing the young plant for the first few weeks to allow it to focus on establishing itself in its new home. Within a few months, the pup will begin to grow vigorously and start its own journey toward producing a beautiful bloom.
Establishing new plants successfully
Once your new plant is in its pot or on its mount, the first few weeks are a critical period for adaptation. The plant is dealing with the stress of being moved and needs a very stable environment to recover and thrive. Keep the humidity consistently high and avoid any extreme changes in temperature or light intensity during this time. Regular misting with pure water will help the foliage stay hydrated while the roots begin to grip their new substrate.
Monitoring the color and texture of the leaves will give you immediate feedback on how the plant is adjusting to its new home. If the leaves appear limp or curled, the plant likely needs more humidity or more frequent misting to compensate for a lack of roots. If the base starts to turn dark or soft, it is a sign that the environment is too wet and the plant is at risk of rot. Being proactive in adjusting your care routine during this phase will save the plant from unnecessary suffering.
Root development in epiphytes is a slow process that requires patience and the right environmental cues to happen effectively. You can encourage root growth by keeping the base of the plant slightly moist but never saturated for long periods. Using a very diluted rooting hormone in your misting water may also provide a slight boost to the plant’s natural anchoring instincts. Once you see small, wire-like roots firmly grasping the wood or bark, you know the plant is well-established.
Long-term success with your newly planted or propagated bromeliad comes from consistency and a deep respect for its natural rhythms. These plants do not grow quickly, so do not be discouraged if you don’t see massive changes from week to week. Focus on providing the best possible atmosphere and the plant will eventually reward you with its stunning architectural form. Sharing your propagated plants with friends and fellow enthusiasts is a great way to spread the joy of this unique species.