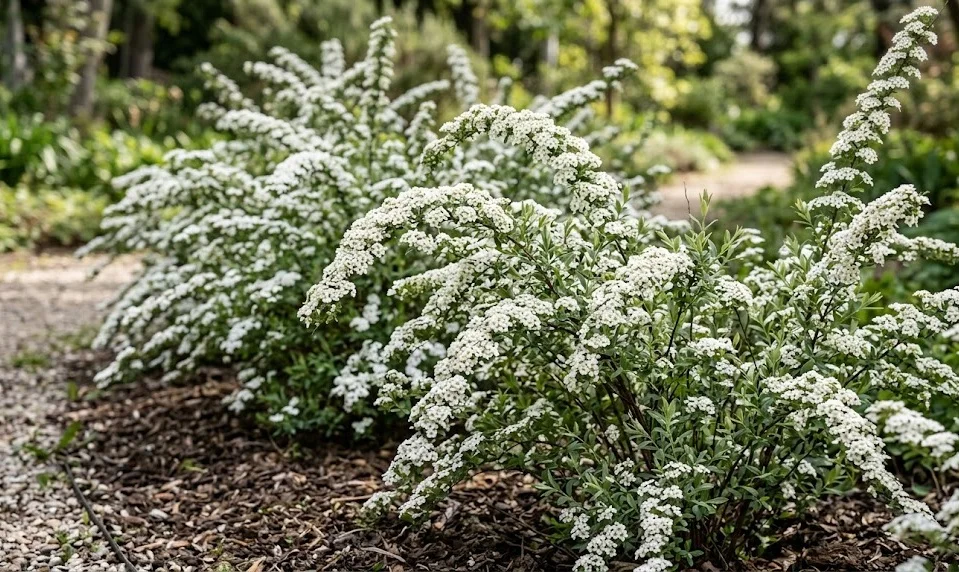
Establishing a new garland spirea in your garden begins with a precise planting technique that ensures quick root development. This species is remarkably resilient, yet the initial weeks after placement are critical for its long-term survival and growth rate. Selecting the right location and preparing the soil correctly will dictate how fast the shrub reaches its full flowering potential. Once you have a healthy plant, expanding your collection through various propagation methods becomes a rewarding and cost-effective endeavor.
Site selection
The first step in a successful planting project is identifying a location that meets the biological needs of the shrub. Garland spireas thrive best when they receive ample sunlight, which directly influences the density of their spring blossoms. While they can tolerate a bit of afternoon shade, a spot that is too dark will result in leggy growth and sparse flowering. Aim for a location that offers at least six hours of direct light for the best results.
Consider the drainage capabilities of the area before you start digging any holes for the new plants. These shrubs do not like having “wet feet,” meaning their roots should never sit in standing water for extended periods. If you notice water pooling in a certain spot after a heavy rain, that area is likely unsuitable without significant soil modification. Choosing a slightly elevated position or a gentle slope can naturally help with excess water runoff.
Air circulation is an often overlooked factor when choosing a site for your new garden addition. Planting too close to a solid fence or in a tight corner can create pockets of stagnant air where humidity builds up. This environment is perfect for the development of powdery mildew, which can dull the appearance of the leaves. Ensuring there is enough space around the plant for breezes to pass through will keep the foliage dry and healthy.
Finally, think about the ultimate size of the shrub and how it will interact with its surroundings in five years. It is a common mistake to plant them too close to paths or other structures because they look small in their nursery pots. Allow enough room for the branches to arch naturally without needing constant trimming to keep them out of the way. Proper spacing from the start prevents a lot of maintenance headaches down the road.
More articles on this topic
Planting techniques
Once the site is chosen, you should dig a hole that is twice as wide as the root ball but no deeper. This extra width allows the young roots to easily penetrate the surrounding soil as they begin to expand. If the soil is particularly compacted, use a garden fork to loosen the sides of the hole to prevent a “pot-bound” effect. Placing the plant at the correct depth is perhaps the most important detail to get right.
Carefully remove the shrub from its container and inspect the roots for any circling growth that might girdle the plant later. Gently tease the outer roots apart with your fingers to encourage them to grow outward into the new soil. Place the plant in the center of the hole, ensuring that the top of the root ball is level with or slightly above the surrounding ground. Burying the stem too deeply can lead to rot and eventual death of the entire shrub.
Fill the hole halfway with a mixture of native soil and a small amount of organic compost to provide initial nutrients. Water this mixture well to help the soil settle and remove any large air pockets around the roots. Once the water has drained, finish filling the hole and gently firm the soil down with your hands. Avoid stomping on the soil with your feet, as this can compress the earth too much and damage delicate new roots.
Immediately after planting, apply a thick layer of mulch around the base of the shrub to conserve moisture. This mulch also helps regulate soil temperature, protecting the young plant from the shock of rapid weather changes. Water the new planting thoroughly once more to ensure the root zone is completely saturated. For the first few months, you will need to monitor the soil moisture daily to help the plant establish itself.
More articles on this topic
Propagation by cuttings
Taking softwood cuttings is one of the most effective ways to create new garland spireas that are identical to the parent. This process is best done in late spring or early summer when the plant is actively growing and the stems are still flexible. Choose healthy, non-flowering shoots that are about four to six inches long for the best chance of success. Using a sharp, clean knife or shears will ensure the parent plant and the cutting are not unnecessarily damaged.
Remove the leaves from the bottom half of the cutting to expose the nodes where roots will eventually form. Dipping the cut end into a rooting hormone powder can significantly increase the speed and reliability of root development. Insert the cuttings into a pot filled with a well-draining medium, such as a mix of peat and perlite. Make sure to space them so that their leaves do not touch, as this helps prevent the spread of rot.
Maintaining a humid environment is crucial while the cuttings are trying to form their own root systems. You can cover the pot with a clear plastic bag or place it in a specialized propagation tray with a dome. Keep the container in a bright spot but away from direct, scorching sunlight which would overheat the delicate stems. Mist the cuttings regularly to keep the humidity high and the soil consistently moist but not soggy.
After several weeks, you can check for roots by giving the cuttings a very gentle tug to see if there is resistance. Once a strong root system has formed, the young plants can be moved into individual pots with regular potting soil. Gradually acclimate them to outdoor conditions before eventually planting them in their permanent spots in the garden. This method allows you to produce dozens of new plants from a single established shrub.
Propagation by layering
Layering is a more passive but highly reliable method of propagation that takes advantage of the shrub’s natural growth habit. Because the garland spirea has long, arching branches, it is very easy to pin one down to the earth. This method is best started in the spring when the sap is flowing vigorously through the stems. It allows the new plant to remain attached to the mother plant while it develops its own roots.
Choose a flexible, healthy branch that can easily reach the ground without breaking or being under too much tension. Clear a small area of soil where the branch will make contact and dig a shallow trench a few inches deep. You can slightly wound the underside of the stem where it will be buried to stimulate the production of root cells. This simple action often speeds up the entire process by several weeks or even months.
Secure the branch into the soil using a U-shaped landscape pin or a heavy stone to keep it in constant contact with the earth. Cover the middle section of the branch with soil, leaving the tip of the branch exposed and pointing upwards. Keeping this buried section moist is essential, so you may need to water it specifically during dry spells. Over time, roots will begin to grow from the wounded area and into the surrounding soil.
By the following spring, the layered section should have developed a root system strong enough to support itself. You can test this by trying to lift the buried section or simply waiting until you see vigorous new growth from the tip. Once the roots are established, cut the connection to the parent plant and carefully dig up the new shrub. Transplant it immediately to its new home or a container for further development.