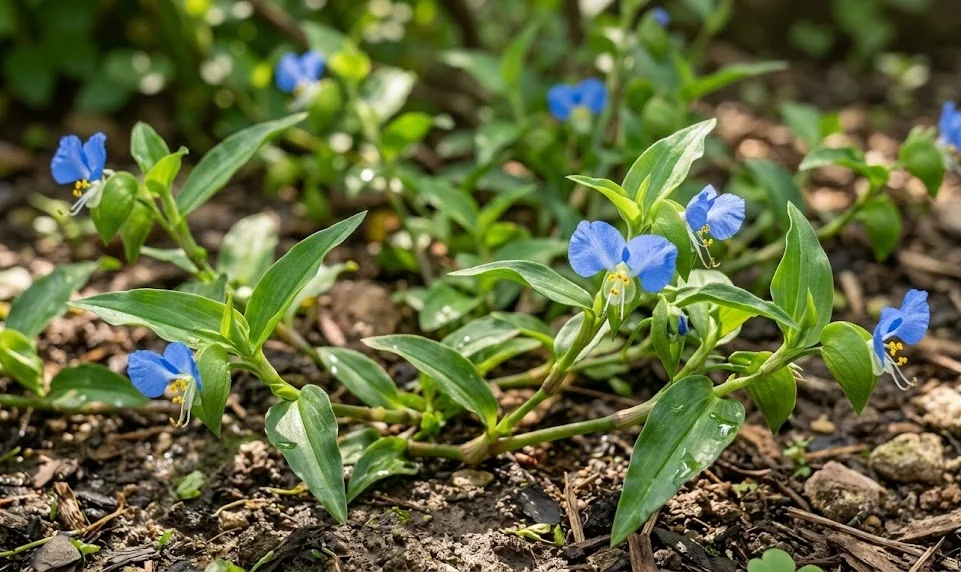
Planting and propagating the asiatic dayflower is a rewarding endeavor for any gardener who appreciates a splash of deep blue in their landscape. This species is famous for its ease of growth and its ability to adapt to a wide range of garden conditions with minimal fuss. To start your journey, you must first understand the best methods for introducing this plant to your outdoor space. Whether you are starting from scratch or expanding an existing collection, the right techniques will ensure a successful and vibrant establishment.
Selecting and preparing the perfect site
The first step in a successful planting project is identifying a location that meets the fundamental needs of the species. You should look for a spot that receives plenty of morning sunlight but offers some protection from the harsh rays of the mid-afternoon sun. While the plant can tolerate a variety of light levels, a balanced exposure ensures the most prolific flowering and healthiest foliage. Spend a few days observing the light patterns in your garden before you commit to a specific planting area.
Once the site is chosen, you must turn your attention to the condition of the soil to give your plants the best possible start. This species prefers a soil that is loose, fertile, and rich in organic matter to support its rapid growth habit. You should clear the area of any existing weeds or grass and dig in a generous amount of well-composted material to a depth of about six inches. Breaking up any large clumps of soil will make it easier for the young roots to spread out and establish themselves quickly.
Drainage is a vital component of site preparation that you should never ignore if you want to avoid future health problems. If your chosen area tends to hold water after a rainstorm, you might need to create a slightly raised bed to improve the runoff. Mixing in some coarse organic material can also help keep the soil structure open and prevent compaction over time. A well-prepared site acts as a solid foundation for the entire life of the plant in your garden.
Finally, consider the spatial layout of your planting area to account for the plant’s natural tendency to spread. You should leave enough room between individual plants so they don’t immediately crowd each other out as they begin to grow. A distance of about twelve to eighteen inches is usually sufficient to allow for healthy air circulation while still achieving a full look. Planning the spacing ahead of time prevents the need for thinning or transplanting later in the season.
More articles on this topic
Sowing seeds for a new generation
Starting your dayflowers from seed is a cost-effective and satisfying way to fill large areas of your garden with color. You should ideally sow the seeds in the early spring once the danger of heavy frost has passed and the soil has begun to warm up. The seeds are relatively large and easy to handle, which makes the planting process quite straightforward even for beginners. Simply press them into the surface of the prepared soil and cover them with a very thin layer of fine earth or compost.
Consistency in moisture is the most important factor during the germination phase of the planting process. You should use a fine mist to water the area regularly, ensuring that the top layer of soil never completely dries out. Depending on the soil temperature, you can expect to see the first green shoots appearing within two to three weeks of sowing. Once the seedlings have developed their first set of true leaves, they become much more resilient to minor environmental fluctuations.
If you prefer to get a head start on the season, you can also sow the seeds indoors in biodegradable pots about six weeks before the last frost. This allows you to control the environment more precisely and results in larger plants that are ready to go into the ground as soon as the weather permits. Be sure to provide plenty of light to the indoor seedlings to prevent them from becoming leggy or weak. Hardening them off gradually before transplanting will ensure a smooth transition to the outdoor garden.
Managing the young plants as they grow requires a watchful eye to ensure they aren’t being overwhelmed by faster-growing weeds. You should hand-pull any competing vegetation that appears near your dayflower seedlings to give them full access to nutrients and light. As the plants grow taller and start to spread, they will eventually create their own shade and suppress many of the weeds themselves. This early-stage care is the secret to creating a professional-looking and healthy garden bed.
More articles on this topic
Masterful propagation through stem cuttings
One of the easiest ways to multiply your dayflower collection is through the use of stem cuttings, which root with incredible speed. You can take cuttings at almost any time during the active growing season, provided the parent plant is healthy and vigorous. Look for strong, green stems and cut a section that is about four to six inches long, making the cut just below a node. The nodes are the points where the leaves join the stem, and they contain the cells necessary for new root growth.
To prepare the cuttings for planting, you should strip the leaves from the bottom two inches of the stem to prevent them from rotting in the soil. You can either place the cuttings directly into a pot of moist potting mix or stick them into a glass of water until roots begin to form. If you choose the water method, you will be able to see the tiny white roots appearing within just a few days. Once the roots are about an inch long, the cuttings are ready to be moved into their permanent home in the garden.
Directly sticking cuttings into the garden soil is also a viable option if you keep the area consistently moist for the first week or two. You should choose a cloudy day or late afternoon to do this to minimize the initial transplant shock on the delicate stems. Firm the soil gently around the base of the cutting to ensure good contact between the node and the moist earth. This method allows you to quickly expand your ground cover without the need for extra pots or indoor space.
The beauty of this propagation method is that it produces an exact genetic clone of the parent plant, ensuring consistent flower color and growth habits. You can use this technique to fill in any bare spots that develop in your garden beds or to share the plant with friends and neighbors. Because the dayflower is so eager to grow, you will find that your success rate with cuttings is remarkably high. It is a simple and effective way to exercise your skills as a professional gardener.
Transplanting and early establishment care
Moving established plants or nursery-bought specimens into your garden requires a gentle touch and careful timing to ensure success. You should aim to transplant during the cooler parts of the day or when the sky is overcast to reduce moisture loss from the leaves. Dig a hole that is slightly larger than the root ball of the plant and place it at the same depth it was growing in its previous container. This prevents the stem from being buried too deeply, which can lead to crown rot issues.
After placing the plant in the hole, you should backfill with the amended soil and press down firmly with your hands to remove any large air pockets. Watering the plant immediately after transplanting is crucial to help settle the soil around the roots and provide instant hydration. You should continue to water the new transplants every day for the first week, especially if the weather is warm or dry. This intensive initial care helps the plant overcome the stress of moving and encourages it to start new growth.
Applying a layer of organic mulch around the base of the new transplants can significantly improve their chances of a quick recovery. Mulch helps to keep the soil moist and cool, which is exactly what the young roots need as they begin to explore their new environment. You should be careful not to pile the mulch directly against the stems of the plant to maintain good air circulation at the base. This small detail can make a big difference in the overall health and longevity of your planting.
As the plants become established, you will notice them starting to produce new leaves and eventually their first blue flowers. This is a clear signal that the root system is functioning well and the plant has successfully adapted to its new home. You can then begin to transition to a more standard care routine, reducing the frequency of watering as the plant becomes more self-sufficient. Successfully planting and propagating this species is the first step toward a lush, professional-quality garden display.