Planting coral bells well from the start is the foundation of healthy foliage, strong crowns, and reliable flowering. These perennials are forgiving in many garden situations, but they respond clearly to careful soil preparation and correct planting depth. Propagation is also straightforward when timed properly and carried out with clean, healthy material. With thoughtful handling, one mature plant can become several vigorous new specimens for borders, containers, and shaded planting schemes.
Preparing the planting site
The planting area should be loosened thoroughly before coral bells are placed in the ground. Their root system is relatively shallow, so the upper soil layer must be open, fertile, and well aerated. Compost or leaf mold improves both moisture retention and biological activity. In heavy soil, extra drainage material can prevent winter wetness around the crown.
Before planting, remove perennial weeds from the site rather than simply covering them. Weeds compete strongly with young coral bells because both occupy the same upper soil zone. Deep-rooted weeds should be removed carefully so they do not regrow through the crown. A clean planting bed also makes later maintenance much easier.
Spacing depends on the mature size of the chosen variety. Compact cultivars can be planted closer together, while larger selections need more room for air circulation. Crowding may look full in the first season, but it often creates disease pressure later. A moderate spacing allows each plant to form a natural mound.
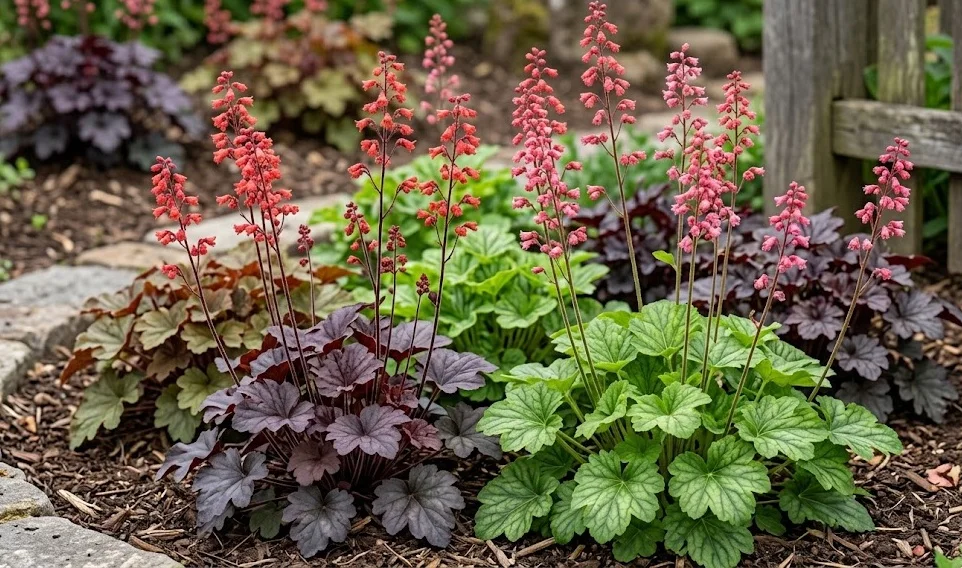
When planting several coral bells together, consider foliage color before making the final arrangement. Dark varieties can visually recede in deep shade, while bright varieties can become focal points. Repeating the same color in groups gives a calmer and more professional effect. Good placement turns planting into design rather than simple installation.
More articles on this topic
Correct planting technique
Water the plant well before removing it from its pot. A hydrated root ball handles transplanting better and is less likely to crumble. If the roots are circling tightly, tease them apart gently with fingers. This encourages them to grow outward into the surrounding soil.
The planting hole should be slightly wider than the root ball but not excessively deep. Coral bells must be set so the crown remains level with the surrounding soil surface. Planting too deeply can trap moisture around the crown and lead to rot. Planting too shallowly exposes roots and weakens establishment.
After placing the plant, backfill with improved soil and firm it gently. The aim is to remove large air pockets without compacting the soil heavily. Water thoroughly after planting to settle the soil around the roots. If the soil sinks afterward, add a little more around the root zone while keeping the crown clear.
A thin mulch can be applied once the plant is watered in. Mulch reduces evaporation and moderates temperature swings near the roots. It should be kept away from direct contact with the crown. This small detail is especially important in damp climates and during winter.
More articles on this topic
Propagating by division
Division is the most reliable propagation method for coral bells. It preserves the characteristics of the parent plant, including leaf color, shape, and growth habit. Seed-grown plants can vary widely, so division is preferred for named varieties. It is also a practical way to rejuvenate older clumps.
The best time to divide coral bells is usually spring, when new growth begins. Early autumn can also be suitable in mild regions with reliable moisture. Avoid division during hot, dry weather because root recovery is slower. Plants divided under stress may lose leaves or establish poorly.
Lift the entire clump carefully with a fork or spade. Shake or wash away enough soil to see the crown structure clearly. Separate healthy outer sections that have roots and several growing points. Discard weak, rotten, or excessively woody central pieces.
Replant divisions immediately whenever possible. The roots should not be left exposed to wind or sun. Water the new plants deeply and keep the soil evenly moist while they recover. Light shade for the first weeks can reduce stress and help the foliage remain firm.
Establishing new plants after propagation
Newly divided coral bells need consistent care during the first growing season. They should be watered before the soil becomes completely dry. However, constant saturation should be avoided because small root systems are vulnerable to rot. Balanced moisture encourages quick root regeneration.
Feeding should be gentle after division. A compost-enriched soil is usually enough at first. Strong fertilizer can push soft leaf growth before the roots are ready to support it. Once the plant shows steady new growth, a light organic feed may be applied if needed.
Some older leaves may wilt or decline after division, and this is normal. Removing damaged foliage helps reduce water loss and keeps the plant tidy. New leaves from the crown are a better sign of recovery than the condition of old leaves. Patience is important because the plant is rebuilding below the soil first.
By the following season, well-established divisions often look like independent mature plants. They can be used to repeat color through a border or refresh container displays. Propagation also gives the gardener a reserve of plants in case older crowns weaken. With regular division, coral bells remain both decorative and sustainable in long-term planting designs.

