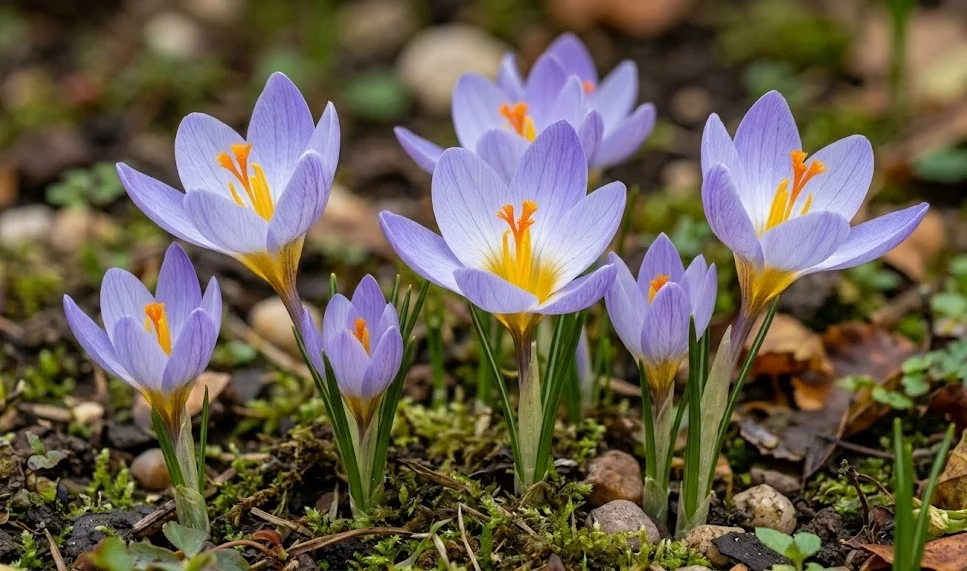
Planting beautiful crocus successfully depends on timing, drainage, and a light touch with the corms. This autumn-flowering species rewards careful placement with elegant blooms when the garden is entering a quieter season. It is not difficult to grow, but it dislikes heavy, wet, and frequently disturbed soil. Propagation is also straightforward when the plant is allowed to form healthy offsets over time.
Selecting strong corms for planting
Choose firm, healthy corms that feel heavy for their size. They should be dry on the outside but not shrivelled or soft. Avoid corms with mould, wounds, dark sunken patches, or a sour smell. Such defects often indicate storage problems or early rot.
Large corms usually flower more reliably in the first season. Smaller corms can still be useful, but they may need a year or two to build strength. When buying, select stock from reputable suppliers who handle autumn-flowering bulbs correctly. Freshness is especially important because dried-out corms establish slowly.
The tunic, or outer covering, may look papery and irregular. This is normal and does not need to be peeled away. Removing protective layers can expose the corm to damage and disease. Only loose debris should be brushed off gently before planting.
Planting should take place before the main autumn flowering period whenever possible. Late summer to early autumn is often ideal, depending on climate and supplier availability. The corms should be planted soon after purchase. Long storage in warm indoor conditions can reduce vigour.
More articles on this topic
Preparing the planting area
The planting site should be cleared deeply and carefully before the corms go in. Remove couch grass, bindweed, and other persistent weeds by hand where possible. These weeds are difficult to control later without disturbing the corms. A clean start gives the planting a much better future.
Loosen the soil to improve root penetration, but avoid creating a rich, soft pocket that holds water. In heavy soils, add grit or fine gravel throughout the planting zone. Surface improvement alone is not enough if water collects below the corms. The root zone must drain freely.
A raised position is useful in gardens with wet winters or compacted subsoil. Even a slight mound can help water move away from the corms. Rock gardens and gravel borders are especially suitable because they imitate open, stony habitats. The plant appreciates firmness, but not hard compaction.
If planting among perennials, choose companions with compatible growth habits. Summer plants should not demand constant irrigation above the dormant corms. They should also leave enough open space for autumn flowers to be visible. Low, fine-textured plants make better neighbours than vigorous groundcovers.
More articles on this topic
Planting depth and spacing
Plant beautiful crocus at a moderate depth, usually around two to three times the height of the corm. In light sandy soil, slightly deeper planting can protect the corms from drying and temperature swings. In heavier soil, shallower planting is safer because it reduces the risk of rot. The corms should be covered firmly but not buried under compacted layers.
Spacing depends on the effect desired. For a natural drift, plant corms several centimetres apart in loose groups rather than straight lines. Groups of five, seven, or more look more convincing than isolated single plants. Over time, the clumps can thicken if they are left undisturbed.
Place each corm with the pointed or shoot end upward if it is visible. If the shape is unclear, plant it on its side rather than forcing a direction. Healthy shoots usually find their way to the surface. Gentle handling is more important than perfect orientation.
After planting, water lightly to settle the soil around the corms. Do not soak the bed unless conditions are extremely dry. The aim is good contact between soil and corm, not saturation. Once autumn rain arrives, the plant usually needs little help.
Propagation by offsets and division
The easiest way to propagate beautiful crocus is by separating offsets from established clumps. Offsets are small new corms that form beside the original corm. They gradually increase the size of the colony. This method preserves the characteristics of the parent plant.
Division is best done during dormancy, after the leaves have yellowed and disappeared. Lift the clump carefully with a fork, starting well away from the centre. Shake off loose soil and separate the corms by hand. Discard any that are soft, damaged, or diseased.
Small offsets should be replanted at suitable depth in a nursery area or directly into their final position. They may not flower immediately, but they will develop with patient care. Keep the soil free-draining and lightly moist during active growth. Strong foliage is the sign that young corms are building reserves.
Seed propagation is possible but slower and less predictable. Fresh seed should be sown in a free-draining mix and exposed to natural seasonal temperature changes. Seedlings may take several years to reach flowering size. For most garden purposes, division is faster, simpler, and more reliable.