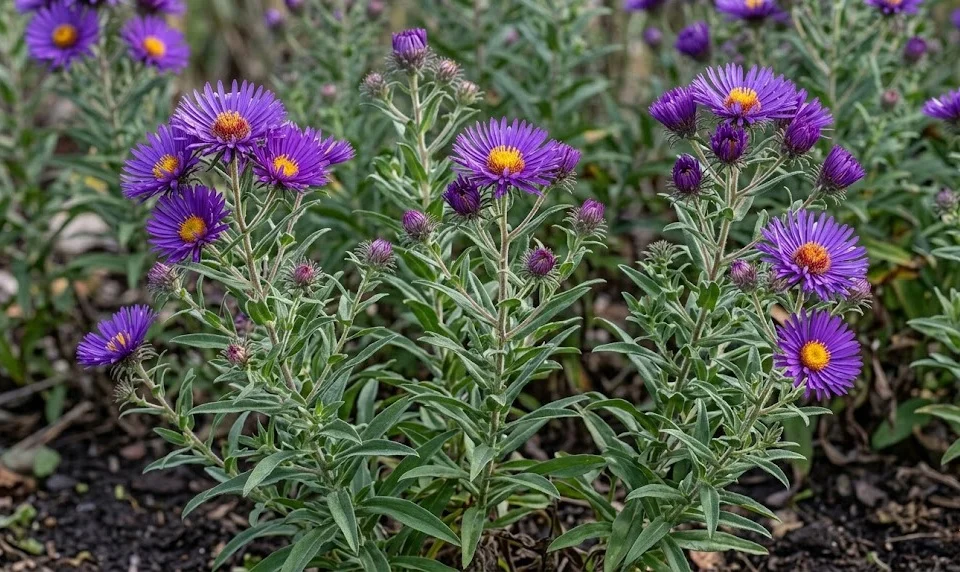
Successfully establishing a New England aster in your landscape requires a thoughtful approach to both timing and location. These perennials are known for their hardy nature, but giving them the right start is essential for long-term vigor and prolific blooming. When you understand the specific environmental preferences of this species, you can ensure a smooth transition from the nursery to your garden bed. This guide will walk you through the essential steps of planting and the various methods available for expanding your collection through propagation.
Site selection and timing for success
The first step in planting a New England aster is identifying a location that meets its basic physiological needs for light and soil. You should look for a spot that receives at least six to eight hours of direct sunlight each day to ensure strong stems and abundant flowers. While they can tolerate some light afternoon shade, too much shade often leads to leggy growth and increased susceptibility to mildew. A sunny, open site with good air movement is the ideal environment for this meadow-dwelling species.
Timing is just as critical as location when it comes to getting your new plants into the ground. The best time to plant is typically in the early spring, just as the new growth begins to emerge from the soil. This allows the plant to establish a deep root system before the stress of the summer heat arrives. If you miss the spring window, late summer or early fall is another viable option, provided you give the plants enough time to root before the ground freezes.
Soil preparation should be done well in advance of the actual planting day to create an inviting environment for the roots. You should incorporate organic matter, such as compost or aged manure, into the soil to improve its structure and nutrient content. These asters prefer a soil that stays moist but does not become waterlogged, so ensuring good drainage is paramount. If you have heavy clay soil, adding some coarse sand or organic grit can help improve the internal drainage.
Consider the ultimate size of the plant when choosing its permanent home in your garden. Since many New England asters can reach a width of three feet or more, you must provide enough space for them to expand without crowding their neighbors. Proper spacing not only looks better but also prevents the stagnant air conditions that favor fungal diseases. Planning for the future size of the plant prevents the need for stressful transplanting just a few years down the line.
More articles on this topic
The planting process and initial care
Once you have prepared the site and selected your plants, the actual process of putting them in the ground is straightforward. You should dig a hole that is twice as wide as the root ball and exactly the same depth as the container it came in. Placing the plant too deep can lead to crown rot, while planting it too shallow can cause the roots to dry out. Gently loosen any circling roots before placing the plant in the hole to encourage them to grow outward into the surrounding soil.
After placing the plant in the hole, you should backfill with the amended soil, firming it gently with your hands to remove any large air pockets. You should avoid tamping the soil down too hard with your feet, as this can compress the soil and make it difficult for new roots to penetrate. Once the hole is filled, create a small basin of soil around the base of the plant to help hold water. This simple step ensures that moisture goes directly to the root zone where it is needed most.
Immediate and thorough watering is the most important part of the post-planting care routine. You should saturate the soil around the new plant to ensure that it settles and makes good contact with the root ball. Continue to monitor the moisture levels daily for the first few weeks, especially if the weather is warm and dry. A layer of organic mulch, such as wood chips or shredded straw, can help retain this moisture and suppress competing weeds.
In the first few months after planting, you should avoid the temptation to apply heavy amounts of synthetic fertilizer. The plant needs to focus its energy on building a strong root system rather than pushing out excessive top growth. A light application of a balanced, slow-release organic fertilizer is usually sufficient if the soil was properly amended before planting. Watching for signs of transplant shock, such as wilting or leaf drop, will help you intervene quickly if the plant needs extra attention.
More articles on this topic
Division and revitalization of established clumps
Propagating New England asters through division is one of the most effective ways to maintain the health of your plants while gaining new ones. As these perennials age, the center of the clump often becomes woody and less productive, leading to fewer flowers and a messy appearance. You should plan to divide your asters every three to four years to keep them vigorous and youthful. This process is best performed in the early spring when the new shoots are only a few inches tall.
To begin the division process, you should carefully dig around the entire perimeter of the plant with a sharp spade. Lift the whole clump out of the ground, taking care to preserve as much of the root system as possible. Once the plant is out of the ground, you can use a sharp knife or the edge of your spade to cut the root mass into smaller sections. Each new division should have at least three to five healthy shoots and a substantial amount of attached roots.
Discard the old, woody center of the original plant and focus your efforts on the vigorous outer sections. These younger portions of the plant have the most potential for growth and will establish themselves quickly in their new locations. You should replant these divisions as soon as possible to prevent the delicate root hairs from drying out in the air. Treat the new divisions just as you would a newly purchased plant, focusing on proper depth and consistent watering.
Sharing divisions with friends and neighbors is a wonderful way to spread the beauty of this plant throughout your community. Because New England asters are so prolific, you will often find yourself with more plants than you have room for in your own garden. This form of propagation is not only practical but also reinforces the social connections that make gardening such a rewarding hobby. A well-divided garden is a healthy garden that continues to thrive year after year.
Propagation from seeds and softwood cuttings
While division is the most common method, growing New England asters from seeds can be a fascinating and rewarding experience for patient gardeners. You should collect the seeds in the late fall once the flower heads have dried and turned fuzzy. These seeds require a period of cold stratification to break their dormancy and germinate successfully. You can either sow them directly in the garden in the fall or store them in the refrigerator for several months before starting them indoors.
If you choose to start seeds indoors, use a well-draining seed-starting mix and barely cover the seeds with a thin layer of soil. They need some light to germinate, so placing them under a grow light or in a very bright window is essential. Keep the soil consistently moist but not soggy, and you should see sprouts within two to three weeks. Once the seedlings have several sets of true leaves, you can begin the process of hardening them off before transplanting them into the garden.
Softwood cuttings are another alternative for propagating specific cultivars that may not come true from seed. You should take these cuttings in late spring or early summer from the non-flowering tips of healthy, vigorous stems. Make a clean cut just below a leaf node and remove the lower leaves to expose the stem. Dipping the end of the cutting in a rooting hormone can help speed up the process, though it is not always strictly necessary for this species.
Insert the cuttings into a pot filled with a moist, sterile medium like perlite or a mix of peat and sand. You should cover the pot with a clear plastic bag to create a humid environment that prevents the cuttings from wilting. Place the pot in a bright spot out of direct sunlight and check for root development after a few weeks. Once the cuttings have established a good root system, they can be potted up or moved directly into the garden beds.