Successful establishment of this majestic ornamental grass begins with a well-considered planting strategy that accounts for both soil conditions and future growth. You must select a location that offers ample space for the mature width of the plant, which can be surprisingly large after a few seasons. Proper timing is equally important, as the root system needs a window of moderate weather to anchor itself before the extremes of summer or winter. By starting with a strong foundation, you ensure that your garden addition thrives and becomes a focal point of the landscape.
Selecting the perfect location
The first step in planting is finding a spot that meets the specific physiological needs of the grass while fitting your design goals. You should look for an area that receives a high amount of daily sunlight to encourage the best plume development and foliage color. Avoid planting in low-lying areas where water tends to collect, as this can lead to root issues during the rainy seasons. A site with good air circulation is also beneficial for preventing the buildup of humidity within the dense foliage.
Consider the ultimate height and spread of the variety you have chosen before you start digging the hole. You should place the plant far enough away from walkways and buildings so that its arching stems do not become an obstacle. Many gardeners make the mistake of planting too close together, only to find they have a crowded and messy appearance within three years. Giving each plant its own defined space allows its natural silhouette to shine and makes future maintenance much easier for you.
Soil quality at the chosen site should be assessed to determine if any amendments are necessary before the plant goes into the ground. You should aim for a loamy soil that provides a good balance between moisture retention and drainage for the root system. If your soil is particularly sandy or heavy clay, incorporating some organic compost can significantly improve the environment for the new grass. Taking the time to prepare the earth correctly will pay dividends in the form of faster establishment and more vigorous growth.
Think about the visual impact the grass will have as it transitions through the different phases of the year in that specific location. You should consider what the plant will look like in the winter when only its dried skeleton and plumes remain standing in the garden. Placing it where it can be seen from a window or as a backdrop for shorter perennials creates a dynamic and interesting landscape. A well-placed ornamental grass acts as a living sculpture that provides movement and texture to your outdoor living space.
More articles on this topic
The step-by-step planting guide
Once you have selected the site and prepared the soil, the actual planting process should be done with care and precision. You should dig a hole that is at least twice as wide as the root ball but no deeper than the container the plant came in. This extra width allows the roots to spread out easily into the loosened soil, which speeds up the establishment process significantly. Keeping the depth consistent ensures that the crown of the plant is not buried, which could lead to rot.
Carefully remove the grass from its pot and check the roots for any signs of being “root-bound” or circling the bottom. You should gently tease the outer roots outward if they have started to grow in a tight circle to encourage them to explore the new soil. This simple step is crucial for ensuring that the plant develops a stable and expansive root system in its new home. Avoid pulling on the stems themselves, as this can damage the delicate connection between the foliage and the root crown.
Place the plant in the center of the hole and begin backfilling with a mixture of the native soil and a small amount of compost. You should firm the soil gently with your hands as you go to eliminate any large air pockets that could dry out the roots. Avoid stomping on the soil with your feet, as excessive compaction can make it difficult for water and oxygen to penetrate the root zone. Ensuring a snug but breathable fit for the roots is the goal during this stage of the process.
After the hole is filled, you should water the area thoroughly to help settle the soil and provide immediate hydration to the roots. This initial watering is the most important one the plant will ever receive, as it bridges the gap between the nursery environment and your garden. You might see the soil settle slightly after watering, in which case you can add a little more soil to bring it back to the level of the surrounding ground. Finish by applying a light layer of mulch to protect the area and retain the moisture you just provided.
More articles on this topic
Dividing mature specimens
Propagation through division is the most effective and common way to increase your collection of ornamental grasses without spending money. You should plan to divide your plants every three to five years, or whenever you notice the center of the clump becoming thin. This process rejuvenates the original plant by giving it fresh space to grow while providing you with new specimens for other areas. Early spring is the ideal time for this task, just as the new green shoots are beginning to emerge from the ground.
To begin the division, you should use a sharp spade to cut a circle around the perimeter of the clump, about six inches from the stems. Carefully pry the entire root ball out of the ground, which may require some significant physical effort depending on the size of the plant. Once the clump is out of the earth, you can use a saw or a heavy-duty knife to slice it into smaller sections. Each new piece should have a healthy portion of roots and several active growing points or “eyes” at the top.
When you have your new divisions ready, you should treat them just like a new plant purchased from a nursery. Keep the roots moist while you are preparing the new planting sites so they do not dry out in the sun and wind. You should plant them as soon as possible to minimize the stress of being out of the ground and to encourage quick re-rooting. This method ensures that the new plants are genetically identical to the parent, maintaining the specific characteristics of your favorite variety.
The success rate for divisions is very high if you perform the task during the cool, moist days of early spring. You should notice the new sections starting to grow within just a few weeks of being replanted in their new locations. While they may not reach their full height in the first year, they will quickly catch up and become substantial plants by the second season. Division is a rewarding way to share your favorite plants with friends and neighbors who admire your beautiful garden landscape.
Rooting and establishment phase
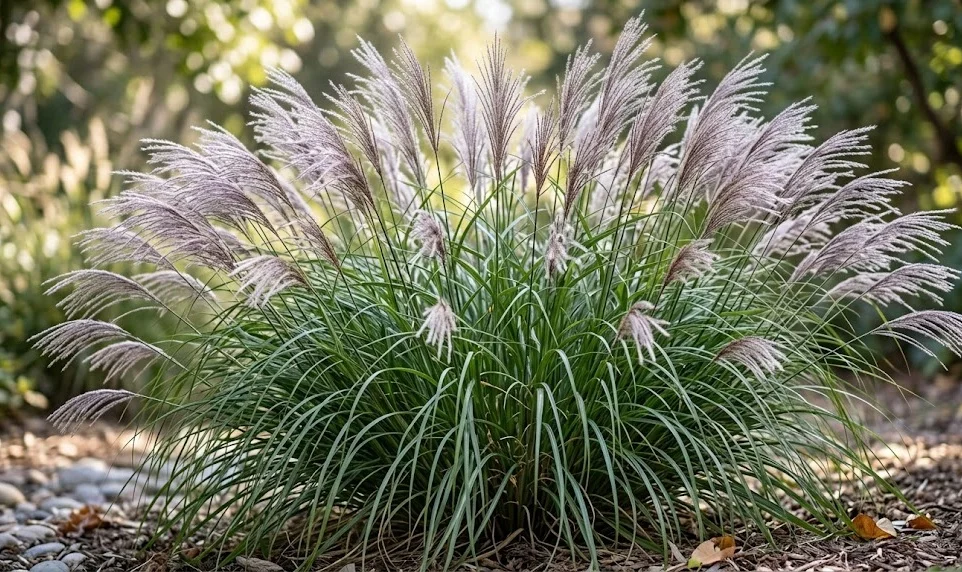
The first few months after planting or dividing are critical for the long-term success of your japanese silver grass. You should monitor the moisture levels in the soil daily, especially if the weather is unseasonably warm or windy during the spring. The new roots are not yet deep enough to access moisture from the lower layers of the soil, so they rely entirely on your watering efforts. A consistent supply of water helps the plant overcome the shock of transplanting and focus on building its underground infrastructure.
During this establishment phase, you should avoid using heavy fertilizers that might encourage too much top growth at the expense of root development. The plant needs to build a solid foundation first before it can support the massive amount of foliage it is capable of producing. You might see some minor yellowing of the older leaves as the plant reallocates its energy to the roots, which is a normal part of the process. If you provide a stable environment, the plant will eventually find its balance and begin to push out healthy new growth.
Keep the area around the new plant free of competing weeds that might steal water and nutrients during this delicate time. You should hand-pull any weeds that appear near the crown of the grass to avoid damaging the shallow new roots with garden tools. A thick layer of mulch is your best friend here, as it suppresses weed growth and keeps the soil at a consistent temperature. This protective barrier allows the young plant to establish itself without having to fight for its place in the garden.
By the end of the first growing season, your grass should have a well-developed root system that can withstand more varied weather conditions. You should continue to monitor its progress throughout the first winter to ensure it is not pushed out of the ground by frost heaving. If the plant looks secure and healthy by the following spring, you can consider it fully established and transition to a more standard maintenance routine. Your patience and care during these early stages will be rewarded with a magnificent and resilient plant that lasts for many years.