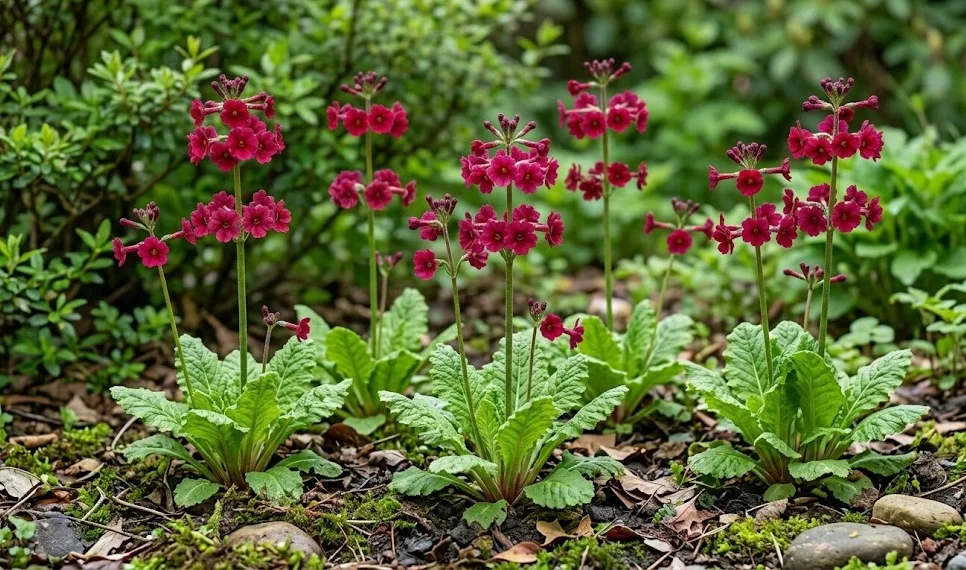
Establishing a vibrant colony of these moisture-loving perennials requires a thoughtful approach to both their initial placement and their eventual expansion. You must recognize that these plants are uniquely adapted to specific environmental conditions, and successful planting hinges on replicating those conditions in your own landscape. Whether you are starting with nursery-grown specimens or trying your hand at growing them from seed, the process is incredibly rewarding. A little bit of planning in the early stages will pay off with years of spectacular floral displays.
Site selection and soil preparation
The first step in a successful planting project is identifying a location that stays naturally damp or can be easily irrigated. You should look for areas in your garden where the soil feels cool to the touch and doesn’t bake in the summer sun. Low-lying spots or areas near a pond are usually the best candidates for a thriving primrose bed. If your garden is naturally dry, you will need to put in extra effort to amend the soil and keep it hydrated.
Before you put any plants in the ground, you must focus on the quality and structure of the soil in the chosen area. These plants crave high levels of organic matter, so digging in plenty of compost or leaf mold is essential. You should aim for a soil that is rich and dark, capable of holding onto moisture like a sponge while remaining loose enough for roots. Avoid using chemical fertilizers at this stage, as natural organic matter provides a much more stable environment for new roots.
You should also consider the light levels of the site, as this will dictate how well the plants grow and how often you need to water. Dappled shade is ideal, as it protects the leaves from the harshest rays of the sun while still providing enough energy for flowering. If the site is too dark, the flower spikes may become leggy and lean toward the light. Finding that “goldilocks” zone of light and shadow is the key to a healthy, well-formed plant.
Finally, take a moment to clear the area of any aggressive weeds or grass that might compete with your new arrivals. Because you will be keeping the soil very moist, weeds will find it an inviting place to grow if you give them the chance. Starting with a clean slate makes it much easier to manage the garden as the primroses begin to establish themselves. Once the area is prepared, you are ready to move on to the actual planting process.
More articles on this topic
The planting process
When you are ready to plant, the best time to do so is either in the early spring or the early autumn. These cooler windows of time allow the plants to settle into their new home without the stress of extreme heat or freezing temperatures. You should dig a hole that is slightly larger than the root ball to ensure there is plenty of loose soil for the roots to explore. Gently tease the roots out if they have become pot-bound before placing the plant in the hole.
It is vital to set the plant at the correct depth, as planting too deep can lead to crown rot, while planting too shallow can cause the roots to dry out. The base of the leaves should sit just at the surface of the soil, ensuring a seamless transition from the roots to the foliage. Once the plant is in place, firm the soil around it gently with your hands to remove any large air pockets. You don’t want to pack it too tightly, as the roots still need a bit of oxygen to thrive.
Immediately after planting, you must give each specimen a thorough soaking to help settle the soil and hydrate the roots. This initial watering is crucial for reducing transplant shock and helping the plant transition to its new environment. You should continue to monitor the moisture levels daily for the first few weeks until you see signs of new growth. A well-hydrated plant will establish itself much faster and be more resilient to future environmental stresses.
Spacing is another important consideration during the planting process to allow for future growth and air movement. You should space the plants about twelve to fifteen inches apart to give each rosette room to expand without crowding its neighbor. While the garden might look a bit sparse at first, these plants grow quickly and will fill the gaps within a season or two. Proper spacing also helps prevent the spread of diseases that thrive in stagnant, crowded conditions.
More articles on this topic
Propagation through seed
Growing these plants from seed is an economical way to create a large display, and it is a fascinating process to watch. You can collect seeds from your own plants in late summer after the flower spikes have dried and the seed pods have turned brown. These seeds often require a period of cold stratification to break their dormancy and trigger germination. You can achieve this naturally by sowing them outdoors in the autumn or by keeping them in a refrigerator for several weeks.
Sowing the seeds in containers or a dedicated seedbed allows you to monitor their progress and protect them from harsh weather. Use a seed-starting mix that is light and moisture-retentive, and barely cover the seeds with a thin layer of fine soil or grit. You should keep the containers in a cool, shaded spot and ensure that the growing medium never dries out completely. Germination can be erratic, so you must be patient and keep a close eye on the pots.
Once the seedlings have developed their first set of true leaves, they are ready to be thinned or transplanted into individual pots. You should handle the young plants gently by their leaves to avoid damaging the delicate stems and roots. Continue to grow them in a sheltered, shady area until they are large enough to be moved into their permanent positions in the garden. This process usually takes a full growing season before the plants are strong enough to face the elements.
One of the joys of growing from seed is that you may end up with a variety of flower colors that differ slightly from the parent plants. This natural variation adds a sense of surprise and charm to your garden landscape. If you have a specific color you love, you can try to isolate those plants, but most gardeners enjoy the colorful mix. Over time, your garden may even start to self-seed, creating a naturalized look that is truly stunning.
Dividing established clumps
Division is the most reliable way to propagate your favorite plants while maintaining the exact characteristics of the parent. You should consider dividing your clumps every three to four years to keep them vigorous and prevent them from becoming overcrowded. The best time for this task is in the early spring just as the new growth begins to emerge from the soil. You will need a sharp spade or a garden fork to lift the entire clump out of the ground.
Once the clump is lifted, you can usually see where the individual rosettes have formed and where the best places to divide are. You can gently pull the rosettes apart by hand or use a sharp knife to cut through the thick rootstock if necessary. Ensure that each new division has a healthy portion of roots and at least one strong growing point or “eye.” Discard the older, woody center of the clump, as it will not grow as vigorously as the outer sections.
Replant the new divisions immediately into freshly prepared soil, following the same depth and spacing guidelines as for new plants. Because the divisions already have an established root system, they will usually settle in quickly and may even bloom in the same season. You must be diligent about watering the new divisions until they are firmly established in their new locations. This is a great way to spread your collection throughout the garden or share plants with friends and neighbors.
Dividing your plants not only gives you more flowers but also improves the health of the original colony by reducing competition for resources. It prevents the center of the clump from dying out and encourages the production of larger, more vibrant flower spikes. By making division a regular part of your gardening routine, you ensure that your display remains spectacular year after year. It is one of the most effective ways to manage a long-lived and healthy garden.