Properly planting the Hjelmqvist’s cotoneaster is the first and most critical step in ensuring its long-term success and vigor in your landscape. This hardy shrub requires a thoughtful approach to site selection, soil preparation, and initial care to establish a deep and resilient root system. Whether you are aiming to create a dense hedge, a decorative ground cover, or a standalone specimen, the techniques you use during the early stages will define the plant’s future. Understanding the specific needs of this species allows you to create an environment where it can truly flourish with minimal intervention later on.
The best time for planting is typically in the early autumn or late spring when the weather is mild and the soil is naturally moist. Autumn planting is often preferred because it allows the roots to settle in and begin growing before the stress of summer heat arrives. If you choose to plant in the spring, you must be prepared to provide more frequent watering as the plant enters its most active growth phase. Avoiding the extreme heat of mid-summer or the frozen ground of mid-winter is essential for reducing transplant shock and ensuring a high survival rate.
Before you even dig a hole, you should spend time evaluating the drainage and light levels of your chosen location. This cotoneaster variety thrives in full sun to partial shade, but it must have soil that drains freely to prevent root-related diseases. You can test your soil by digging a small hole and filling it with water; if it takes more than an hour to drain, you may need to amend the area. Taking these preparatory steps ensures that you aren’t fighting against the natural environment once the shrub is in the ground.
Once the site is ready, the actual process of placing the plant requires care to avoid damaging the delicate root tips. You should dig a hole that is twice as wide as the root ball but no deeper, as burying the stem too deep can lead to rot. Gently loosening the roots if they have become pot-bound will encourage them to spread outward into the surrounding soil. This initial “marriage” between the plant’s nursery soil and your garden’s native earth is the foundation upon which the shrub will build its entire life.
Site selection and preparation
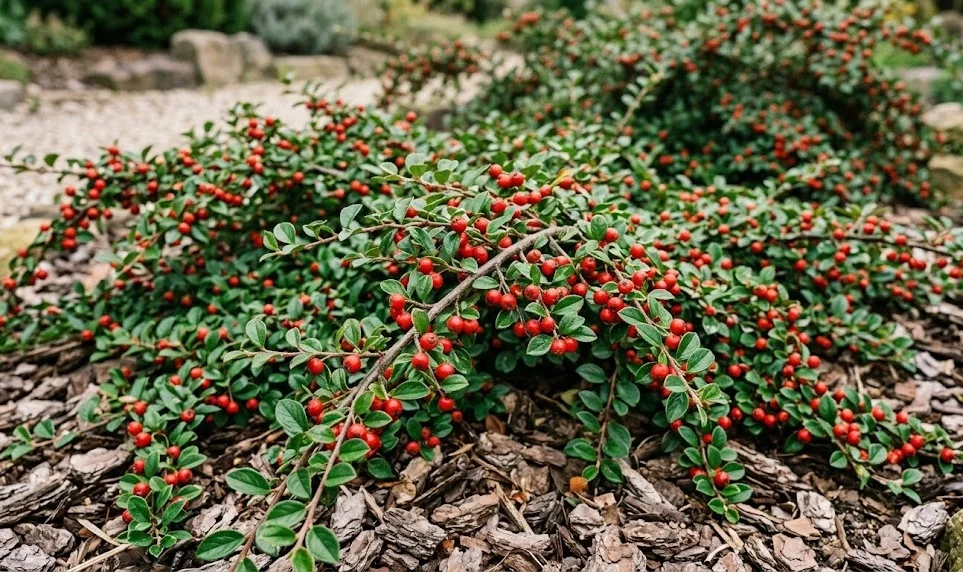
Choosing the right spot for your Hjelmqvist’s cotoneaster involves balancing its aesthetic role with its biological requirements. You should look for a position that offers at least six hours of direct sunlight if you want the best possible berry production and leaf color. While it can tolerate more shaded areas, the growth will be less dense, and the arching branches may become somewhat leggy as they reach for the light. Consider how the plant’s mature size—usually around one meter in height and spread—will interact with nearby structures and other plants.
More articles on this topic
Soil preparation is a task that should never be rushed, as it is much easier to improve the soil before the plant is in the ground. You should incorporate well-rotted organic matter, such as compost or leaf mold, into the planting area to improve both fertility and structure. If your soil is particularly heavy, adding a small amount of horticultural grit can help ensure that excess water moves away from the root zone quickly. Clearing a circle of at least one meter in diameter of all grass and weeds will give the young shrub a “clear run” without competition.
Consider the prevailing winds and potential physical impacts when selecting your site, especially in exposed gardens or near high-traffic paths. While the shrub is quite tough, very strong winter winds can desiccate the foliage of semi-evergreen varieties if they aren’t properly established. If you are planting on a slope, which is a common and effective use for this species, ensure you create a small “terrace” or basin around the base. This helps capture rainwater and prevents it from simply running off the surface before it can reach the roots.
Lastly, think about the long-term maintenance access when you are deciding where to plant. Although it is a low-maintenance shrub, you will still need to reach it for occasional pruning or to check for pests. Planting it too far back in a deep, crowded border might make these simple tasks difficult and lead to the plant becoming neglected. A well-placed cotoneaster acts as a bridge between different garden elements, providing a consistent green texture that ties the landscape together visually.
Planting techniques and timing
When the day comes to plant, start by thoroughly watering the cotoneaster while it is still in its nursery container. A well-hydrated root ball is much easier to remove and experiences less stress during the transition to the open ground. After you have dug your hole to the appropriate width, you can add a small amount of slow-release fertilizer or bone meal to the bottom, mixing it in well with the loose soil. This provides a gentle boost of nutrients that will be available as the roots begin to explore their new home.
More articles on this topic
Carefully remove the plant from its pot by turning it sideways and tapping the rim, rather than pulling on the main stem. If the roots are circling the bottom, use your fingers or a clean knife to make a few shallow vertical cuts to encourage them to grow outward. Place the shrub in the center of the hole, ensuring that the top of the root ball is level with or slightly above the surrounding soil surface. This prevents water from settling around the base of the trunk, which is a common cause of bark rot in young shrubs.
Fill the hole with the amended soil, firming it down gently with your hands as you go to remove any large air pockets. You want the soil to be snug around the roots but not so compacted that air and water cannot penetrate. Once the hole is filled, create a slight depression or “saucer” around the base of the plant to help direct water toward the roots during future waterings. This is also the perfect time to apply a generous layer of mulch, keeping it a few centimeters away from the main stem to prevent moisture-related rot.
The final step of the planting process is a deep, thorough watering that settles the soil and ensures the roots have immediate access to moisture. Even if rain is forecast, this initial manual watering is crucial for eliminating any hidden air gaps around the root ball. For the first few weeks, you should check the soil moisture every few days, as the root ball can dry out faster than the surrounding earth. Consistent attention during this establishment phase is the secret to a fast-growing and healthy Hjelmqvist’s cotoneaster.
Propagation by cuttings
Propagation is a wonderful way to expand your collection of Hjelmqvist’s cotoneaster without the expense of buying new plants. The most common and successful method for home gardeners is taking semi-hardwood cuttings during the late summer or early autumn. This involves selecting healthy, current-season growth that has started to become slightly woody at the base but remains flexible at the tip. These cuttings have a high success rate because they contain enough stored energy to produce roots before the winter dormancy begins.
To take a cutting, use a sharp, sterilized pair of secateurs to remove a stem about 10 to 15 centimeters long. You should cut just below a leaf node, as this is where the highest concentration of natural rooting hormones is located. Remove the leaves from the bottom half of the cutting to reduce moisture loss and prevent them from rotting when they are placed in the rooting medium. If you wish to speed up the process, you can dip the base of the cutting in a rooting hormone powder or gel, though it is not strictly necessary for this species.
Prepare a small pot with a well-draining mix of compost and perlite or coarse sand to provide the ideal environment for root development. Insert the cuttings into the mix, making sure they are firm and upright, and water them lightly to settle the medium around the stems. It is often helpful to cover the pot with a clear plastic bag or place it in a cold frame to maintain high humidity around the foliage. Place the cuttings in a bright spot but out of direct sunlight, which could cause them to overheat and wilt.
Over the next few months, you should monitor the cuttings for signs of growth and ensure the medium stays consistently moist but not soggy. Roots typically begin to form within six to eight weeks, though it may take longer depending on the temperature and the health of the parent plant. Once you see new leaves appearing and feel resistance when you gently tug on the cutting, you know that a root system has been established. At this stage, you can begin to acclimate the young plants to the open air before eventually potting them on or planting them out.
Growing from seed and layering
While cuttings are faster, growing Hjelmqvist’s cotoneaster from seed can be a rewarding experiment for the patient gardener. The seeds are contained within the bright red berries and require a period of cold stratification to break their natural dormancy. You can collect the ripe berries in late autumn, remove the fleshy pulp, and clean the small seeds thoroughly before sowing. Sowing them in a seed tray and leaving them outdoors over the winter is the simplest way to mimic the natural process of freezing and thawing.
In the spring, as temperatures rise, you should see the small seedlings beginning to emerge from the compost. These young plants are quite delicate and will need protection from slugs and extreme weather for their first few months of life. You should thin them out to give each plant enough space to grow and move them into individual pots once they have two or three sets of true leaves. It will take several years for a seed-grown plant to reach the size and berry-producing maturity of a cutting-grown specimen, but the satisfaction is immense.
Another very effective and natural propagation method is known as “simple layering,” which takes advantage of the shrub’s arching branches. This involves choosing a flexible, low-growing branch and pinning a section of it to the ground, covering it with a few centimeters of soil. You can lightly wound the underside of the stem where it touches the soil to stimulate root growth in that specific area. Over the course of a growing season, the buried section will develop its own root system while still being nourished by the parent plant.
Once the layer has developed a strong set of roots, usually by the following spring, you can sever the connection to the parent shrub. This new plant can then be carefully dug up and moved to its permanent location in the garden. Layering is an excellent “set and forget” method that requires almost no equipment and has a very high success rate. It is particularly useful if you want to create a dense colony or fill in gaps in a cotoneaster hedge without the need for nursery-grown replacements.