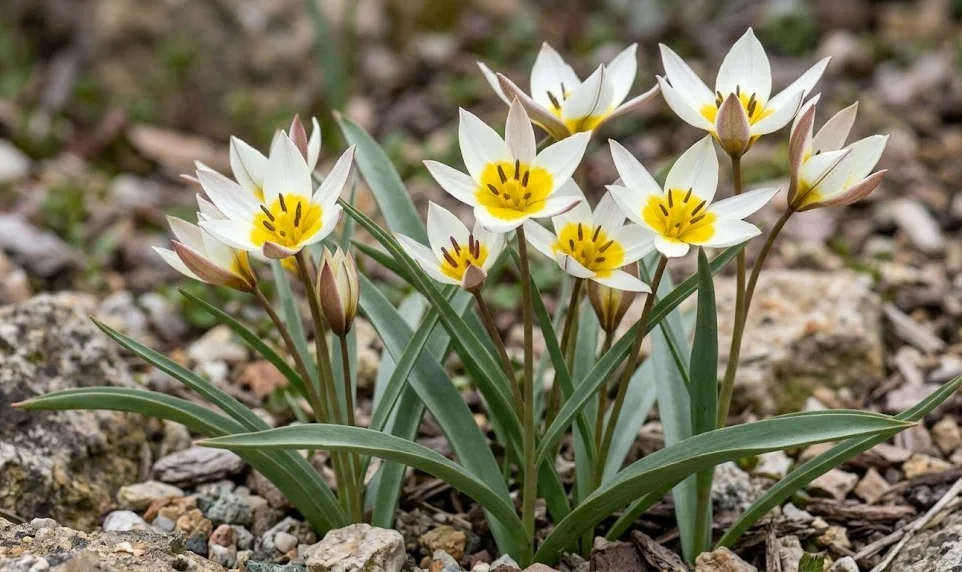
The Turkestan tulip is naturally suited to cold winters, and overwintering it successfully is less about protection from frost than protection from unsuitable moisture. The bulb needs a cool period to root well and prepare for spring flowering. In most temperate gardens, it can remain outdoors throughout winter without special covering. The real challenge is keeping the soil open, drained, and stable while the bulb is dormant or slowly rooting.
Winter hardiness and seasonal rhythm
This tulip is a hardy bulb that expects winter cold. Autumn planting allows roots to develop before the deepest cold arrives. Once rooted, the bulb can tolerate low temperatures in suitable soil. Cold is part of its normal growth cycle, not a threat in itself.
Winter moisture must be managed more carefully than winter temperature. Bulbs in saturated soil may rot even if the air temperature is not extreme. Free-draining soil protects the bulb by allowing excess water to move away. This is why raised beds and sloping sites are so effective.
Snow cover is usually not harmful. In fact, snow can insulate the soil and protect emerging shoots from sudden temperature swings. Problems arise when snow melts into compacted soil that drains poorly. Good soil preparation before planting prevents this issue.
The bulb remains mostly hidden during winter, but it is not inactive. Root growth continues whenever soil temperatures allow. By late winter, shoots may begin to push upward. This early growth is normal and should not be covered heavily unless severe weather threatens exposed tips.
More articles on this topic
Protecting bulbs in the ground
In open ground, protection should be light and breathable. A thin layer of gravel or coarse grit can reduce surface compaction and discourage digging. Heavy, wet organic mulches are less suitable directly over the bulbs. They can trap moisture and delay soil warming.
If the planting area is exposed to winter flooding, bulbs should be moved before the problem repeats. No amount of surface covering can compensate for standing water around bulbs. Raised planting pockets or rock garden crevices are better long-term solutions. Drainage must come before insulation.
Where rodents disturb winter bulbs, mesh baskets can be useful. They are installed at planting time and remain underground. The mesh should be strong enough to resist chewing but open enough for roots to grow through. This protection is especially valuable in loose, sandy soils.
Avoid walking on frozen or wet bulb beds. Compaction reduces air spaces in the soil and worsens drainage. Small bulbs are also vulnerable to physical damage when soil is compressed. Marking planting areas helps prevent accidental trampling during winter maintenance.
More articles on this topic
Overwintering in containers
Container-grown bulbs need more attention because pots expose bulbs to sharper temperature changes. The compost can freeze harder than garden soil and thaw more rapidly. This is not always fatal, but repeated freeze-thaw cycles can stress roots. A sheltered outdoor position is usually best.
Pots should remain cold, but they should not sit in water. Raise containers on feet or place them on a free-draining surface. Check that drainage holes are clear before winter sets in. Blocked drainage can ruin an otherwise healthy planting.
In very cold regions, containers can be grouped together against a wall or placed in an unheated cold frame. The aim is protection from excessive wet and extreme temperature swings, not warmth. Bringing pots into a heated room is harmful because it disrupts the cold period. Warm indoor conditions can produce weak, pale growth.
Water container bulbs sparingly during winter. The compost should not become bone dry for long periods, but it should never be soggy. Rain may provide enough moisture if the pot is outdoors. Under cover, occasional light watering may be necessary.
Preparing for spring after winter
As shoots emerge, remove any loose covering that blocks light. Early leaves need sun to grow compact and strong. If a late frost is forecast after buds are visible, temporary light protection can be used overnight. It should be removed promptly in the morning.
Inspect the planting for signs of disturbance. Bulbs pushed out of the soil by frost heave should be replanted at once if they are still firm. Exposed bulbs dry out and are more vulnerable to animals. Firm the soil gently around them without compacting it heavily.
Spring watering should begin only if the soil is dry. Many gardens have enough moisture from winter rain. Overwatering at this stage can still cause problems, especially in cold soil. Wait until active growth clearly increases before adjusting care.
A light spring feed can be applied when shoots are visible. This helps support flowering and bulb renewal. Do not apply strong fertilizer to frozen soil or directly onto young shoots. Gentle, timely care after winter sets the plant up for a healthy flowering season.