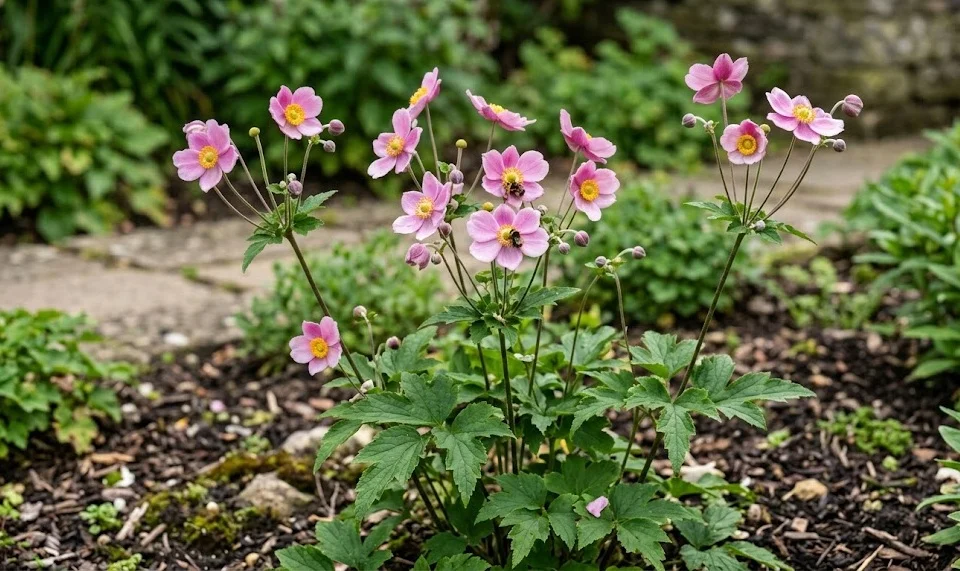
Preparing the Japanese anemone for the cold months is a vital task that ensures the survival and vigor of the plant for the following season. While many varieties are quite hardy and can withstand freezing temperatures, the degree of success often depends on the specific microclimate of your garden and the maturity of the specimen. Proper overwintering is not just about protection from the cold; it also involves managing moisture levels and preventing the roots from rotting in cold, wet soil. A professional approach to winter care starts long before the first snowflake falls, involving a series of deliberate steps to harden off the plant.
As the days shorten and the temperatures begin to drop in late autumn, the Japanese anemone naturally begins its transition into dormancy. You will notice the foliage losing its vibrant green color and eventually turning brown as the plant pulls its resources down into the underground rhizomes. This is a crucial physiological process that allows the perennial to store energy and survive the harsh conditions of winter. Resisting the urge to cut back the foliage too early allows the plant to maximize these energy reserves, providing a stronger start in the spring.
The primary threat during the winter months for this species is often not the temperature itself, but the combination of cold and excessive soil moisture. In heavy clay soils that do not drain well, the dormant roots can easily suffocate and rot if they are sitting in water for extended periods. Professional gardeners often look for ways to improve drainage around the crown of the plant before the winter rains begin in earnest. This might involve lightly mounding the soil or ensuring that nearby gutters and paths are not directing excess water toward the anemone bed.
Consistency in the root environment is the key to a successful overwintering strategy for any established perennial in the landscape. Large fluctuations in soil temperature, particularly the cycle of freezing and thawing, can actually push the plants out of the ground in a process known as frost heaving. This exposes the delicate crown and roots to the drying winds and extreme cold, which can be fatal even for hardy species. By applying the right protective measures, you create a stable blanket that keeps the plant safely tucked away until the warmth of spring returns.
Late autumn cleanup and crown protection
Once the first hard frost has completely blackened the foliage of your Japanese anemones, it is time to begin the final cleanup of the season. Use clean, sharp shears to cut the spent flower stalks and dead leaves back to within a few inches of the ground level. Removing this material is essential for garden hygiene, as it eliminates potential hiding spots for pests and reduces the amount of fungal spores that might overwinter. Be careful not to damage the crown of the plant during this process, as this is where the new growth will emerge next year.
More articles on this topic
After the cleanup is complete, the focus shifts to protecting the crown and the shallow root system from the upcoming winter extremes. Many professional gardeners recommend applying a light layer of compost or well-rotted manure directly over the base of the plant. This not only provides a small amount of insulation but also serves as a slow-release nutrient source that will be ready for the plant in the spring. This “top-dressing” mimics the natural accumulation of organic matter on a forest floor, providing the perfect environment for a dormant perennial.
In regions where the winters are particularly severe or the snow cover is unreliable, additional measures may be necessary to ensure survival. You might consider placing a few evergreen boughs over the crown to act as a natural windbreak and to trap any available snow for insulation. Snow is actually an excellent insulator, but in its absence, the bare ground can freeze much deeper and faster. These simple, natural additions can make a significant difference in the survival rates of younger or more delicate anemone cultivars.
Monitoring the garden during late autumn also involves checking for any signs of late-season pests that might be looking for a winter home. Slugs and snails can sometimes congregate under the remaining debris, ready to attack the very first shoots that appear in the spring. By clearing the area thoroughly and perhaps applying a late-season organic deterrent, you give your anemones a “clean slate” for the winter. This proactive mindset is what separates a professional maintenance routine from a casual one and leads to much better results over time.
Mulching techniques for winter insulation
Mulching is perhaps the most important technique for successfully overwintering Japanese anemones in a wide range of climates. A thick layer of organic mulch, applied once the ground has started to cool but before it freezes solid, acts as a thermal blanket for the soil. This layer should be about three to four inches deep and extend several inches beyond the visible crown of the plant to protect the lateral roots. Ideal materials include shredded bark, wood chips, or even chopped leaves from your own garden.
More articles on this topic
The timing of mulch application is critical, as applying it too early in the autumn can trap heat in the soil and delay the plant’s entry into dormancy. Conversely, waiting too long might leave the roots exposed to a sudden, deep freeze that can cause significant cellular damage. A good rule of thumb is to wait until several light frosts have occurred and the plant has fully retreated into its underground structures. This ensures that the plant is “sleeping” soundly before you add the extra layer of insulation.
During the winter, you should periodically check the mulch layer to ensure it hasn’t been blown away by high winds or disturbed by foraging animals. In some cases, you may need to top up the mulch in mid-winter to maintain the necessary depth and protection. Avoid using heavy, matted materials like whole wet leaves, as these can create an anaerobic environment that encourages rot and disease. The goal is to provide a porous but insulating layer that allows the soil to breathe while staying at a relatively constant temperature.
As the winter draws to a close, the mulch also serves to prevent the soil from warming up too quickly during a random mid-winter thaw. This prevents the plant from “waking up” prematurely and sending out new growth that would be immediately killed by the next return of freezing weather. By keeping the soil temperature stable, the mulch ensures that the Japanese anemone remains dormant until the spring has truly arrived. This stability is the secret to healthy, vigorous plants that emerge ready to grow as soon as the conditions are right.
Special considerations for container-grown plants
Japanese anemones grown in pots and containers require a much higher level of care during the winter than those planted in the ground. Because the root system is elevated and surrounded only by a thin layer of potting soil and the container wall, it is much more vulnerable to freezing. In many cases, the roots in a pot will experience temperatures many degrees colder than they would if they were buried in the earth. Therefore, a container-grown anemone often needs to be moved or significantly insulated to survive a hard winter.
One professional strategy is to move the containers into an unheated garage, shed, or a protected porch where they are shielded from the worst of the wind and precipitation. The temperature in these locations should remain cool enough to keep the plant dormant but avoid the extreme deep freezes found outdoors. While the plants are in storage, it is important to check the soil moisture occasionally, as they should not be allowed to dry out completely. A small amount of water every few weeks is usually enough to keep the dormant roots alive without encouraging rot.
If moving the heavy pots is not an option, you can create a “pot-in-pot” system or wrap the containers in insulating materials like bubble wrap or burlap. Some gardeners bury their pots directly into a garden bed for the winter, using the earth’s natural warmth to protect the roots. This method provides the benefits of ground planting while allowing you to lift the pot back out and move it to a different location in the spring. Whatever method you choose, the goal is to prevent the root ball from freezing solid for extended periods.
In the late winter, as the sun begins to get stronger, you must be careful that containers kept in sunnier spots don’t overheat and cause the plant to break dormancy too early. If you see signs of new growth in February or March, you will need to be extremely vigilant about protecting those tender shoots from late-season frosts. Gradually reintroducing the pots to the outdoors as the weather stabilizes is the safest way to transition them back into the growing season. Patience during this transition phase is just as important as the protection provided during the middle of winter.
Post-winter recovery and spring inspection
The arrival of spring is an exciting time in the garden, but it is also a period for careful inspection and recovery for your Japanese anemones. As the soil begins to warm and the risk of deep freezes passes, you can slowly begin to pull back the winter mulch from the crown of the plant. Do this gradually over a week or two to avoid shocking the newly emerging shoots with sudden exposure to the light and air. This is also the perfect time to check for any signs of damage or disease that may have occurred during the dormant months.
If you notice that the crown of the plant has been pushed up by the frost, gently press it back into the soil and add a bit of fresh earth to cover any exposed roots. This “frost heave” is common in certain soil types and can be easily corrected if caught early enough in the season. You should also look for any signs of crown rot, which usually appears as a soft, blackened area at the base of the plant. If the rot is extensive, it may be necessary to remove the affected sections to prevent it from spreading to the healthy parts of the plant.
Spring is also the ideal time to apply a fresh layer of compost or a balanced slow-release fertilizer to give the anemones a nutritional boost. As the new leaves begin to unfurl, the plant’s demand for energy will increase rapidly, and having nutrients readily available in the soil is a huge advantage. Be careful not to over-fertilize at this stage, as you want to encourage steady, strong growth rather than a sudden flush of weak, spindly stems. A healthy start in the spring is the best predictor of a spectacular floral display in the late summer.
Finally, remember that Japanese anemones are often among the last perennials to emerge in the spring garden. Don’t be too quick to give up on a plant that hasn’t shown signs of life by early May, as they are notorious for their late start. Continue to keep the area clear of weeds and monitor the moisture levels, and you will likely be rewarded with the sight of dark green leaves pushing through the soil. Once they begin their active growth, they will quickly make up for lost time and return to their former glory in your garden.