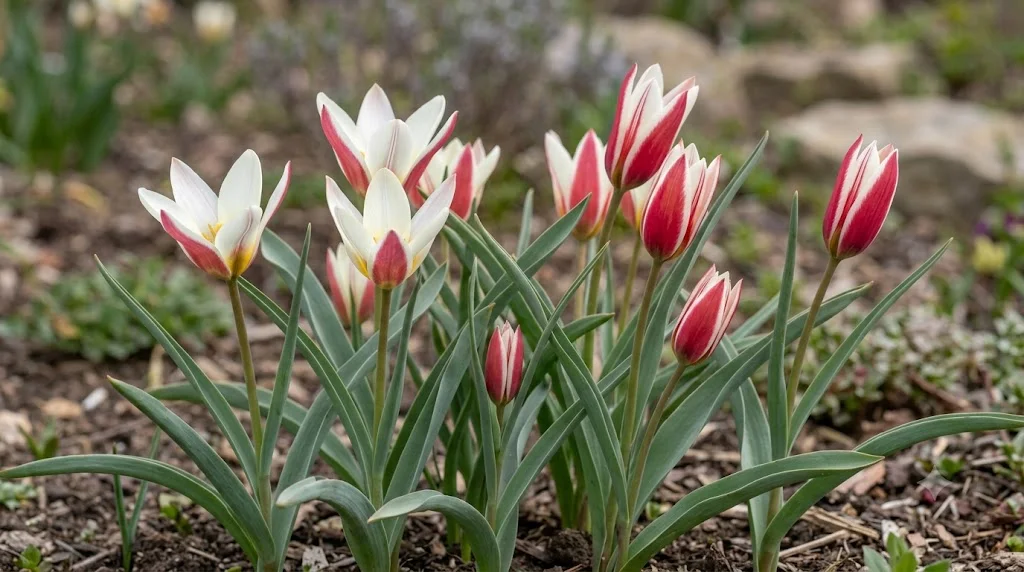

The lady tulip is a graceful botanical tulip valued for its slender foliage, star-shaped flowers, and distinctive red-and-white colouring. Unlike many large-flowered hybrid tulips, it can remain in the garden for years when planted in suitable soil and given a naturally dry summer rest. Its compact growth makes it especially useful in rock gardens, gravel beds, raised borders, and sunny container displays. Successful care depends less on constant attention than on choosing the right site and respecting the plant’s seasonal rhythm.
Understanding the natural growth cycle
Lady tulips begin their annual growth cycle while the weather is still cool, often sending up narrow leaves in late winter or early spring. The developing bulb uses stored reserves to produce foliage, roots, and flower buds before surrounding plants become dense. This early activity allows the tulip to take advantage of spring moisture and abundant sunlight. Gardeners should avoid disturbing the soil once new shoots become visible because the emerging stems are easily damaged.
Flowering usually occurs in mid to late spring, depending on climate, planting depth, and local weather conditions. The flowers tend to open widely in bright sunshine and close during dull weather or in the evening. This movement protects the reproductive parts while also creating a lively, changing display throughout the day. Individual flowers may last longer during cool, dry weather than during periods of heat, wind, or heavy rain.
After flowering, the leaves continue photosynthesising and return energy to the underground bulb. This stage is essential because the bulb must rebuild its reserves before entering dormancy. Removing or tying the foliage too early weakens the plant and may reduce flowering the following year. The leaves should remain untouched until they have yellowed and loosened naturally.
Summer dormancy is a normal and necessary part of the lady tulip’s life cycle. Once the foliage disappears, the bulb rests underground and prefers relatively warm, dry conditions. Repeated summer watering can interfere with dormancy and encourage fungal decay. A well-planned planting position therefore provides spring moisture but avoids persistent wetness after the bulb becomes dormant.
More articles on this topic
Choosing the best soil and planting position
A sunny, open position usually produces the strongest growth and the most abundant flowers. Lady tulips perform particularly well where they receive direct morning and midday sun. Light shade for a small part of the day is generally acceptable, especially in regions with hot springs. Deep shade, however, often causes weak stems, sparse flowering, and gradual decline.
Drainage is one of the most important factors in long-term care. The soil should allow excess rainwater to move away quickly from the bulb, especially during winter and summer dormancy. Sandy loam, gravelly soil, and well-structured raised beds are usually suitable. Heavy clay should be improved extensively or avoided because pockets of stagnant moisture can quickly cause bulb rot.
Lady tulips prefer soil that is moderately fertile rather than heavily enriched. Excessive nitrogen encourages soft foliage and may make plants more vulnerable to disease. A small amount of mature compost can improve structure in poor soils without creating overly rich conditions. Fresh manure and concentrated fertiliser should never be placed directly beneath or around the bulbs.
The planting site should also be protected from routine digging and aggressive neighbouring plants. Vigorous perennials can shade the foliage before the bulbs have completed their spring growth. Dense ground covers may also compete for water and nutrients or conceal pest activity. Low-growing, drought-tolerant companions are generally better because they share similar conditions without overwhelming the tulips.
More articles on this topic
Supporting flowering and bulb renewal
Reliable flowering begins with healthy bulbs that are firm, heavy for their size, and free from mould or deep wounds. Bulbs that feel soft or unusually light may have dried out or begun to decay. Minor papery skin damage is not usually serious, but the basal plate should remain intact. Planting high-quality bulbs gives the colony the strongest possible start.
The bulb must receive enough light through its foliage after flowering to replenish its energy reserves. Shading by rapidly expanding shrubs or perennials can reduce the amount of carbohydrate stored for the next season. If neighbouring plants become too dense, they should be thinned rather than cutting the tulip foliage. Maintaining an open canopy supports both flower formation and bulb multiplication.
Deadheading may be useful when the primary aim is to strengthen the bulbs rather than collect seed. Removing the developing seed capsule prevents the plant from investing energy in seed production. The flower stem can be cut just below the spent bloom while all green foliage remains in place. Some gardeners deliberately leave a few capsules to mature because seedlings can increase the natural character of the planting.
Flowering can become less abundant when bulbs are overcrowded or buried beneath accumulated mulch and soil. Dense clusters may compete for moisture, nutrients, and physical space during active growth. Lifting and dividing the bulbs during dormancy can restore vigour when congestion becomes obvious. Replanting the largest bulbs at the correct depth usually improves the display within one or two seasons.
Seasonal maintenance through spring and summer
In early spring, the planting area should be checked for compacted mulch, fallen leaves, and debris that may obstruct emerging shoots. A thin organic covering can protect the soil, but a heavy wet layer may trap moisture around the young stems. Debris should be removed carefully by hand to avoid snapping hidden shoots. Soil cultivation with a fork or hoe is best avoided near established bulbs.
During active growth, watering should be adjusted according to rainfall and soil texture. Lady tulips need moisture while producing leaves and flowers, yet the soil should never remain saturated. Deep, occasional watering is more useful than frequent shallow sprinkling. Containers require closer observation because their compost can dry out faster than garden soil.
Once flowering ends, the watering frequency should gradually decrease as the foliage begins to yellow. This change imitates the increasingly dry conditions of the plant’s natural habitat. Sudden drought immediately after flowering can reduce bulb recovery, but continued heavy irrigation is equally harmful. The ideal approach is a gradual transition from moderate spring moisture to a dry summer rest.
During dormancy, the planting area may appear empty, so its location should be marked discreetly. Markers prevent accidental digging, replanting, or damage during summer maintenance. A layer of decorative gravel can help keep the surface dry while indicating that bulbs are present below. Deep organic mulch is less suitable because it may retain moisture and cool the soil excessively.
Growing lady tulips in containers
Containers are an excellent option where garden soil is heavy, poorly drained, or regularly irrigated in summer. A pot with generous drainage holes is essential because trapped water quickly damages dormant bulbs. Terracotta containers are particularly useful because their porous walls allow moisture to evaporate. The pot should still be sturdy enough to withstand winter weather and repeated temperature changes.
The growing medium should combine good drainage with enough structure to support root development. A quality peat-free compost can be mixed with horticultural grit, coarse sand, or fine gravel. The mixture should remain open after watering rather than collapsing into a dense mass. A gravel layer at the bottom is less important than ensuring the entire compost drains effectively.
Container-grown lady tulips may be planted more closely than bulbs in open ground, but they should not touch one another. Dense planting creates an attractive spring display while still allowing space for roots and offsets. The bulbs should be covered deeply enough to remain stable and protected from temperature fluctuations. A top dressing of grit helps reduce splashing, discourages weeds, and keeps the bulb necks relatively dry.
After flowering, containers should be moved to a sunny position where the foliage can mature fully. Watering should continue lightly until the leaves begin to fade, after which the compost can become almost dry. Pots exposed to prolonged summer rain may need shelter beneath an overhang or in a cold frame. They should not be stored in a dark indoor room while the leaves are still green.
Preventing common care mistakes
One of the most frequent mistakes is planting lady tulips in soil that stays wet for long periods. Even strong bulbs cannot tolerate constant oxygen deprivation around their roots and basal plates. Drainage problems may remain unnoticed until the foliage suddenly collapses or bulbs fail to return. Improving the planting site before installation is far more effective than trying to rescue rotting bulbs later.
Another common error is removing the leaves as soon as the flowers fade. Untidy foliage may be visually inconvenient, but it performs essential work for several weeks. Cutting it prematurely forces the bulb to rely on incomplete reserves and can eventually eliminate flowering. Companion plants can disguise the fading leaves without blocking their access to light.
Overfeeding can also reduce the natural resilience of the plant. High-nitrogen fertilisers encourage lush, soft growth that may flop or attract disease. Lady tulips are adapted to relatively lean conditions and usually need only modest nutritional support. A balanced, low-dose bulb fertiliser is more appropriate than repeated applications of general-purpose liquid feed.
Frequent disturbance prevents colonies from developing their characteristic naturalised appearance. Digging around the bulbs can damage offsets, roots, and emerging shoots even when no injury is visible above ground. Established clumps should be left undisturbed unless flowering declines or the planting becomes overcrowded. Careful observation and restrained maintenance usually produce better results than constant intervention.
Long-term care and naturalising
Lady tulips are among the tulips most capable of returning and multiplying in favourable gardens. Their success depends on allowing the bulbs to complete each stage of growth without excessive moisture or disturbance. Over time, established plants may produce offsets around the parent bulb and seedlings nearby. This gradual expansion creates a softer, more natural display than formal annual replanting.
Naturalising works best in sunny, sharply drained areas that are not heavily irrigated during summer. Gravel gardens, the edges of stone paths, raised slopes, and open rockeries often provide ideal conditions. The surrounding soil should remain relatively undisturbed so small bulbs and seedlings can develop. Avoid planting them in lawns that receive regular summer watering or early mowing.
Colonies should be monitored for declining flower numbers, unusually crowded shoots, or increasing disease. These signs may indicate that division, soil improvement, or pest control is required. Healthy clumps can often remain untouched for several years before attention becomes necessary. When division is needed, it should be completed during full dormancy while the bulbs are dry and easy to handle.
A successful long-term planting combines careful establishment with minimal later interference. The bulbs should receive sunshine, spring moisture, moderate nutrition, and a dry rest after the foliage dies down. Gardeners who reproduce these conditions are often rewarded with stronger colonies each year. The lady tulip then becomes not merely a seasonal bedding plant, but a durable and distinctive part of the garden.