
Maintaining a successful carrot crop requires a blend of patience, precision, and understanding of the specific environmental needs of these root vegetables. While carrots are generally hardy, their quality depends heavily on consistent management throughout the growing season. A gardener must focus on soil texture, moisture levels, and the absence of physical obstructions to ensure straight, sweet roots. By following professional guidelines, you can achieve a harvest that far exceeds the quality of store-bought alternatives.
Consistent monitoring of the garden bed is essential to prevent the soil from forming a hard crust on the surface. If the top layer becomes too compacted, the delicate seedlings may struggle to emerge, leading to an uneven stand. You should gently scratch the surface of the soil if you notice it hardening after heavy rain. This practice ensures that oxygen can reach the roots while allowing the young plants to push through the soil without damage.
Temperature management plays a vital role in the development of the flavor and texture of the roots. Carrots prefer cooler temperatures, ideally between fifteen and eighteen degrees Celsius, to produce the highest sugar content. If the soil becomes too hot during the peak of summer, the roots may become bitter or woody in texture. To mitigate this, you can provide light shade or use reflective mulches to keep the root zone at a more stable temperature.
Record keeping is a professional habit that helps you refine your caring techniques over multiple seasons. You should note the planting dates, weather patterns, and any specific challenges you encountered during the growth cycle. This data allows you to adjust your maintenance schedule for the following year to better suit your local microclimate. Successful carrot cultivation is often a result of these small, iterative improvements based on direct observation.
Managing soil structure and health
The foundation of high-quality carrots is deep, loose soil that allows the taproot to penetrate easily without resistance. You should aim for a sandy loam texture that is free of stones, large clumps, or heavy clay deposits. If the soil is too heavy, the roots will likely bifurcate or become stunted, which reduces their commercial and aesthetic value. Preparing the bed deeply with a garden fork before sowing is a mandatory step for any serious grower.
More articles on this topic
Organic matter is beneficial, but you must ensure it is fully decomposed before it comes into contact with the carrots. Fresh manure can cause the roots to fork or grow excessive hairy side roots, which is undesirable for a clean harvest. Use well-rotted compost instead, and mix it thoroughly into the soil several months before planting. This timing allows the nutrients to stabilize and the soil structure to improve without harming the developing taproots.
Soil pH is another critical factor that influences nutrient availability and overall plant health. Carrots thrive in slightly acidic to neutral soil, typically within the range of six point zero to seven point zero. You should conduct a soil test every few years to monitor the acidity and adjust it with lime or sulfur if necessary. Maintaining the correct pH ensures that the plants can efficiently absorb the minerals required for vigorous growth.
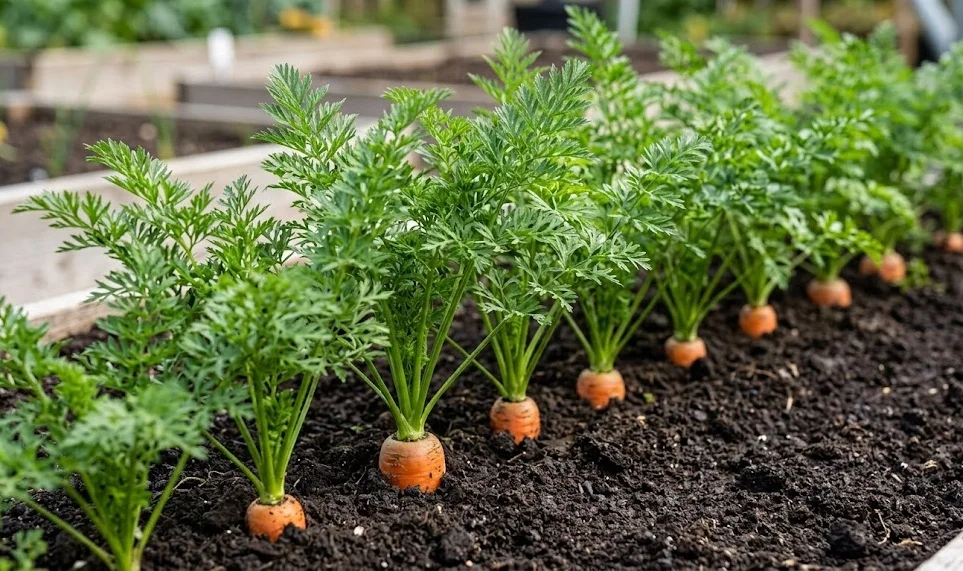
Compaction is the enemy of the carrot, so you should avoid walking on the growing beds at all costs. Using permanent raised beds or clearly defined paths prevents the weight of a person from squeezing the air out of the soil. When the soil remains airy and porous, the roots can expand naturally and reach their full genetic potential in length and girth. This physical environment is just as important as the chemical composition of the earth.
Thinning for optimal root development
Thinning is perhaps the most difficult task for hobbyists, but it is a professional necessity for producing uniform roots. Because carrot seeds are tiny, they are often sown too thickly, leading to intense competition for light and nutrients. If you fail to thin the seedlings, the resulting carrots will be spindly and tangled together. This process should begin as soon as the first true leaves appear and the plants are a few centimeters tall.
More articles on this topic
The first round of thinning should aim for a spacing of about two to three centimeters between individual plants. You should use a pair of garden scissors to snip the unwanted seedlings at the soil line rather than pulling them out. Pulling can disturb the delicate root systems of the remaining plants, which often leads to crooked or deformed mature carrots. This careful approach protects the integrity of the primary taproots you intend to keep.
A second thinning is usually required a few weeks later once the plants have grown larger and their foliage begins to touch. During this stage, you should increase the distance to approximately five to eight centimeters, depending on the variety. The larger the variety of carrot, the more space each individual root requires to expand without crowding its neighbor. This final spacing ensures that each plant has enough soil volume to gather water and minerals.
Proper spacing also improves air circulation among the carrot tops, which is a key factor in preventing fungal diseases. When the foliage is too dense, moisture can become trapped near the crown, creating a perfect environment for pathogens. By maintaining the correct distance, you allow the wind to dry the leaves quickly after rain or irrigation. This simple mechanical adjustment serves as a natural form of disease prevention in the vegetable garden.
Weed suppression and foliage care
Weeds compete aggressively with carrots for resources, especially during the early stages when the crop grows slowly. Because carrot seedlings are so fine and fragile, they can easily be smothered by faster-growing garden weeds. You must be diligent about hand-weeding the rows as soon as you spot any unwanted vegetation emerging. Removing weeds while they are small prevents them from developing deep roots that could disturb your carrots when pulled.
A professional tip for managing weeds is to use a “stale seedbed” technique before you even sow your carrot seeds. This involves preparing the bed, watering it to encourage weed germination, and then killing those weeds with a flame weeder or light hoeing. Once the first flush of weeds is gone, you sow your carrots into the clean soil. This gives the slow-germinating carrots a significant head start over any remaining weed seeds in the ground.
As the carrots grow, their own fern-like foliage will eventually provide some level of natural shade to the soil. This canopy helps to suppress new weed growth by blocking sunlight from reaching the soil surface. However, you should still check the rows periodically for any tall weeds that manage to break through the foliage. Keeping the area clean ensures that all available sunlight is captured by the carrot leaves for photosynthesis.
Healthy foliage is the engine that drives root development, so you should protect the leaves from physical damage. Avoid walking through the rows when the plants are wet, as this can crush the stems and spread spores between plants. If the tops become damaged, the plant will divert energy away from the root to repair the leaves. A lush, green canopy is a strong indicator that the root below is growing steadily and accumulating sugars.
Mulching for moisture and protection
Mulching is a highly effective technique for stabilizing soil moisture and protecting the tops of the carrots. Once the plants are well-established and have been thinned for the final time, you can apply a layer of organic mulch. Shredded straw, leaf mold, or clean grass clippings are excellent choices for this purpose. The mulch acts as a barrier, preventing the sun from drying out the soil too quickly during hot spells.
One of the primary benefits of mulching carrots is the prevention of “green shoulders” on the roots. When the top of the carrot root is exposed to sunlight, it produces chlorophyll, which turns the tissue green and gives it a bitter taste. By keeping the crowns covered with a layer of mulch or extra soil, you ensure the entire root remains orange and sweet. This simple step significantly improves the culinary quality of your final harvest.
In addition to moisture retention, mulch helps to keep the soil temperature cooler, which carrots greatly prefer. In regions with intense summer heat, a thick layer of mulch can make the difference between a successful crop and a failed one. It also provides a habitat for beneficial soil organisms, such as earthworms, which help to aerate the soil. As the mulch decomposes over the season, it slowly adds valuable organic matter back into the earth.
You should be careful not to apply mulch too early in the spring, as it can keep the soil too cold and slow down germination. Wait until the soil has warmed up and the seedlings are at least ten centimeters tall before tucking them in with mulch. Always ensure the mulch does not directly touch the stems to prevent any potential rot issues. This balanced approach maximizes the benefits of mulching while minimizing the risks of moisture-related diseases.
Monitoring growth and maturity
Determining when to harvest carrots requires a combination of checking the calendar and physical inspection of the roots. Most varieties take between sixty and eighty days to reach full maturity, depending on the environmental conditions. You can start harvesting “baby” carrots as soon as they reach a usable size, which is often around fifty days. These young roots are exceptionally tender and sweet, making them a favorite for fresh consumption.
To check the progress of your crop, gently move some soil away from the crown of a few plants. This allows you to see the diameter of the root without actually pulling the entire plant out of the ground. A professional grower looks for a rounded shoulder and a diameter that matches the specific variety’s description. If the root still looks thin and tapered at the top, it likely needs more time to develop.
The color of the foliage can also give you hints about the health and maturity of the underlying root. Deep green, vigorous tops usually indicate that the plant is still actively pumping sugars into the storage organ. If the lower leaves start to turn yellow or brittle, it may be a sign that the root has reached its peak. Harvesting at the right moment ensures the best balance of crunch, sweetness, and nutritional value.
If you leave carrots in the ground too long, they may start to become woody or lose some of their characteristic sweetness. In some cases, the roots might even begin to split, especially if there is a sudden influx of water after a dry spell. Regular monitoring allows you to harvest the crop in batches, ensuring that you always have the highest quality produce. Developing a “feel” for maturity is an essential skill for any expert gardener.
Tools and techniques for a clean harvest
Harvesting carrots should be done with care to avoid snapping the roots or damaging the delicate skin. You should never try to pull a carrot out of the ground by its foliage alone, especially in heavy or dry soil. Instead, use a garden fork to gently loosen the soil a few inches away from the row. This breaks the tension of the earth and allows the roots to be lifted out easily with minimal resistance.
The best time to harvest is in the cool of the morning when the roots are fully hydrated and their sugar levels are stable. If you harvest during the heat of the afternoon, the carrots may wilt quickly and lose their crispness. Once lifted, the roots should be handled gently to prevent bruising or scratching. Any damage to the skin can become an entry point for rot during the storage period.
After lifting the carrots, you should remove the green tops immediately by twisting or cutting them off about a centimeter above the crown. If you leave the leaves attached, they will continue to draw moisture from the root, causing it to go limp very quickly. Removing the foliage helps the carrot retain its internal moisture and extends its shelf life significantly. You can compost the tops or use them in cooking if they are clean and fresh.
Finally, avoid washing the carrots if you plan to store them for an extended period, as excess moisture can promote fungal growth. Simply brush off the loose soil and allow the roots to air dry in a shaded, well-ventilated area for a few hours. For immediate use, a quick rinse under cold water is sufficient to remove any remaining dirt. Following these professional harvesting steps ensures that your hard work in the garden translates into a high-quality product on the plate.