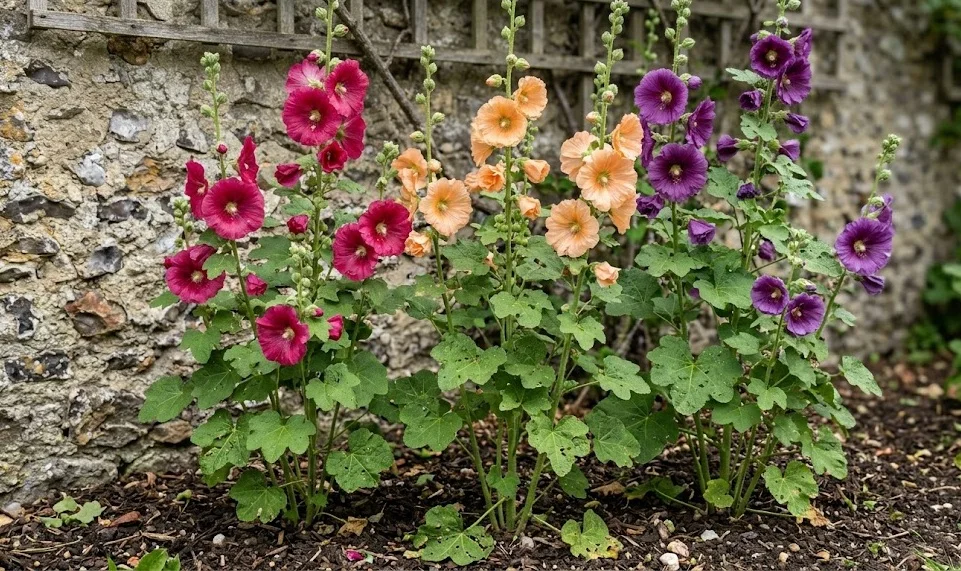
Maintaining the health and vibrancy of hollyhocks requires a consistent approach to garden management throughout the growing season. These towering biennials or short-lived perennials are famous for their architectural presence, but they demand specific attention to thrive in a domestic landscape. Success starts with understanding that their tall stalks and heavy blooms create unique structural needs that differ from smaller bedding plants. By establishing a routine that covers support, cleaning, and environmental monitoring, you ensure these classic flowers reach their full potential.
Essential structural support and placement
Proper support is arguably the most critical aspect of caring for hollyhocks once they begin their rapid vertical ascent. Because the flower spikes can reach heights of up to eight feet, they are incredibly susceptible to being leveled by strong summer winds or heavy rainfall. Gardeners should ideally place stakes in the ground early in the spring before the root system becomes too expansive to avoid accidental damage. Using bamboo canes or sturdy metal rods tied loosely with soft garden twine allows the plant to move naturally without snapping under pressure.
Placement within the garden also dictates the level of care required to maintain the plant’s aesthetic and physical integrity. Positioning hollyhocks against a south-facing wall or a sturdy wooden fence provides a natural windbreak that supplements manual staking efforts. This placement also takes advantage of reflected heat, which these sun-loving plants appreciate during the cooler start of the growing season. However, ensure there is still enough space between the plant and the structure to allow for adequate air circulation, which is vital for preventing fungal issues.
Airflow management is a subtle but vital component of structural care that often goes overlooked by novice growers. When hollyhocks are crowded by neighboring perennials, the lack of wind movement creates a humid microclimate around the lower foliage. This humidity is a primary driver for various leaf spot diseases that can defoliate the plant from the bottom up. Thinning out surrounding vegetation or spacing the hollyhocks at least two feet apart will significantly reduce the manual labor needed for disease control later in the year.
Monitoring the soil density around the base of the plant is the final piece of the structural puzzle. As the stalks grow heavier with developing buds, the center of gravity shifts, making the plant prone to leaning if the soil is too loose or sandy. Adding a layer of organic mulch can help stabilize the surface and prevent the soil from eroding during heavy irrigation or rain events. Check the tension of your ties weekly, as the stems will thicken considerably throughout the summer, and ties that are too tight can girdle the plant and restrict nutrient flow.
More articles on this topic
Managing the life cycle through deadheading
Deadheading is the process of removing spent flowers, and for hollyhocks, it serves both aesthetic and biological purposes. Once a bloom fades, the plant begins to divert significant energy away from further flower production and toward seed development. By snipping off the individual wilted blossoms, you encourage the plant to continue opening the buds further up the spike. This practice can extend the blooming period by several weeks, keeping the garden looking fresh and vibrant well into late summer.
When a flower is removed, it is important to cut back to the main stem without damaging the emerging buds that sit just below the spent one. Use sharp, sterilized shears to ensure clean cuts that heal quickly and do not invite pathogens into the vascular system of the plant. If the entire stalk has finished blooming, it can be cut down to the basal rosette of leaves to improve the plant’s appearance. This redirection of resources helps the plant build up its root reserves for the following year, which is especially important for perennial varieties.
While deadheading is generally encouraged, a strategic gardener will leave a few stalks intact toward the end of the season. Hollyhocks are prolific self-seeders, and allowing the final pods to ripen ensures a fresh crop of seedlings for the following spring. This is the most cost-effective way to maintain a permanent colony of these plants in your landscape without having to purchase new stock. Simply wait for the seed pods to turn brown and slightly brittle before either letting them drop naturally or harvesting them for controlled sowing.
Sanitation is a byproduct of the deadheading process that helps maintain a healthy garden environment. Spent flowers that fall and rot on the lower leaves can trap moisture and trigger the onset of rot or mold. By proactively removing these fading blooms, you are effectively practicing preventative medicine for your garden. Always dispose of the clippings in a compost pile unless you suspect a fungal infection, in which case the material should be bagged and removed from the property entirely.
More articles on this topic
Soil health and nutrient management
The foundation of any successful hollyhock care routine lies in the quality and composition of the soil in which they are rooted. These plants are heavy feeders, requiring a soil profile rich in organic matter to sustain their rapid growth and massive flower production. Ideally, the soil should be a well-draining loam that retains enough moisture to prevent wilting but sheds excess water quickly. Incorporating well-rotted manure or garden compost into the planting site each spring provides a slow-release source of essential macronutrients.
Ph balance is another technical aspect of soil care that can influence the overall vigor of the Alcea species. They generally prefer a neutral to slightly alkaline environment, with a target pH range between 6.0 and 7.5 for optimal nutrient uptake. If your soil is excessively acidic, the plant may struggle to access calcium and magnesium, leading to stunted growth or yellowing leaves. Periodic soil testing allows you to make informed adjustments with lime or sulfur to keep the environment perfectly tuned for their needs.
Mulching serves as a multi-functional tool in the care of hollyhocks, addressing both moisture retention and soil temperature. A three-inch layer of organic mulch, such as shredded bark or straw, helps keep the roots cool during the intense heat of mid-summer. This layer also suppresses weed competition, which is important because weeds can host the same pests and diseases that plague hollyhocks. Be careful to keep the mulch a few inches away from the actual stem to prevent crown rot, which occurs when moisture is trapped against the plant’s base.
As the growing season progresses, the initial boost from spring compost may begin to wane, necessitating supplemental fertilization. A balanced, water-soluble fertilizer applied every four to six weeks can provide the necessary nitrogen for foliage and phosphorus for bloom strength. However, over-fertilizing with high-nitrogen mixes should be avoided, as this can lead to excessive, weak leaf growth at the expense of flowers. Observational care is key; if the leaves look deep green and the stalks are sturdy, your current soil management is likely sufficient.
Seasonal pruning and autumn cleanup
As autumn approaches and the temperature begins to drop, the care routine for hollyhocks shifts toward preparation for dormancy. Once the foliage begins to yellow and die back naturally, it is time to perform a thorough cleanup of the garden bed. Cutting the stalks down to within six inches of the ground helps eliminate the overwintering sites for the notorious hollyhock rust fungus. This aggressive pruning is one of the most effective ways to break the disease cycle and ensure a healthier start for the next year.
Removing all fallen debris from around the base of the plants is just as important as cutting back the stalks themselves. Leaves that have fallen during the summer often harbor fungal spores or the eggs of common garden pests like spider mites. By raking the area clean and replacing the old mulch with a fresh layer, you significantly reduce the biological load in the soil. This “clean slate” approach is a hallmark of professional horticultural management and pays dividends in the following spring’s growth.
For perennial hollyhock varieties, the crown of the plant must be protected from the freeze-thaw cycles of winter. In colder climates, applying a thick layer of evergreen boughs or clean straw over the trimmed basal rosette provides necessary insulation. This protective layer prevents the ground from heaving, which can expose the roots to desiccating winds and sub-zero temperatures. The timing of this application is crucial; wait until the ground has frozen for the first time to ensure the plant is fully dormant.
Spring pruning involves the careful removal of this winter mulch once the threat of hard frost has passed. As you clear the area, look for the first signs of new green growth emerging from the center of the crown. This is also an excellent time to inspect the site for any unwanted seedlings that may have sprouted from late-season seeds. Thinning these seedlings early ensures that the primary plants have enough room to grow without being choked out by their own offspring.
Monitoring for environmental stress
Hollyhocks are generally hardy, but they can exhibit signs of stress when environmental conditions become extreme. Heat stress is common during prolonged droughts, often manifesting as drooping leaves and premature bud drop. To mitigate this, provide deep irrigation in the early morning hours to allow the plant to hydrate before the sun reaches its peak. If the weather is consistently above ninety degrees, providing temporary afternoon shade can help the plant conserve energy and maintain its bloom quality.
Wind damage is another environmental factor that requires constant vigilance, especially during the stormy months of mid-summer. Even well-staked plants can suffer from “whiplash,” where the upper, softer parts of the stem are bent or broken by sudden gusts. After any significant weather event, inspect your hollyhocks for hairline fractures in the stems or loosened ties. Promptly repairing minor damage or adding additional support can prevent a total loss of the flower spike.
In regions with high humidity, the physiological stress caused by poor transpiration can weaken the plant’s natural defenses. When the air is saturated with moisture, the plant cannot effectively move water through its system, leading to a buildup of heat in the tissues. Increasing the spacing between plants or using fans in a greenhouse setting are ways to combat this invisible stressor. Observation of the leaf margins can tell you a lot; if they appear burnt or crispy despite adequate watering, humidity or salt buildup may be the culprit.
Late spring frosts represent a significant threat to the tender new growth of hollyhocks that have just emerged from dormancy. While the roots are hardy, the first flush of leaves is quite sensitive and can be blackened by a sudden drop in temperature. Keeping frost blankets or even old bedsheets on hand allows you to quickly cover the plants if a freeze is forecasted. This extra effort in the early season protects the terminal buds, which are responsible for the height and bloom potential of the entire stalk.
Professional propagation and colony expansion
Expanding a hollyhock collection is a rewarding part of their care, allowing a gardener to create a more impactful visual display. While they are often treated as biennials, many modern cultivars exhibit perennial tendencies if managed correctly. Dividing established clumps every three to four years can rejuvenate an aging plant and provide new material for other parts of the garden. This should be done in early spring using a sharp spade to ensure each division has a healthy section of the taproot and several growth nodes.
Seed collection is the most common method for propagation and requires careful timing to ensure the highest germination rates. Wait for the pods to turn a tan, papery color before cracking them open to reveal the flat, disc-shaped seeds. Storing these seeds in a cool, dry place over the winter mimics their natural dormancy period and prepares them for spring sowing. If you are growing specific hybrids, keep in mind that the offspring may not “come true” to the parent plant’s color or form.
For those looking to accelerate the process, starting seeds indoors in late winter can lead to blooms in the first year for some varieties. Using deep peat pots is advisable because hollyhocks develop a long taproot very quickly, and they resent having their roots disturbed during transplanting. Providing a consistent bottom heat and bright supplemental lighting will produce sturdy seedlings that are ready for hardening off by May. This controlled environment eliminates the risks associated with unpredictable spring weather and pests.
Understanding the genetic diversity of your hollyhocks can also help you care for them more effectively over several generations. If you notice a particular plant is more resistant to rust or has a more robust stem, prioritize collecting its seeds. Over time, you can effectively “breed” a strain of hollyhocks that is perfectly adapted to your specific garden microclimate. This level of intentional care transforms a simple gardening hobby into a sophisticated horticultural project that improves year after year.
Integration with companion planting
Integrating hollyhocks into a broader garden design involves more than just picking a pretty spot; it requires strategic companion planting. Choosing neighbors that share similar water and light requirements simplifies the overall care routine for the entire bed. Plants like delphiniums, foxgloves, and poppies make excellent companions because they create a layered, “cottage garden” effect while blooming at different times. This ensures that the garden bed remains visually interesting even when the hollyhocks are between bloom cycles.
Companion plants can also serve a functional role by acting as a “living mulch” for the base of the hollyhocks. Low-growing perennials with dense foliage can shade the soil, keeping the hollyhock roots cool and moist without competing for the same vertical space. However, it is essential to choose companions that do not have aggressive, mat-forming roots that might interfere with the hollyhock’s taproot. Geraniums or smaller bellflowers are often ideal candidates for this role, providing color and ground cover simultaneously.
From a pest management perspective, certain companion plants can actually help protect your hollyhocks from common threats. Marigolds and nasturtiums are known to repel aphids and other sap-sucking insects that might otherwise target the tender hollyhock buds. Planting these around the perimeter of the hollyhock patch creates a natural chemical barrier that reduces the need for synthetic pesticides. This ecological approach to care fosters a healthier garden biome and supports beneficial pollinators like bees and butterflies.
Finally, consider the visual transition that occurs as hollyhocks finish their blooming season and need to be cut back. Planting mid-to-late summer bloomers like rudbeckia or echinacea in front of your hollyhocks can hide the fading foliage. As the hollyhocks are pruned down for the season, these secondary plants step into the spotlight, maintaining the garden’s structure and color. This thoughtful planning ensures that your care efforts result in a garden that looks professional and intentional through every month of the growing year.