Pruning is a fundamental horticultural practice that, when applied to hollyhocks, serves to manage the plant’s massive size, improve its health, and extend its display. Unlike woody shrubs that require complex structural pruning, the care of Alcea involves a series of timely interventions throughout the growing season. From the removal of the first spent flowers to the final cut of the autumn, each snip of the shears has a specific purpose. Mastering these techniques allows a gardener to keep these giants looking refined and productive rather than overgrown and messy.
The art and science of deadheading
Deadheading is the most frequent pruning task for a hollyhock grower and involves the removal of individual flowers as they begin to fade. As the lower blossoms on the spike finish their cycle, they often turn into unsightly, mushy remnants that can trap moisture and harbor mold. By carefully snipping these off at the base of the flower stalk, you maintain the clean appearance of the spike and prevent the plant from wasting energy on seed production. This simple act tells the plant to continue focusing its resources on the buds that are still waiting to open further up the stem.
To deadhead correctly, use a pair of small, sharp floral snips or garden scissors to make a clean cut just above the main stem. Avoid pulling the flowers off by hand, as this can tear the delicate skin of the stalk and create an entry point for diseases. Because hollyhocks bloom from the bottom up, you will find yourself working your way up the stalk over the course of several weeks. Regular deadheading can extend the total bloom period of a single spike by ten to fourteen days, making it well worth the few minutes of effort each week.
Beyond aesthetics, deadheading is a vital part of “sanitation pruning” that helps control the spread of hollyhock rust. Faded flowers that fall and rest on the large lower leaves create humid micro-pockets where fungal spores can flourish. By removing these spent blooms before they fall, you are actively reducing the humidity and the biological load on the foliage. This proactive approach is one of the “secrets” of professional gardeners who manage to keep their hollyhocks looking green and healthy until the very end of the summer.
There is, however, a strategic time to stop deadheading toward the end of the season. If you want the plant to self-seed and provide you with a new generation of seedlings for the following year, you must leave the final few blossoms on the stalk to develop into seed pods. These pods will turn from green to a papery brown as they ripen, at which point the seeds are ready to be harvested or allowed to drop naturally. Balancing the desire for a clean look with the need for future plants is a key part of the hollyhock gardener’s seasonal strategy.
More articles on this topic
Structural pruning for health and height
As the hollyhock’s flower spike reaches its full height, it may become necessary to perform structural pruning to maintain the plant’s stability. In some cases, a stalk may grow so tall that it becomes top-heavy and starts to lean dangerously, even with staking. If you notice a spike is beginning to buckle under its own weight, you can “tip” the plant by cutting off the very top few inches of the growing point. This stops the vertical growth and encourages the plant to strengthen the existing stalk and open the remaining buds.
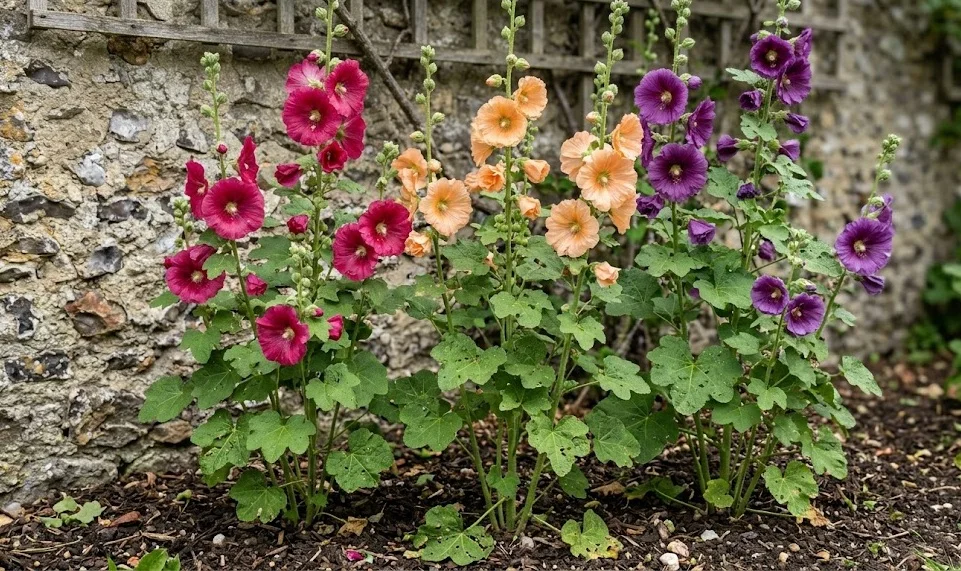
Another form of structural pruning involves the removal of secondary or “axillary” shoots that sometimes emerge from the base of the main leaves. While these extra shoots can provide more flowers, they also divert energy away from the main spike and can lead to a crowded, messy appearance. Many professional growers prefer to remove these side shoots early on to ensure that the main flower spike is as large and impressive as possible. This “single-leader” approach creates the classic, iconic look that makes hollyhocks such a powerful architectural element in the garden.
Thinning the basal rosette of leaves is another technique used to improve the plant’s overall health and airflow. If the cluster of leaves at the base of the plant becomes too dense, the lack of wind movement can create a breeding ground for pests and fungi. Carefully removing a few of the largest, oldest leaves from the center of the rosette allows light and air to reach the crown of the plant. This is particularly important for perennial hollyhocks, as a healthy, well-ventilated crown is much less likely to suffer from rot during the damp months of spring and autumn.
If a flower spike becomes damaged by wind or a heavy storm, prompt corrective pruning is essential to save the rest of the plant. Use a sharp saw or heavy-duty loppers to cut the broken stalk back to a clean, healthy point, ideally just above a leaf node. If the break is low on the plant, you may need to remove the entire stalk to prevent it from rotting and affecting the crown. While losing a flower spike is disappointing, a clean cut allows the plant to heal quickly and potentially produce a smaller, secondary spike later in the season.
More articles on this topic
Seasonal cutback and rejuvenation
The most significant pruning event occurs at the end of the growing season when the plant begins to enter its dormant phase. Once the foliage has turned yellow or brown and the final seeds have been harvested, the entire plant should be cut back to within a few inches of the soil. This “hard pruning” is a critical step in managing the long-term health of the colony, as it removes the primary overwintering sites for the notorious hollyhock rust fungus. By clearing away all the old growth, you are giving the plant a clean slate for the following spring.
The timing of this final cutback is a matter of debate among gardeners, but most professionals recommend waiting until after the first hard frost has killed the top growth. This ensures that the plant has had every possible opportunity to move its energy reserves down into the roots for the winter. Use a sharp spade or heavy shears to make the cuts, and be sure to rake up and remove every bit of debris from the area. This level of thoroughness is what separates a casual hobbyist from an expert gardener, as it directly impacts the success of the next season.
For hollyhocks that are being grown as biennials, this final cutback often marks the end of the individual plant’s life. However, if the plant has successfully self-seeded, you will likely see a new generation of small green rosettes already forming around the base of the old stalk. Be careful not to damage these “babies” as you prune back the parent plant. In some cases, if the original plant was a short-lived perennial, it may produce a new rosette from the same crown, which will be the starting point for next year’s growth.
Finally, spring pruning involves a quick inspection and cleanup once the winter mulch has been removed. You may find a few dead or “mushy” leaves at the center of the new growth that should be carefully snipped away to prevent rot. This is also the time to thin out any excess self-sown seedlings to ensure that the remaining plants have enough space to reach their full potential. By viewing pruning as a continuous cycle of care rather than a one-time chore, you can maintain a hollyhock display that is both healthy and breathtaking year after year.