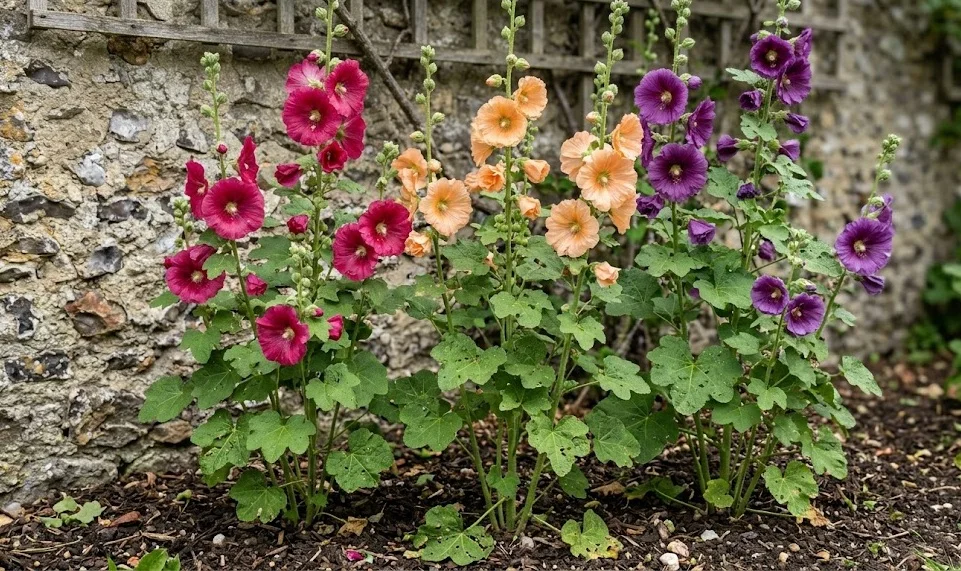
The ability of hollyhocks to return year after year is one of their most valued traits, but survival through the harsh winter months is not always guaranteed. While many varieties are hardy to zone 3 or 4, the combination of extreme cold, fluctuating temperatures, and damp soil can prove fatal to the crown. Successful overwintering is a deliberate process that begins in late summer and continues until the first signs of growth appear in the spring. By taking specific steps to protect the plant’s energy reserves and its physical structure, you ensure a vigorous return for the next growing season.
Preparing the plant for dormancy
The transition to winter begins with a strategic reduction in care as the days grow shorter and the temperatures begin to drop. Stop all fertilization by late August to prevent the plant from producing new, tender growth that would be easily killed by the first frost. This “hardening off” period allows the hollyhock to shift its energy from foliage and flower production toward strengthening its root system. It is also a good time to ensure the plant is well-hydrated, as drought-stressed plants are much less likely to survive a deep freeze.
Once the first hard frost has blackened the foliage, it is time to perform the primary seasonal pruning. Cut the main stalks down to about four to six inches above the ground, leaving a small “handle” that marks the location of the plant. Removing the old, potentially diseased stalks is critical for preventing the overwintering of fungal spores like rust. Be sure to clean your cutting tools with alcohol between plants to avoid spreading any pathogens from one individual to another during this final cleanup.
Cleaning the surrounding soil surface is just as important as pruning the plant itself. Remove all fallen leaves, spent flowers, and old mulch from the base of the hollyhocks and dispose of them far away from the garden. This debris acts as a winter hotel for pests like slugs and various insect eggs that would otherwise be ready to attack in the spring. A clean “footprint” around the crown of the plant reduces the biological pressure it will face when it emerges from dormancy several months later.
For first-year rosettes that have not yet bloomed, the preparation is slightly different, as you want to preserve as much of the green foliage as possible. These young plants rely on their leaves to continue photosynthesizing until the ground actually freezes. Only remove leaves that are clearly dead or showing signs of disease, and leave the healthy green center intact. This small rosette of leaves will be the starting point for the massive flower spike that will emerge in the following summer, so its protection is paramount.
More articles on this topic
Insulation and crown protection
The primary threat to hollyhocks during the winter is not just the cold, but the cycle of freezing and thawing that can heave the plant out of the ground. When the soil expands and contracts, the long taproot can be snapped or the crown exposed to the drying effects of the winter wind. To prevent this, apply a thick layer of protective mulch once the ground has frozen for the first time. Using materials like clean straw, evergreen boughs, or shredded leaves provides excellent insulation without trapping excessive moisture against the plant.
A four-to-six-inch layer of mulch is usually sufficient to maintain a stable soil temperature throughout the winter. If you live in an area with very little snow cover, this insulation is even more critical, as snow itself acts as a natural blanket for the garden. Be careful not to use heavy, matted materials like whole wet leaves, as these can suffocate the crown and lead to rot. The goal is to provide a “breathable” layer that protects against the wind and temperature swings while allowing some air exchange.
In regions with particularly severe winters or very wet soils, some gardeners choose to use specialized winter covers or “cloches” for their prized hollyhocks. A simple bottomless bucket or a specialized frost dome can provide an extra layer of protection against freezing rain and heavy ice buildup. However, if you use a solid cover, you must ensure there is some ventilation to prevent the temperature inside from rising too high on sunny winter days. This prevents the plant from “waking up” too early and then being killed by a subsequent cold snap.
The timing of this insulation is a delicate balance that requires monitoring the local weather patterns. If you apply the mulch too early, while the ground is still warm and moist, you may inadvertently encourage rodents to nest near the crown or promote the growth of mold. Wait until the top inch of soil is firm and frozen before tucking your plants in for the winter. This ensures that the plant is fully dormant and that the “biological clock” of the garden has officially shifted to its rest phase.
More articles on this topic
Managing winter moisture and drainage
While cold is a major factor, excessive moisture is perhaps the most common cause of hollyhock mortality during the winter months. These plants are very susceptible to crown rot if they sit in cold, saturated soil for an extended period. If your garden has heavy clay soil that tends to stay wet, you may need to take extra steps to improve drainage around the hollyhock patch. Creating a slight mound of soil or adding grit to the planting area can help shed excess water away from the sensitive crown.
During a winter with heavy snowfall, be mindful of where you pile the snow when clearing paths or driveways. Avoid dumping large amounts of snow directly onto your hollyhock beds, as the weight can crush the dormant crowns and the extra meltwater in the spring can cause rot. As the snow melts, ensure that the water has a clear path to drain away from the garden beds rather than pooling around the plants. Professional site planning always takes these winter drainage patterns into account to ensure long-term plant survival.
In some cases, a “dry mulch” strategy is the best approach for hollyhocks in wet climates. This involves using a water-repellent layer, such as a piece of plywood or a plastic sheet held up by bricks, placed a few inches above the mulched crown. This “umbrella” keeps the direct rain and melting snow off the center of the plant while still allowing the roots to access the moisture they need from the surrounding soil. This technique is particularly useful for protecting heirloom varieties that may be less resilient to modern climate fluctuations.
Checking on your plants during a mid-winter thaw can provide valuable information about how well they are surviving. If you notice that the mulch has blown away or that a plant has been partially heaved out of the ground, take a moment to gently press it back down and replace the cover. This small amount of “emergency maintenance” can save a plant that would otherwise perish in the next freeze. Winter care is not a “set it and forget it” task; it requires a watchful eye even when the garden looks completely asleep.
Spring awakening and transition
The final stage of the overwintering process is the careful re-introduction of the plant to the growing season. As the temperatures begin to consistently stay above freezing and the first signs of green growth appear, it is time to gradually remove the winter protection. Don’t remove all the mulch at once, as a late spring frost can still damage the tender new shoots. Instead, pull the mulch back from the center of the crown over a period of a week or two, allowing the plant to acclimate to the increasing light and air.
Once the danger of a hard freeze has passed, a thorough spring cleaning of the area is in order. Remove any remaining winter mulch and replace it with a fresh, thinner layer of compost or organic mulch for the summer. This is also the ideal time to inspect the crowns for any signs of winter damage or rot. If a crown feels mushy or pulls away from the soil easily, it may have succumbed to the winter and should be removed to prevent it from becoming a host for pests.
The emergence of new leaves is also the signal to start your preventative disease management for the year. As mentioned in the chapter on diseases, applying a light dusting of sulfur or a preventative spray can help stop the first generation of rust spores from taking hold. Because the fungus often overwinters on the smallest bits of organic matter, this early intervention is the most effective way to ensure a healthy summer. A proactive start in the spring is the direct result of a successful overwintering strategy.
Finally, take note of which varieties survived the winter most successfully in your specific microclimate. Gardening is a continuous learning process, and the hollyhocks that return with the most vigor are the ones best suited for your garden’s unique conditions. You may decide to prioritize these varieties in future plantings or even collect their seeds to create a locally adapted strain. Overwintering is the ultimate test of a plant’s resilience, and seeing those first green leaves in the spring is the greatest reward for a gardener’s hard work.