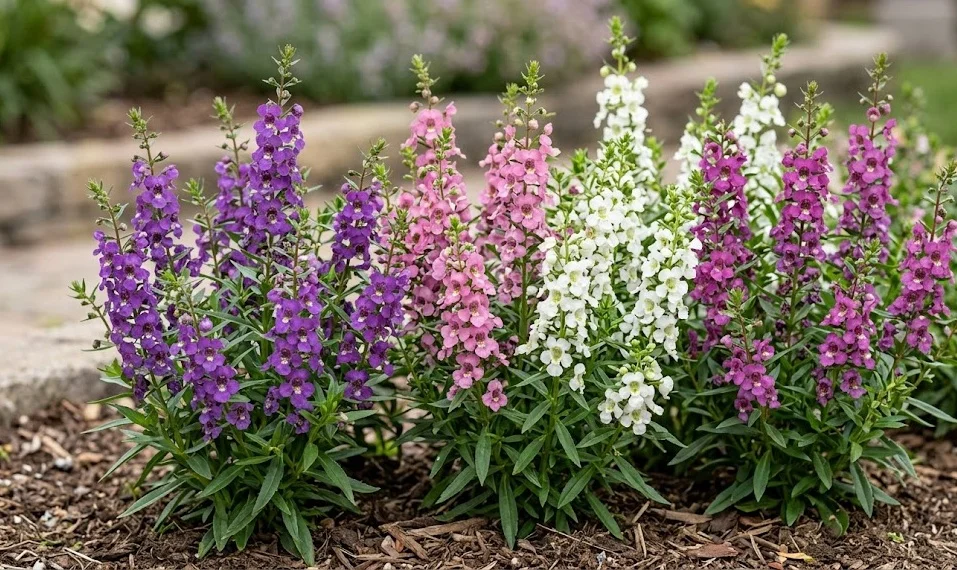
Establishing a vibrant garden display begins with the careful planting and strategic propagation of your chosen species. The narrowleaf angelonia is a versatile plant that can be started from seeds, cuttings, or nursery-grown transplants depending on your preference. Each method requires a specific set of skills and environmental conditions to ensure the highest success rate and healthiest plants. This article details the professional techniques needed to populate your garden with these stunning summer bloomers.
When you decide to add this plant to your landscape, the timing of your planting is the most critical factor to consider. Because it is a heat-loving species, placing it in the ground too early can lead to stunted growth or even death from late-season frosts. Professionals usually wait until the soil temperature has consistently reached at least 18 degrees Celsius before beginning the transplanting process. Patience during the early spring months will be rewarded with much more vigorous growth once the heat of summer truly arrives.
Site preparation is another foundational step that should never be rushed or overlooked if you want professional results. You must clear the area of any competing weeds and turn the soil to a depth of at least fifteen centimeters to ensure it is loose and airy. Adding a layer of high-quality compost will provide the necessary nutrients and improve the soil’s ability to hold moisture without becoming waterlogged. A well-prepared site allows the young plants to establish their roots quickly and begin their upward growth without unnecessary stress.
The physical process of planting should be done with care to avoid damaging the delicate root systems of the young starts. Dig a hole that is slightly larger than the root ball of the plant to allow for easy placement and root expansion. Once the plant is in the ground, press the soil firmly around the base to eliminate air pockets, but avoid compacting it too tightly. Water the new transplants immediately to help settle the soil and provide the hydration needed for the plant to recover from the shock of moving.
Starting plants from seeds
Growing narrowleaf angelonia from seeds is a cost-effective way to produce a large number of plants for extensive garden beds. The seeds are quite small and require light to germinate, so they should be sown on the surface of the starting mix rather than buried deeply. Using a fine-mist sprayer to moisten the seeds is better than heavy watering, which could wash them away or bury them too far. A temperature-controlled environment with plenty of light is essential for achieving a high germination rate within the first two weeks.
More articles on this topic
Providing a consistent source of warmth from below can significantly speed up the germination process and improve the health of the seedlings. Many professional growers use heating mats specifically designed for seed starting to maintain a steady temperature of around 22 to 24 degrees Celsius. This bottom heat encourages rapid root development, which is vital for the young plant’s ability to take up nutrients. Once the seedlings have developed their first set of true leaves, you can begin to reduce the temperature slightly to prepare them for the outdoor environment.
Lighting is perhaps the most challenging aspect of starting seeds indoors, as typical household light levels are usually insufficient. Seedlings that do not receive enough light will become “leggy,” characterized by long, weak stems that may not be able to support the plant later. Using full-spectrum grow lights positioned just a few centimeters above the seedlings will ensure they grow strong and compact. The lights should be on for about fourteen to sixteen hours a day to mimic the long days of the upcoming summer season.
Thinning the seedlings is a necessary but sometimes difficult task for the home gardener to perform correctly. If too many plants are growing in a small space, they will compete for resources and become weak and spindly. Choose the strongest-looking seedling in each cell or pot and carefully remove the others to give the remaining plant plenty of room to expand. This selection process ensures that only the most vigorous individuals make it to your garden, leading to a much higher quality of display in the long run.
Propagating through vegetative cuttings
Taking cuttings is an excellent way to create exact clones of your favorite plants, ensuring that you maintain specific flower colors or growth habits. This process is best performed in late spring or early summer when the plant is growing actively and the stems are still relatively flexible. Choose a healthy, non-flowering stem and cut a section about ten centimeters long just below a leaf node. Removing the lower leaves will expose the nodes where new roots will eventually form once the cutting is placed in a rooting medium.
More articles on this topic
To increase your success rate, using a rooting hormone powder or gel can stimulate the production of new roots more quickly. Dip the cut end of the stem into the hormone and then gently insert it into a moist, sterile potting mix or a combination of perlite and peat. It is important to keep the cuttings in a high-humidity environment to prevent them from wilting before they can grow their own roots. Many professionals use a clear plastic dome or a simple plastic bag to create a mini-greenhouse effect around the young cuttings.
During the rooting phase, which typically takes two to three weeks, the cuttings should be kept in bright but indirect sunlight. Direct sun can cause the temperature under the plastic to rise too high, potentially cooking the delicate stems before they have a chance to establish. Check the moisture level of the medium daily and mist the leaves if they appear to be losing their turgidity. You can test for root development by giving the cutting a very gentle tug; if you feel resistance, it means roots have begun to take hold in the soil.
Once the cuttings have established a strong root system, they can be gradually acclimated to the outdoor environment through a process called hardening off. Start by placing them in a sheltered spot for a few hours a day and slowly increase their exposure to direct sun and wind. This transition period is crucial for preventing transplant shock and ensuring the survival of your newly propagated plants. After about a week of hardening off, the young angelonias will be ready to take their place in your garden beds or containers.
Best practices for transplanting and establishment
Transplanting is the final step in the propagation process and requires attention to detail to ensure the plant transitions smoothly to its permanent home. Before moving the plants, make sure they are well-watered, as a hydrated plant is much more resilient to the stresses of being moved. Avoid transplanting during the hottest part of the day, as the intense sun can cause rapid moisture loss and lead to wilting. Late afternoon or an overcast day provides the ideal conditions for settling new plants into the landscape without excessive environmental stress.
When placing multiple plants in a bed, proper spacing is essential to allow for future growth and adequate air circulation between the specimens. Most varieties of narrowleaf angelonia should be spaced about twenty to thirty centimeters apart, depending on their expected mature width. If plants are crowded too closely together, they will compete for light and nutrients, and the lack of airflow will increase the risk of disease. Giving each plant enough room to breathe will result in a much healthier and more visually appealing garden display.
After the plants are in the ground, a thorough watering is necessary to settle the soil around the roots and eliminate any remaining air pockets. You may also want to apply a mild, diluted liquid fertilizer to provide an immediate boost of nutrients for the establishment phase. Be careful not to over-fertilize at this early stage, as too many salts can burn the young, tender roots. The goal is to provide just enough support for the plant to begin producing new growth and anchoring itself firmly into the soil.
The first few weeks after transplanting are the most critical for the long-term success of your angelonia display. Monitor the moisture levels daily and be prepared to provide supplemental water if the weather is particularly dry or windy. You should also keep an eye out for any pests that might be attracted to the tender new growth of the young plants. By providing consistent care during this establishment period, you set the stage for a season of spectacular blooms and robust plant health.