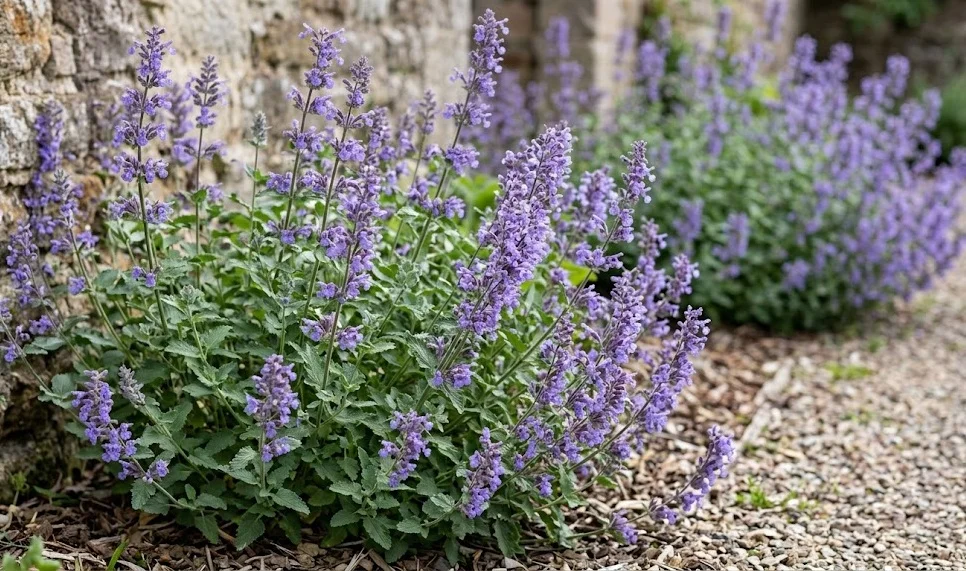
The ability of garden catmint to survive the cold months is one of its most valued traits as a perennial landscape plant. However, successful overwintering involves more than just leaving the plant to fend for itself in the frost. A professional approach to winter preparation ensures that the crown and roots remain healthy and ready for a vigorous spring awakening. This article details the essential steps for protecting your catmint during the dormant season and managing the transition back to growth.
Preparing for the dormant phase
As the days grow shorter and temperatures drop in late autumn, your catmint will naturally begin to slow its growth. This transition into dormancy is a vital part of the plant’s life cycle, allowing it to store energy in its root system for the coming year. You will notice the foliage starting to lose its vibrant green color and the stems becoming somewhat brittle. This is the signal for you to begin your winter preparation routine to protect the plant from extreme conditions.
One of the first decisions you need to make is whether to cut the plant back before winter or wait until spring. Many professional gardeners prefer to leave the dried stems standing to provide some natural insulation for the crown. The hollow stems can also serve as winter habitat for beneficial insects, which is a great way to support garden biodiversity. If you prefer a tidier look, you can certainly cut the stems back to about three or four inches above the ground.
Clearing away fallen leaves from other trees that might have collected around the base of your catmint is an important task. While a light layer of leaves can provide insulation, a heavy, wet mat can trap moisture and lead to rot at the crown. You want to ensure that the area stays relatively dry and that air can still circulate around the base of the plant. This simple cleaning step can prevent many of the fungal issues that occur during the damp winter months.
It is also a good idea to check the surrounding soil for any drainage issues that might have developed during the growing season. In areas with high winter rainfall, standing water is the primary enemy of catmint during its dormant phase. If you notice a low spot where water collects, you might want to consider gently lifting the plant and adding some grit to the hole. Ensuring that the roots are not sitting in freezing water will significantly increase the survival rate of your perennials.
More articles on this topic
Mulching and crown protection
Mulching is a key professional technique for stabilizing soil temperatures and protecting the sensitive crown of the plant from freeze-thaw cycles. However, the type of mulch you choose for catmint is different from what you might use for moisture-loving plants. Inorganic mulches like pea gravel, crushed stone, or coarse sand are often the best choice for these Mediterranean-style perennials. These materials allow water to drain away quickly while providing a protective layer against the cold air.
If you live in an area with extremely harsh winters and little snow cover, you might consider a light layer of evergreen boughs or straw. These materials provide excellent insulation without packing down and becoming a soggy mess that could rot the plant. Avoid using heavy wood chips or thick layers of bark directly against the stems, as these can hold too much moisture. The goal is to provide a “breathable” blanket that protects the plant from the worst of the wind and frost.
The timing of mulch application is just as important as the material itself to ensure the best results. You should wait until the ground has actually frozen before applying your winter mulch for protection. Applying it too early can trap heat in the soil and prevent the plant from entering deep dormancy properly. Once the soil is cold, the mulch acts as an insulator that keeps the temperature stable even when the air temperature fluctuates wildly.
In the early spring, you must be diligent about removing any protective winter mulch as the temperatures begin to rise. If you leave heavy covers on for too long, they can trap moisture and heat, leading to premature growth that is vulnerable to late frosts. Gradually thinning the mulch as the first signs of green emerge allows the plant to acclimate to the changing season. This careful transition is a hallmark of professional garden management during the spring thaw.
More articles on this topic
Winter container care
Growing catmint in containers presents unique challenges during the winter, as the roots are more exposed to the cold than those in the ground. In many climates, a pot can freeze solid, which might damage the root system of even the hardiest varieties. One professional solution is to move your containers to a more sheltered location, such as against a south-facing wall or into an unheated garage. This provides a buffer against the most extreme temperatures while still allowing the plant to remain dormant.
If moving the pots is not an option, you can wrap them in insulating materials like bubble wrap, burlap, or specialized frost blankets. This helps to slow down the freezing and thawing process, which is often more damaging to plants than the cold itself. Grouping multiple pots together can also create a shared thermal mass that holds onto heat longer than a single isolated container. Ensure that the pots are still able to drain freely even when they are wrapped for protection.
Watering is still necessary for container-grown catmint during the winter, although the frequency should be greatly reduced. On days when the temperature is above freezing and the soil feels dry, give the pots a light drink to prevent the roots from desiccating. You should avoid watering when a hard freeze is expected, as this can lead to ice forming within the pot and damaging the container. Monitoring your pots throughout the winter ensures that they emerge in the spring with healthy, viable roots.
Lastly, consider the material of your containers when planning for winter care in cold climates. Terracotta and some ceramics can crack when the moist soil inside expands as it freezes. Using frost-resistant materials like high-quality plastic, resin, or treated wood can prevent the loss of both the plant and the pot. Taking these precautions allows you to enjoy the beauty of potted catmint year after year without having to replant every spring.
Spring transition and recovery
The moment your catmint starts to show new growth in the spring is an exciting time for any gardener. This is when you should perform your final cleanup by removing any remaining dead stems from the previous year. Use sharp, clean pruners to cut the old growth back to just above the new green shoots that are emerging from the crown. This opens up the plant to light and air, encouraging a flush of healthy new foliage and a tidy appearance.
If you notice any winter damage, such as brown or mushy sections of the crown, don’t panic immediately. Often, the plant can recover if you prune away the affected parts and ensure the drainage is improved. If a large portion of the plant has died, it might be an opportunity to divide the remaining healthy sections and start fresh. Professional gardeners see these moments as a chance to rejuvenate their plantings and improve the overall health of the garden.
Early spring is also the ideal time to add a light layer of fresh compost or a balanced organic fertilizer to support the new growth. As the soil warms up, the microbial activity increases, and the plant begins to demand more nutrients for its rapid development. Avoid the temptation to over-feed, as this can lead to the “flopping” issues mentioned in previous sections. A gentle boost is all that is needed to get your catmint off to a great start for the new season.
Finally, keep a close eye on the weather forecasts during the early spring weeks when the new growth is still tender. A sudden late frost can sometimes singe the tips of the new leaves, although it rarely kills an established catmint. If a particularly cold night is predicted, a temporary covering with a light sheet or frost blanket can save the new foliage. This attention to detail ensures that your garden looks its best as it enters the peak flowering months.