Establishing a healthy population of Mexican morning glory starts with a strategic approach to planting and propagation. This versatile climber can be started from seeds or cuttings, depending on the gardener’s preference and the time of year. Successful establishment requires careful attention to temperature, moisture, and soil composition during the early stages of life. By following professional protocols, you can ensure a high success rate and vigorous growth from the very beginning.
Starting from seeds is the most common method for propagating this annual or short-lived perennial vine. The seeds have a relatively hard outer coat, which can sometimes delay germination if not treated properly. Many experts recommend scarring the seed surface or soaking them in warm water for twenty-four hours before sowing. This process, known as scarification, helps moisture penetrate the seed more easily to trigger the biological processes of growth.
Sowing should ideally take place indoors about six to eight weeks before the last expected frost in your area. Use a high-quality seed starting mix that is light, fluffy, and free from any potential pathogens or weed seeds. Place the seeds about half an inch deep in individual biodegradable pots to minimize root disturbance during later transplanting. Keeping the soil consistently warm, ideally around seventy degrees Fahrenheit, will result in the fastest and most uniform germination.
Once the seedlings have emerged, they require intense light to prevent them from becoming leggy and weak. A bright south-facing window or professional-grade grow lights can provide the energy needed for sturdy stem development. It is important to monitor the moisture levels closely, as young seedlings can quickly dry out in small containers. As the plants grow their first true leaves, you can begin to introduce a very weak liquid fertilizer to support their expansion.
Hardening off and site preparation
Before moving your young vines into the garden, they must undergo a process called hardening off to adjust to the outdoors. This involves gradually exposing the plants to direct sunlight, wind, and fluctuating temperatures over a period of ten to fourteen days. Start by placing them in a shaded, protected area for a few hours each day and slowly increase their exposure. This transition prevents transplant shock, which can stunt growth or even kill delicate young specimens.
More articles on this topic
The selection of the planting site is a critical decision that will affect the plant for the rest of the season. Look for a location that receives at least six to eight hours of direct sunlight per day to ensure maximum flowering potential. The soil in this area should be worked to a depth of at least twelve inches to allow for easy root penetration. Incorporating well-rotted manure or finished compost at this stage will provide a long-lasting reservoir of essential nutrients.
Drainage is another non-negotiable factor when preparing the garden bed for this Mexican native. If the soil is heavy clay, consider building a raised bed or incorporating significant amounts of grit to improve water flow. This vine does not tolerate “wet feet,” and sitting in saturated soil will quickly lead to root rot and death. Testing the drainage by filling a hole with water and timing how long it takes to empty is a professional trick to verify site suitability.
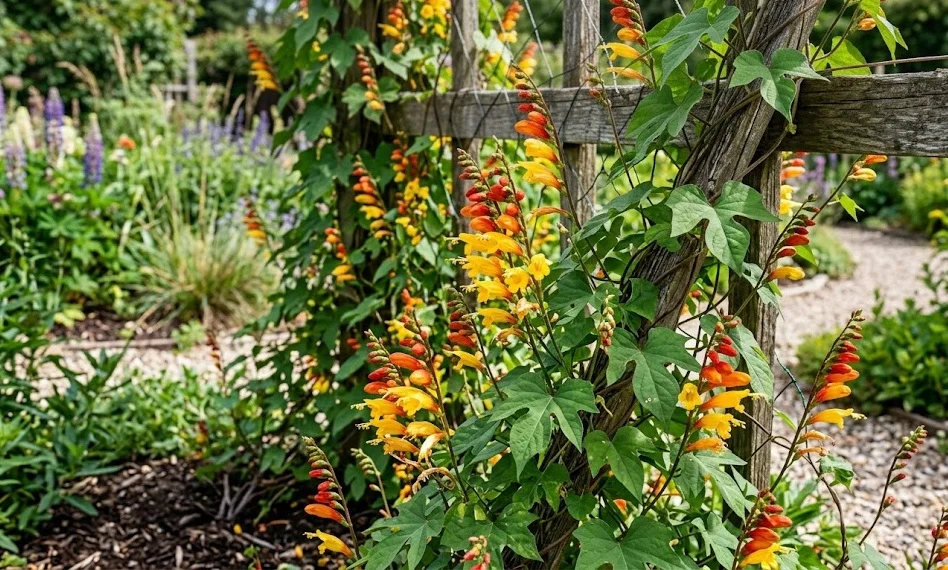
The final step in site preparation is installing the support structure before the plants are actually put into the ground. Doing this early prevents you from accidentally damaging the tender roots of the newly planted vines later on. Whether you choose a wooden trellis, a metal obelisk, or simple garden twine, ensure it is firmly anchored. Having the support ready allows the vine to begin its upward climb immediately after it recovers from transplanting.
Transplanting and early establishment
Transplanting should only occur when the soil has warmed up significantly and all danger of frost has passed. Dig a hole that is slightly larger than the root ball of your seedling to ensure it fits comfortably without crowding. If you used biodegradable pots, ensure the rim is buried below the soil surface to prevent it from acting like a wick and drying out the roots. Gently firm the soil around the base of the plant to eliminate any large air pockets.
More articles on this topic
Immediate watering after transplanting is essential to help settle the soil and hydrate the plant during its transition. Use a gentle stream of water to avoid washing away the soil or damaging the delicate stems of the young vine. Some gardeners like to use a root-stimulating solution during this first watering to encourage faster establishment. Keeping the area consistently moist for the first two weeks is the most important part of the early care routine.
Spacing between individual plants is an important consideration for a professional-looking garden display. To create a dense screen, space the vines approximately twelve to eighteen inches apart along the base of the trellis. Providing enough room between plants allows for better air circulation, which is key to preventing fungal diseases later in the season. If you are planting in containers, one or two plants per large pot is usually sufficient for a lush appearance.
During the first few weeks in the garden, keep a close eye on the plants for any signs of stress or pest activity. Young vines are particularly attractive to slugs and snails, which can quickly consume the tender new growth. Using organic barriers or traps around the base of the plants can provide much-needed protection during this vulnerable phase. Once the plant reaches about a foot in height and begins to climb, it becomes much more resilient and self-sufficient.
Vegetative propagation and seed saving
While starting from seed is popular, this vine can also be propagated through stem cuttings during the active growing season. This method allows you to create exact genetic clones of a particularly vigorous or beautiful specimen. Take a cutting from a healthy, non-flowering shoot that is about four to six inches long. Remove the lower leaves and dip the cut end into a rooting hormone powder to increase the chances of success.
Place the cutting in a glass of water or a pot filled with a moist, sterile rooting medium like perlite or sand. Keep the cutting in a warm, brightly lit area but out of direct sunlight until roots begin to form, which usually takes a few weeks. Once a strong root system has developed, the new plant can be potted up and treated like a seedling. This is an excellent way to expand your collection without the need for purchasing more seeds.
If you wish to save seeds for the following year, allow the final flower spikes of the season to remain on the plant. The flowers will eventually give way to small, papery seed pods that turn brown as they ripen. It is important to wait until the pods are completely dry on the vine before harvesting them. If you pick them too early, the seeds inside may not be fully mature and will fail to germinate in the spring.
Store your harvested seeds in a cool, dry, and dark location in a paper envelope to prevent mold growth. Label the envelope clearly with the name of the plant and the date of harvest to keep your garden records organized. Seeds stored under the right conditions can remain viable for several years, though fresh seeds typically have the highest germination rates. This cycle of propagation and saving ensures that the beauty of the Mexican morning glory remains a permanent fixture in your garden.