The successful establishment of these majestic woodland plants begins with a precise planting strategy and an understanding of their reproductive habits. These perennials are known for their slow growth initially, but once they find their place in the garden, they can live for many years with minimal intervention. Whether you are starting with a nursery-grown container or attempting to propagate your own through division, the early stages are crucial for long-term health. Taking the time to prepare the site correctly will pay dividends when the plant eventually reaches its full, towering height.
Site selection and preparation
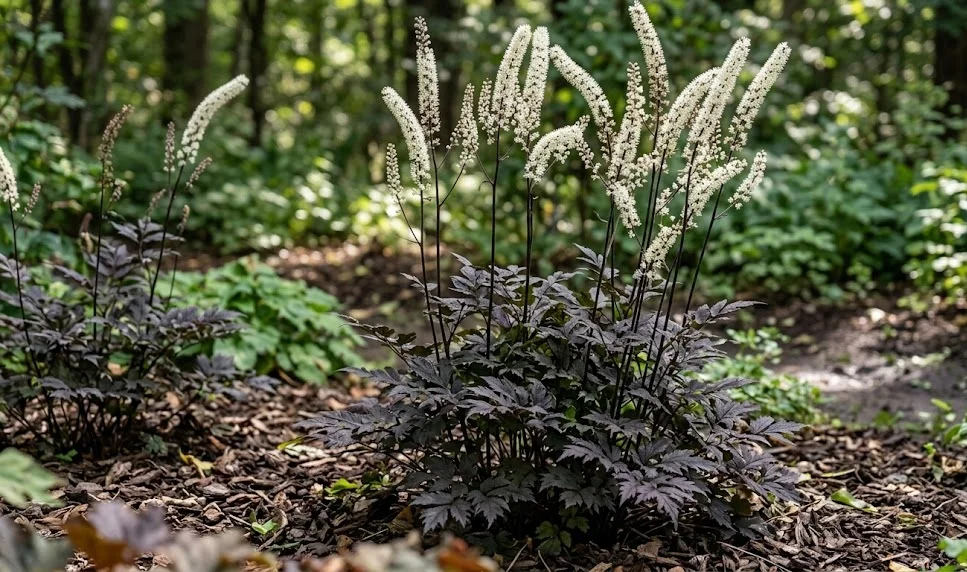
Choosing the right location is the most important decision you will make when adding these plants to your landscape. They naturally prefer the cool, damp environment of a deciduous forest floor, where the soil is rich in organic matter and protected from the wind. You should look for a spot that receives morning sun followed by afternoon shade, as this provides enough light for the flowers without overheating the roots. If the site is too dry or too sunny, the plant will struggle to establish itself and may never reach its full potential.
Preparing the soil before the plant ever touches the ground is a step that should never be rushed or overlooked. You should dig a hole that is twice as wide as the root ball and just as deep, ensuring that the surrounding soil is loose and easy for new roots to penetrate. Mixing in a generous amount of high-quality compost or aged manure will provide the initial boost of nutrients needed for quick establishment. This preparation creates a fertile pocket that mimics the nutrient-rich leaf litter found in the plant’s native habitat.
The drainage capacity of the site must be carefully assessed to ensure the roots do not sit in water during the dormant season. While these plants love moisture, a waterlogged environment will lead to rot and the eventual death of the specimen. You can improve the drainage of heavy clay soils by adding grit or well-rotted organic matter to the planting area. Testing the site after a heavy rain will give you a clear indication of how the water moves through the soil and if any further adjustments are needed.
Spacing is another critical factor to consider during the planting process, as these plants can become quite large over time. You should allow at least two to three feet between each plant to ensure adequate air circulation and room for the foliage to expand. Planting them too closely together can lead to competition for water and nutrients, which may stunt their growth or increase the risk of disease. A well-spaced garden allows each individual plant to stand out and showcase its unique architectural form and beautiful foliage.
More articles on this topic
The planting process
When you are ready to put the plant into the ground, the timing and technique will significantly influence how quickly it recovers from the transplant shock. The best times for planting are in the early spring or early autumn when the temperatures are mild and the soil is naturally moist. You should carefully remove the plant from its container, taking care not to damage the delicate root system or the emerging shoots. If the roots are tightly bound, gently teasing them outward will help them integrate into the new soil more effectively.
Place the plant in the hole so that the crown is level with the surrounding soil surface, as planting it too deep can cause the stems to rot. Once the plant is positioned, backfill the hole with the amended soil, firming it gently with your hands to remove any large air pockets. You want the plant to feel secure in the ground but not so compacted that the roots cannot breathe or expand. This balance is essential for encouraging the plant to settle in quickly and start the process of building a strong root foundation.
Immediately after planting, you must water the area thoroughly to settle the soil and provide the roots with the hydration they need to start growing. A slow, deep soaking is much more effective than a quick sprinkle, as it ensures the moisture reaches the bottom of the planting hole. You might notice some minor wilting in the first few days, which is a normal reaction to being moved to a new environment. Keeping the soil consistently moist during the first few weeks is the most important task you can perform to ensure success.
Applying a layer of organic mulch around the base of the plant will help retain moisture and regulate the temperature of the root zone. You should keep the mulch a few inches away from the stems to prevent moisture from sitting against the crown and causing decay. This protective layer also helps suppress weed growth, which reduces the competition for resources during the critical establishment phase. A well-mulched plant is much better equipped to handle the stresses of the changing seasons and the challenges of the garden environment.
More articles on this topic
Propagation by division
Dividing established clumps is the most reliable way to create new plants that are genetically identical to the original specimen. This process is best done every four to five years, or when you notice that the center of the clump is becoming less productive. You should perform divisions in the early spring before the plant has put too much energy into new foliage growth. Using a sharp spade or a garden fork, carefully lift the entire root mass from the ground, trying to keep as much of the root system intact as possible.
Once the clump is out of the ground, you can use a clean knife or your hands to separate it into smaller sections, each with at least two or three healthy buds. You should look for vigorous outer sections and discard any old, woody parts from the center of the original plant. It is important to keep the roots moist during this entire process, as they can dry out quickly when exposed to the air. Working in the shade or on a cloudy day can help minimize the stress on the newly separated divisions.
Replant the divisions as soon as possible into their new locations or into large pots filled with high-quality potting mix. Treat these new plants with the same care as a newly purchased nursery specimen, paying close attention to their watering needs. Because they already have a developed root system, these divisions usually establish themselves quite quickly and may even bloom in their first or second year. This is a cost-effective and rewarding way to expand your collection and share these beautiful plants with other gardening friends.
The recovery period after division is a time when the plant is particularly vulnerable to environmental extremes and needs a little extra attention. You should provide some temporary shade if the weather becomes unexpectedly hot or sunny shortly after replanting the divisions. Avoiding heavy fertilization during this time is also a good idea, as the focus should be on root development rather than lush foliage growth. With a bit of patience and care, your new plants will soon be as impressive as the original clump from which they were taken.
Starting from seed
Growing these perennials from seed is a slow but fascinating process that requires patience and a bit of technical knowledge. The seeds typically have complex dormancy requirements and often need a period of both warm and cold stratification to germinate. You should collect the seeds as soon as the pods turn brown and start to split open in the late autumn. Sowing the seeds immediately while they are still fresh is often more successful than trying to store them for long periods.
A dedicated seed tray or a protected outdoor nursery bed is the best place to start your seeds, as it allows you to monitor them closely. The soil should be a light, well-draining mix that stays consistently moist but never becomes soggy or waterlogged. You can cover the seeds with a thin layer of fine grit to protect them from heavy rain and to help maintain moisture levels. Over the winter, the natural temperature fluctuations will help break the seed’s dormancy and prepare it for germination in the spring.
Germination can be erratic and may take several months, so do not be discouraged if you do not see green shoots right away. Once the seedlings appear, they will need a sheltered spot with dappled light and careful watering to prevent them from drying out. They are very sensitive at this stage and can be easily overwhelmed by faster-growing weeds or damaged by harsh weather. It may take two or three years of careful nurturing before the young plants are large enough to be moved into their permanent positions in the garden.
While starting from seed takes more time and effort than other methods, it allows you to produce a large number of plants at a very low cost. It also gives you the opportunity to observe the entire lifecycle of the plant and gain a deeper appreciation for its biological complexity. Some seedlings may show slight variations in leaf color or growth habit, adding an element of surprise to your gardening project. Successful seed propagation is a true mark of a skilled gardener and provides a deep sense of accomplishment.