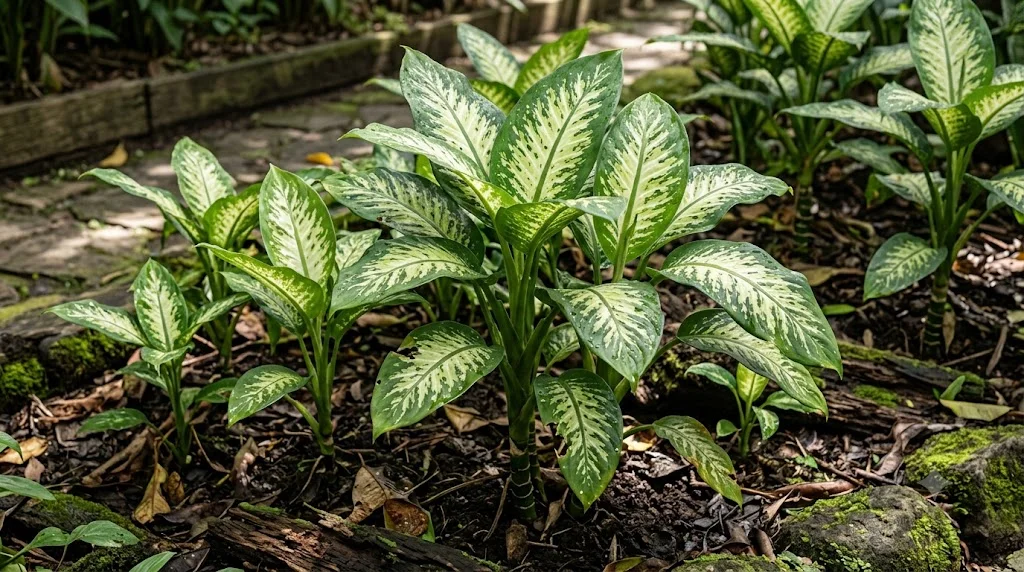

Dumb cane is a striking tropical houseplant valued for its broad leaves, bold patterns, and ability to create an immediate sense of greenery indoors. Although it is often described as easy to grow, its appearance depends heavily on stable light, temperature, moisture, and humidity. Sudden changes in these conditions can lead to yellowing leaves, brown margins, or weak growth. With consistent care, however, the plant can remain dense, colourful, and attractive for many years.
Understanding the plant’s natural needs
Dumb cane originates from warm, humid regions where it grows beneath the filtered canopy of taller vegetation. This background explains why it prefers bright but softened light rather than intense direct sunshine. It also performs best when temperatures remain comfortably warm throughout the year. Recreating these conditions indoors is the foundation of successful long-term care.
The plant grows from thick, fleshy stems that store a limited amount of water and support large leaf blades. Mature specimens may develop a cane-like form as older lower leaves naturally disappear. New growth usually emerges from the upper part of the stem, although dormant buds can also produce side shoots. This growth pattern allows an ageing plant to be rejuvenated through careful pruning.
Leaf colour and pattern vary considerably between cultivars. Some have cream-coloured centres surrounded by deep green margins, while others display speckles, marbling, or broad pale patches. Variegated forms generally require more light than predominantly green varieties because their pale tissues contain less chlorophyll. Even so, none of them should be exposed to harsh midday sun through unfiltered glass.
All parts of the plant contain irritating calcium oxalate crystals. Sap can cause burning, swelling, or irritation if it comes into contact with the mouth, eyes, or sensitive skin. Wear gloves when cutting, repotting, or removing damaged tissue, and wash tools after use. Place the plant where children and pets cannot chew its leaves or stems.
More articles on this topic
Choosing the right indoor position
A position near an east-facing window is often ideal because it provides gentle morning light without severe afternoon heat. A north-facing window may also work, particularly in bright rooms or during summer. Near south- or west-facing windows, the plant should usually stand behind a sheer curtain or several feet from the glass. The goal is to provide abundant indirect light while preventing leaf scorch.
Light intensity changes with the seasons, even when the plant remains in the same room. A location that is suitable in midsummer may become too dark during autumn and winter. Moving the pot slightly closer to the window can help maintain balanced growth during shorter days. Any relocation should be gradual so the leaves can adjust without stress.
Avoid placing dumb cane in dark corners simply because it tolerates low light better than some tropical plants. Prolonged shade causes elongated stems, smaller leaves, weaker colouring, and reduced variegation. The plant may survive under such conditions, but it will not develop its best form. A simple test is to observe whether the position remains bright enough to cast a soft shadow for several hours.
Temperature stability is just as important as brightness. Keep the plant away from cold window glass, exterior doors, air-conditioning vents, radiators, and powerful fans. Repeated hot and cold drafts can damage leaf tissue and interfere with water uptake. A sheltered position with gentle air movement is preferable to a stagnant or draughty corner.
More articles on this topic
Maintaining suitable temperature and humidity
Dumb cane grows most actively at temperatures between approximately 18 and 27 degrees Celsius. It can tolerate slightly cooler nights, but prolonged exposure below about 15 degrees may slow growth and damage roots. Cold soil is particularly risky when it remains wet. Warm, stable conditions encourage stronger roots and regular leaf production.
Humidity between 50 and 70 percent generally supports clean leaf edges and healthy unfurling. In very dry air, young leaves may open imperfectly, while mature leaves can develop crisp brown tips. Grouping tropical plants together can create a slightly more humid local environment. A room humidifier provides a more reliable solution during heated winter months.
Misting offers only brief humidity and should not be treated as the main method of moisture control. Frequent spraying can leave mineral spots on foliage and may encourage disease if leaves remain wet in cool conditions. If misting is used, apply fine droplets early in the day and allow the foliage to dry quickly. Clean, room-temperature water is less likely to mark the leaves.
A humidity tray can offer modest benefits when used correctly. The pot should stand above the waterline on pebbles rather than sitting directly in water. Evaporation may slightly raise humidity close to the foliage, although the effect is limited in large rooms. Regularly clean the tray to prevent algae, unpleasant odours, and fungus gnat breeding.
Managing routine watering
Watering should be based on soil condition rather than a rigid weekly timetable. Insert a finger two to four centimetres into the growing medium and water when this upper layer feels slightly dry. Apply enough water to moisten the root ball evenly, then allow the excess to drain completely. Empty any collected water from the saucer or decorative cover.
Overwatering is one of the most common causes of decline. Constantly saturated compost excludes oxygen from the root zone and encourages tissue breakdown. Early signs may include yellow lower leaves, soft stems, unpleasant-smelling soil, or wilting despite wet compost. These symptoms require immediate attention because damaged roots cannot absorb water efficiently.
Severe drought can also harm the plant. Leaves may droop, curl inward, or develop dry brown edges when the root ball becomes excessively dry. A mildly wilted plant often recovers after thorough watering, but repeated drought weakens roots and causes permanent leaf damage. Maintaining moderate, even moisture is more effective than alternating between extreme dryness and saturation.
Water quality can influence leaf appearance over time. Hard tap water may leave mineral deposits in the compost and contribute to brown tips on sensitive specimens. Rainwater, filtered water, or rested tap water can reduce this problem. Periodically flushing the pot with clean water helps wash accumulated salts from the root zone.
Feeding and supporting healthy growth
During spring and summer, dumb cane benefits from a balanced liquid houseplant fertiliser. Apply it at half the manufacturer’s standard concentration every three to four weeks while growth is active. Fertiliser should be added only to moist compost because concentrated salts can burn dry roots. Reduce or stop feeding when growth slows in autumn and winter.
Excess fertiliser does not produce stronger plants. Overfeeding may lead to scorched root tips, brown leaf margins, weak soft growth, and white deposits on the soil surface. If salt accumulation is suspected, flush the compost thoroughly with clean water. Resume feeding only after the plant shows stable new growth.
Fresh potting compost provides nutrients for a limited period after repotting. A recently repotted plant usually does not need additional fertiliser for four to eight weeks. Feeding too soon can stress newly disturbed roots. Waiting also makes it easier to judge whether the plant has successfully established in its new container.
Large leaves should be kept clean so they can absorb light efficiently. Wipe both surfaces gently with a damp, soft cloth while supporting each leaf from beneath. Avoid commercial leaf-shine products because they may clog stomata or leave sticky residues. Cleaning also provides an opportunity to inspect the plant closely for pests and early damage.
Repotting and maintaining the root zone
Repotting is usually necessary every one to three years, depending on growth rate and container size. Signs include roots circling tightly around the pot, rapid drying, stunted growth, or water running straight through compacted compost. Spring is generally the best time because the plant can recover during active growth. Choose a pot only slightly larger than the previous one.
The growing medium should hold moderate moisture while still allowing rapid drainage and air exchange. A useful mix can include quality houseplant compost combined with perlite, fine bark, or coconut fibre. Heavy garden soil is unsuitable because it compacts easily and may carry pests or pathogens. The finished mix should feel loose, springy, and structurally stable.
Drainage holes are essential regardless of the container material. A decorative outer pot may be used, but the inner nursery pot must never stand in trapped water. Terracotta allows faster moisture loss, while glazed ceramic and plastic retain water for longer. Watering frequency should therefore be adjusted to the container as well as the season.
When repotting, examine the roots before placing the plant into fresh compost. Healthy roots are firm and usually pale cream, tan, or light brown, while rotten roots are dark, soft, and often foul-smelling. Remove unhealthy tissue with sterilised tools and avoid damaging sound roots unnecessarily. Replant at the same depth, because burying the stem too deeply can promote decay.
Seasonal care and long-term maintenance
Spring marks the beginning of the strongest growth period. Increase watering gradually as the plant uses moisture more quickly, restart feeding, and consider repotting crowded specimens. This is also a suitable season for pruning and propagation. Inspect new leaves regularly because soft growth can attract sap-feeding pests.
Summer care focuses on protecting the foliage from excessive heat and direct sunlight. Rooms behind large windows can become much hotter than the general outdoor temperature suggests. Increase ventilation without exposing the plant to violent drafts. Check compost more frequently, especially when the plant has many large leaves.
In autumn, growth usually begins to slow as daylight decreases. Reduce fertiliser applications and allow the top layer of compost to dry slightly more between waterings. Move the plant closer to a bright window if necessary, but avoid cold glass. Cleaning the foliage helps maximise the limited available light.
Winter is a period of slower metabolism rather than complete dormancy. Keep the plant warm, protect it from drafts, and water cautiously because wet compost dries slowly in low light. Maintain reasonable humidity around the leaves without leaving them constantly damp. A stable winter environment helps the plant resume vigorous growth when spring returns.