Maintaining the neat appearance and health of these hardy woodland perennials involves minimal but highly specific pruning practices throughout the year. Unlike aggressive garden shrubs, these delicate plants do not require extensive cutting back to maintain their shape or size. Instead, pruning focuses primarily on the careful removal of spent flowers and dead foliage to prevent disease and encourage fresh growth. Implementing these simple maintenance tasks keeps the colony looking its best while supporting the natural lifecycle of the underground tubers.
The primary reason for removing old foliage is to maintain excellent air circulation around the crown of the plant. As the leaves age and begin to decline at the end of spring, they can form a dense, matting layer on the soil surface. This trapped moisture creates an ideal microclimate for the development of destructive fungal rots like botrytis. Regularly clearing away this old material ensures that the top of the tuber remains dry and well-ventilated during its transition.
Removing spent flowers after the blooming season serves two distinct purposes depending on your specific gardening goals. If you wish to prevent self-seeding and keep the colony contained, cutting off the faded blossoms stops seed pod development entirely. However, if you want the colony to expand naturally, the flower stems should be left undisturbed so they can set seed. Understanding this choice allows you to tailor your pruning routine to match the long-term design goals of your garden landscape.
Pruning also provides an excellent opportunity to inspect the overall health of the colony up close. While you are removing old stems, take the time to check the firmness of the underlying tubers and look for signs of pest activity. Finding a localized issue during routine maintenance allows for quick, targeted interventions before the problem spreads widely. This proactive approach combines aesthetic tidying with essential health monitoring to ensure the long-term vitality of the plants.
When and how to trim
The optimal timing for major cleanup tasks occurs in late spring when the foliage naturally begins to yellow and wither. This yellowing signals that the plant is transferring its remaining nutrient reserves from the leaves down into the storage tuber. Wait until the leaves are completely dry and straw-like before attempting to remove them from the garden bed. Removing foliage while it is still green deprives the tuber of essential energy, weakening future flower production significantly.
More articles on this topic
When removing completely dry leaves and flower stems, tools are often unnecessary because the debris detaches easily by hand. Gently grasp the base of the dead stem close to the soil surface and give it a sharp, clean tug. The stem should separate cleanly from the top of the tuber without tearing the surrounding tissue or disturbing the soil. This manual plucking technique is highly efficient and minimizes the risk of damaging the sensitive crown of the plant.
If a stem resists your gentle tug, use a small, sharp pair of trimming scissors to cut it as close to the base as possible. Forcing a stubborn stem to detach can accidentally tear a piece of the tuber’s skin, creating an open wound vulnerable to infection. Always ensure that your pruning scissors are thoroughly sterilized with rubbing alcohol before you begin working on the plants. Clean tools prevent the accidental transmission of viral or fungal pathogens between different individuals in the colony.
During the autumn blooming phase, a light deadheading routine can keep the floral display looking fresh and vibrant. Remove individual withered flowers as they fade to make room for the emerging buds waiting below. This minor maintenance takes only a few minutes but significantly enhances the overall neatness of the garden bed. Avoid disturbing the tightly coiled stems of flowers that have successfully been pollinated if you desire natural seed production.
Supporting growth after maintenance
Once the late spring cleanup is complete and the bed is cleared of all dead debris, the plants enter their summer rest. This is the ideal time to apply a thin, fresh layer of gritty mulch or fine gravel over the bare soil. This mulch protects the exposed surface from heavy summer rains and prevents weeds from establishing themselves in the empty space. It also provides a clean, attractive backdrop that will highlight the emerging flowers when autumn arrives.
More articles on this topic
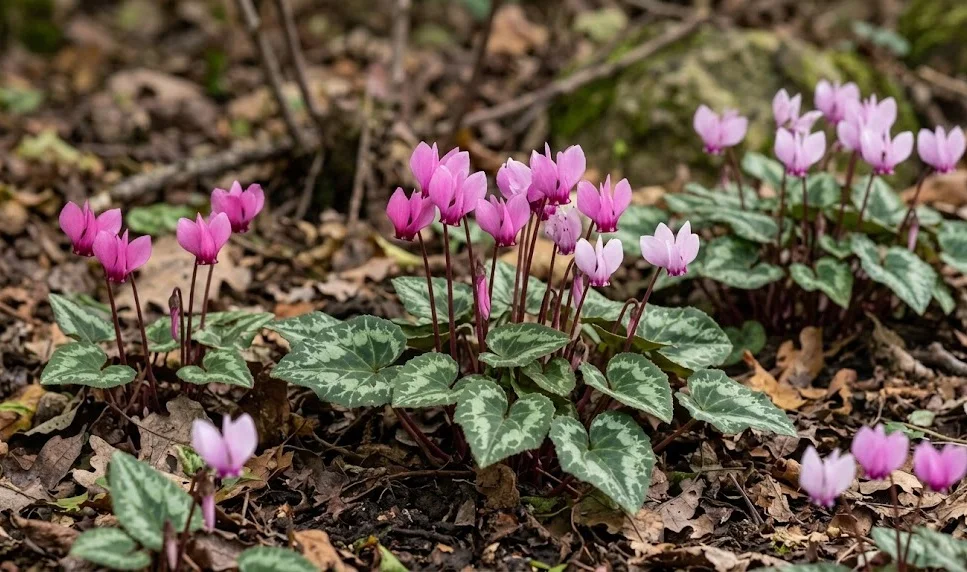
Keep the area completely undisturbed during the hot summer months while the tubers are resting silently beneath the mulch. Avoid digging near the colony or attempting to plant summer annuals in the gaps between the cyclamen positions. The feeding roots are very shallow and can be easily destroyed by careless summer cultivation or hoeing. Respecting their space during this quiet phase ensures they have the strength to produce a spectacular autumn display.
As the first autumn rains arrive, monitor the bed closely for the appearance of the initial flower buds pushing through the grit. If the weather remains unusually dry and warm, provide a gentle, deep watering to support the emerging stems. This initial hydration helps the buds break through the surface smoothly without stalling or drying out prematurely. Watching this reawakening is one of the most rewarding moments for any gardener who cares for these woodland gems.
Finally, celebrate the fresh cycle of growth by keeping the surrounding area free of aggressive weeds that could compete for light. As the gorgeous leaves unfold after the flowers, they will quickly form a dense, weed-suppressing ground cover on their own. This natural canopy requires no further pruning or trimming until the following spring season arrives. Following this simple, respectful maintenance rhythm ensures that your cyclamen colony will continue to flourish and expand beautifully for generations.