The successful establishment of stubble turnips begins with a precise planting strategy that respects the quick-growing nature of this versatile brassica. You must recognize that the window for planting is often narrow, typically occurring after the harvest of a primary cereal crop in late summer. This timing allows the turnips to utilize the remaining warmth and moisture of the season to develop significant biomass before winter arrives. Proper propagation is not just about placing seeds in the dirt; it is about creating an environment where every seed has the maximum chance of becoming a productive plant.
Preparation of the seedbed is the most important physical task you will undertake during the planting phase of the cycle. You should aim for a fine, firm tilth that provides excellent seed-to-soil contact, which is crucial for the small seeds of the stubble turnip. If the soil is too cloddy, the seeds may fall into air pockets where they will fail to hydrate and germinate properly. Achieving the right consistency often requires a combination of light cultivation and rolling to pack the earth without causing excessive compaction.
Direct drilling is a popular and effective method for propagating stubble turnips because it minimizes soil disturbance and preserves existing moisture. You should ensure that your equipment is calibrated correctly to deliver the seeds at a consistent depth across the entire field. Even a slight variation in depth can lead to uneven emergence, which complicates later management tasks like thinning or weed control. By using precision drilling techniques, you can achieve a uniform stand that maximizes the use of available sunlight and nutrients.
The timing of the planting should be carefully synchronized with expected rainfall patterns to facilitate rapid and even germination. You should ideally sow the seeds when there is sufficient residual moisture in the soil or when rain is forecast in the immediate future. If the ground is bone dry and no rain is expected, the seeds may sit dormant or germinate poorly, leading to a weak and patchy crop. Successful propagation requires you to work in harmony with the local weather to give the young plants the best possible start.
Seed selection and quality
Choosing the right variety of stubble turnip is the first decision that will influence the success of your propagation efforts. You should look for cultivars that are specifically bred for your intended use, whether that is high leaf production for grazing or large root mass for storage. Some varieties are more resistant to bolting, while others offer better frost tolerance for late-season performance in cooler climates. Reviewing independent trial data can provide you with the objective information needed to make an informed choice for your specific farm.
More articles on this topic
Seed quality is a non-negotiable factor when you are aiming for a high germination rate and a vigorous early growth phase. You should always source your seeds from reputable suppliers who provide certified batches with high purity and vitality scores. Using low-quality or older seeds can result in poor emergence, which leaves the soil vulnerable to erosion and weed invasion. A small investment in premium seeds pays for itself through the reduced need for reseeding and the higher overall yield of the crop.
Treated seeds can offer significant advantages in propagation by protecting the young plants from early-season pests and soil-borne diseases. You should consider whether your field has a history of specific issues that might warrant the use of fungicidal or insecticidal coatings on the seeds. These treatments provide a temporary shield that allows the seedlings to establish themselves during their most vulnerable period of development. Making this decision during the planning phase ensures that you have the necessary protection in place from day one.
The seeding rate must be calculated based on the specific goals of the crop and the environmental conditions of the planting site. You should adjust the rate upward if you are planting into a less-than-ideal seedbed or if the planting date is later than recommended. A higher density of seeds can compensate for lower germination rates but may require more intensive thinning later in the season. Finding the perfect balance for your specific conditions is a key part of the professional propagation process.
Sowing techniques and depth
Achieving the correct sowing depth is a technical challenge that requires careful adjustment of your planting machinery. You should aim for a depth of approximately one to two centimeters, which provides enough cover for protection while allowing easy emergence. If the seeds are buried too deep, they may exhaust their energy reserves before they reach the surface and can begin photosynthesis. Conversely, seeds that are too shallow are at risk of drying out or being consumed by birds and insects before they can take root.
More articles on this topic
Broadcast sowing is an alternative to drilling that can be very effective in certain conditions, especially when time is of the essence. You should follow the broadcasting with a light harrowing or rolling to ensure that the seeds are incorporated into the top layer of soil. This method is often faster but requires a higher seeding rate to account for the less precise placement of the seeds. It is a viable option for larger areas where speed is prioritized over absolute precision in plant spacing.
The alignment of the rows can also impact how the crop develops and how easily it can be managed throughout its life. You should consider the direction of the prevailing winds and the slope of the land when planning your sowing pattern. Properly aligned rows can help with water infiltration and reduce the risk of soil erosion during heavy rain events. This thoughtful approach to the physical layout of the crop is a mark of a professional who understands the long-term implications of planting decisions.
Consistent calibration of the seeder is necessary to ensure that you are not wasting valuable seeds or creating overly dense patches in the field. You should perform a calibration test on a small area before starting the full planting operation to verify the output. Small changes in seed size between different batches can significantly affect the flow rate through the machine. Taking the time to be precise at this stage prevents a multitude of problems that would otherwise emerge during the growing season.
Germination and early establishment
The first few days after planting are critical as the seeds absorb moisture and begin the complex process of germination. You should monitor the field closely for the first signs of green shoots breaking through the soil surface, which usually happens within a week. During this time, the soil must remain moist enough to support the metabolic activity inside the seed without becoming waterlogged. Successful germination is a clear indicator that your planting depth and soil preparation strategies were executed correctly.
Once the seedlings have emerged, they must quickly establish a primary root system to anchor themselves and access deeper moisture. You should observe the vigor of the young plants and look for the rapid development of the first true leaves following the cotyledons. If the plants appear stunted or yellow, it may indicate a lack of immediate nutrients or a physical barrier in the soil. Early establishment is the foundation of the crop’s resilience against future environmental stressors and pest pressures.
Protection from early-season pests like flea beetles is vital during the establishment phase when the plants have very little leaf area to lose. You should be prepared to intervene if you notice significant “shot-holing” on the young leaves, which can quickly kill a small seedling. A healthy and fast-growing crop can often outgrow minor damage, but heavy infestations require immediate attention to preserve the stand. Monitoring the field daily during this period allows you to catch and manage these threats before they escalate.
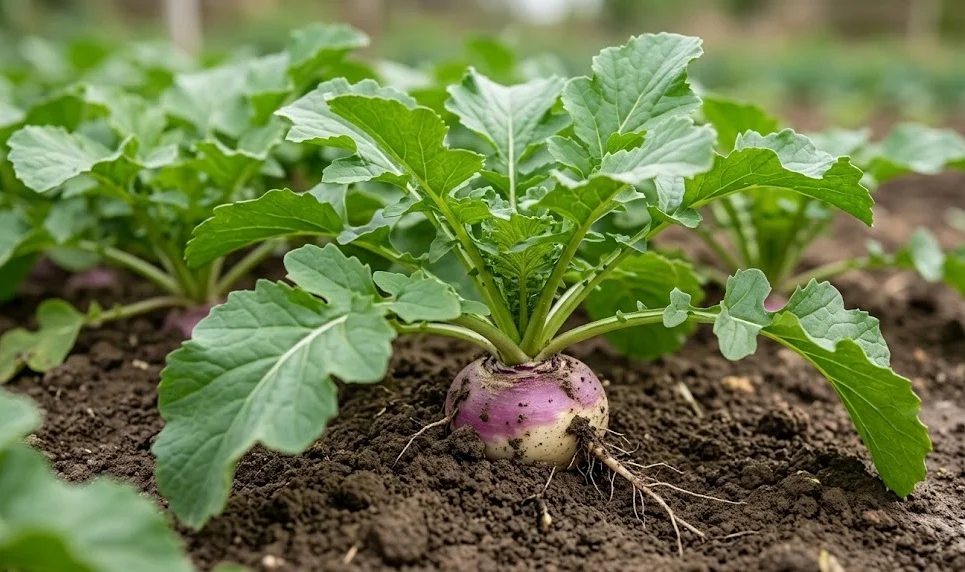
The transition from a seedling to a young plant is complete when the turnip has developed several true leaves and a noticeable root base. You should feel a sense of confidence when the rows become clearly defined and the plants begin to shade the soil around their base. This successful establishment means that the propagation phase is complete and the focus can shift to long-term care and maintenance. Your careful planning and execution during planting have now set the stage for a productive and healthy harvest.