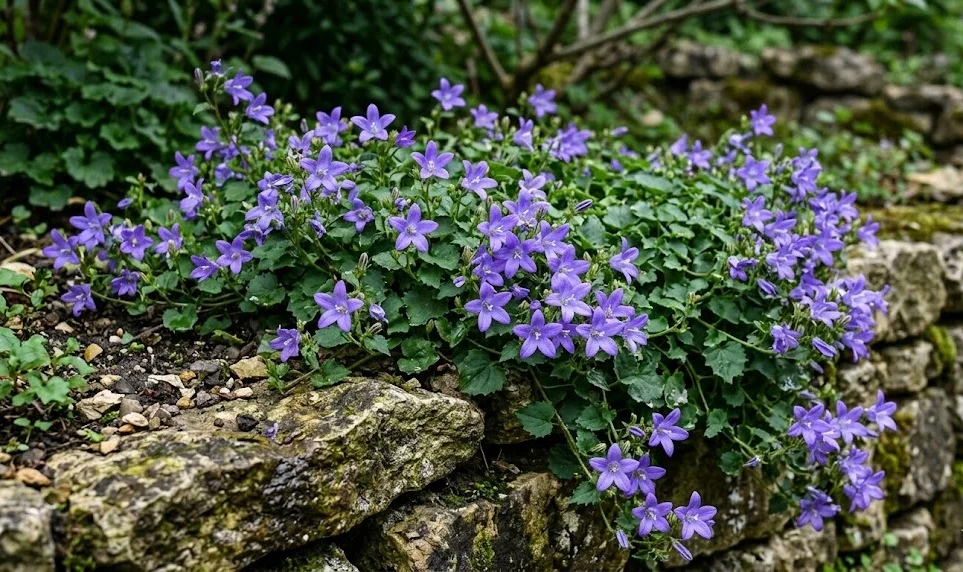
Successful establishment of this perennial starts with choosing the right location and preparing the site to accommodate its spreading nature. Whether you are using it as a ground cover or a rock garden accent, the initial planting phase determines the plant’s long-term health and vigor. Professionals understand that propagation is not just a way to get more plants, but a method to rejuvenate older specimens and maintain the garden’s overall aesthetic. By following a few key steps, you can ensure that your bellflowers take root quickly and begin to thrive in their new environment.
Site selection and soil preparation
The first step in a professional planting project is identifying a location that meets the specific light and drainage requirements of the species. You should look for a spot that receives at least partial sunlight, as this will result in the most prolific blooming. While the plant is adaptable, it will struggle in heavy, waterlogged clay that doesn’t allow the roots to breathe properly. Finding a site with natural drainage, such as a slope or a raised bed, is often the best strategy for long-term success.
Before the plant even touches the ground, you must prepare the soil by removing any existing weeds and their root systems. You should dig over the planting area to a depth of at least twenty centimeters to loosen any compacted layers of earth. Incorporating a generous amount of well-rotted compost or leaf mold will improve the soil structure and provide a slow-release source of nutrients. This preparation stage is the most labor-intensive part of the process, but it is also the most rewarding for the plant’s future.
Consider the surrounding landscape elements, such as walls or large stones, which can influence the local microclimate. You should be aware that stones can hold heat and release it during the night, which can be beneficial in cooler regions. However, in very hot climates, this extra heat might dry out the soil too quickly for a newly planted bellflower. A professional assessment of these factors helps you decide if any additional soil amendments or mulches are necessary to stabilize the environment.
Drainage is so critical for this plant that you should test the soil’s permeability before finalizing the planting site. You can do this by digging a small hole, filling it with water, and observing how long it takes to drain away completely. If the water sits for more than an hour, you should consider adding horticultural grit or perlite to the planting area. Ensuring the roots are never sitting in stagnant water is the single most important factor in preventing root rot during the establishment phase.
More articles on this topic
The planting process
When you are ready to put the plant in the ground, start by digging a hole that is twice as wide as the root ball but no deeper. You should gently tease the roots out if they have become circular or “pot-bound” in their nursery container. This encourages the roots to grow outward into the surrounding soil rather than continuing to grow in a tight spiral. A professional technique involves placing the plant so that the crown is exactly level with the surface of the soil.
Fill the space around the root ball with the prepared soil mixture, pressing down firmly but gently with your hands to remove any large air pockets. You should avoid using your feet to tamp down the soil, as this can lead to excessive compaction and damage the delicate feeder roots. Once the plant is secure, create a small basin around the base to help direct water toward the root zone during the first few weeks. This initial watering is crucial for settling the soil and ensuring the roots make good contact with their new home.
Immediately after planting, you should provide a deep soak to the area to help the plant recover from the stress of being moved. You must monitor the plant daily for the first two weeks to ensure the soil remains consistently moist but not dripping wet. If the weather is particularly sunny or windy, the new plant may need a bit of temporary protection to prevent excessive moisture loss. Professional care during these first few days is what separates a successful transplant from one that struggles to survive.
Spacing is an essential consideration if you are planting multiple specimens to create a ground cover or a border. You should space the plants approximately thirty to forty centimeters apart to allow them room to spread without immediate competition. While the area might look a bit sparse at first, these plants grow quite quickly and will fill in the gaps within one or two seasons. Planning for the mature size of the plant prevents future problems with overcrowding and poor air circulation.
More articles on this topic
Propagation by division
Division is one of the easiest and most effective ways for a professional gardener to increase their stock of bellflowers. You should ideally perform this task in early spring or late autumn when the plant is not in full bloom and the weather is mild. Dig up the entire clump with a spade, taking care to keep as much of the root system intact as possible. You will notice that the plant naturally forms distinct sections that can be easily separated from the main mass.
Use a sharp knife or a clean spade to cut the clump into smaller sections, making sure each piece has a healthy amount of roots and at least a few green shoots. You should discard the old, woody center of the original plant and focus your energy on the vigorous outer portions. These younger sections are much more likely to establish quickly and produce a better floral display in the coming year. This process of renewal keeps the entire garden looking fresh and prevents the plants from becoming over-extended.
Once you have your divisions, you should replant them as soon as possible to prevent the roots from drying out in the air. You can treat these new sections just like nursery-bought plants, following the same soil preparation and planting guidelines. If you cannot plant them immediately, keep them in a shaded spot and cover the roots with damp burlap or potting soil. Moving quickly during the division process ensures a high success rate and minimal stress for the new plants.
After replanting the divisions, you must be particularly diligent with your watering routine for the first month. You should watch for signs of new growth, which is the clearest indicator that the division has successfully taken root. Providing a light application of balanced fertilizer can help the new plants get off to a strong start. Propagation by division is a fundamental skill that allows you to maintain a consistent look throughout your landscape without buying new plants every year.
Propagation from cuttings and seeds
While division is the most common method, you can also propagate this plant from softwood cuttings taken in the early summer. You should select healthy, non-flowering stems and cut them into sections about ten centimeters long. Remove the lower leaves and dip the cut end into a rooting hormone powder to encourage faster root development. Placing the cuttings in a tray of moist, sandy compost and keeping them in a humid environment will yield the best results.
Cuttings need a bright location but should be kept out of direct sunlight to prevent them from wilting before they can form roots. You should check the moisture level of the compost daily and mist the foliage to maintain high humidity around the stems. Within a few weeks, you should see signs of new growth, indicating that roots have begun to form. Once the cuttings are well-rooted, they can be potted up individually and grown on until they are large enough to be planted in the garden.
Growing this bellflower from seed is a more time-consuming process, but it is an excellent way to produce a large number of plants at a low cost. You should sow the tiny seeds on the surface of a fine seed-starting mix, as they require light to germinate properly. Keep the tray in a cool but bright location and ensure the soil remains consistently damp through bottom-watering. Germination can be irregular, so you must be patient and wait for the seedlings to develop several true leaves before handling them.
When the seedlings are large enough to handle, you should “prick them out” into individual small pots to allow them more room to grow. You must continue to provide them with plenty of light and a gentle feeding of liquid fertilizer every two weeks. It usually takes a full growing season for a seedling to become large enough to hold its own in the garden landscape. This method is a professional way to experiment with the plant’s natural genetic diversity and find unique variations in flower color or growth habit.