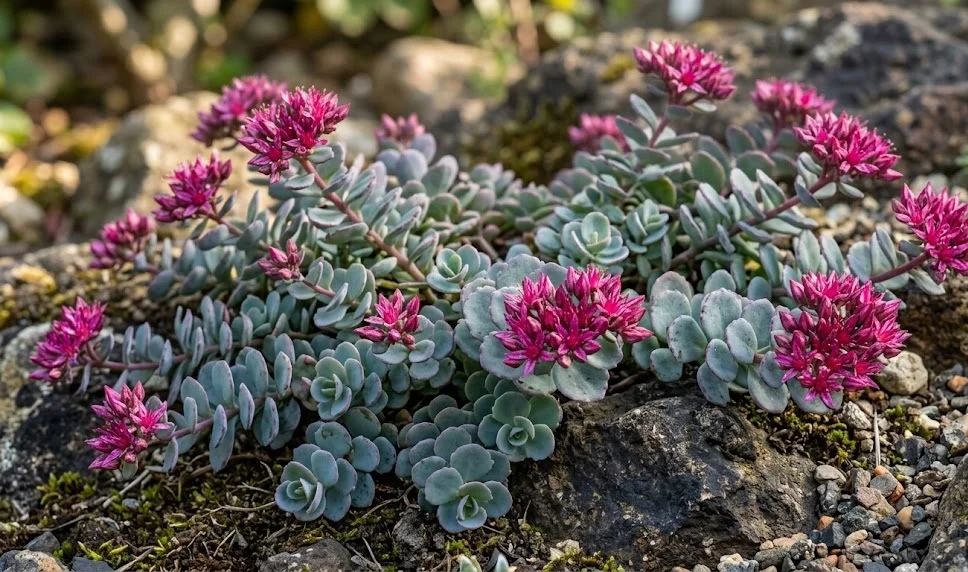
The process of establishing new plants in the garden is both a rewarding and essential skill for any horticultural enthusiast. Planting and propagating the Japanese stonecrop is a relatively straightforward task that rewards the gardener with a wealth of new growth. By understanding the specific requirements for root development and soil contact, you can easily expand your collection of this versatile succulent. This article provides a professional guide on the best practices for getting these plants started and multiplying them effectively.
Site selection and soil preparation
The first step in a successful planting project is choosing a location that meets the biological requirements of the species. You should look for a spot that receives plenty of sunlight, as this is the primary driver for healthy leaf color and flower production. A southern or western exposure is often ideal for providing the intensity of light required for a compact growth habit. Avoid low-lying areas where water tends to collect after heavy rainfall, as this will lead to root problems.
Before you begin digging, it is vital to assess the existing soil structure and make any necessary improvements. If the soil is heavy or poorly drained, you should mix in a significant amount of coarse sand or fine gravel. This creates the macropores necessary for air to reach the roots and for water to drain away rapidly. You don’t need to add much organic matter, as these plants are adapted to nutrient-poor, rocky environments in the wild.
The layout of the planting area should also be considered to allow for the future spread of the plant. Since this variety has a trailing habit, placing it near the edge of a wall or a path allows it to showcase its natural form. Space the individual plants about eight to twelve inches apart to give them room to grow without immediately overcrowding each other. This spacing also ensures adequate air circulation, which is key to preventing fungal diseases in the foliage.
Clearing the site of any perennial weeds is a task that will save you a lot of trouble in the long run. Use a garden fork to loosen the soil and remove as many weed roots as possible before you put your stonecrop in the ground. Once the site is prepared and the soil is loose and friable, you are ready to move on to the actual planting. Taking the time to do this preparation properly ensures that your new plants have the best possible start in their new home.
More articles on this topic
The planting process
When you are ready to plant, start by digging a hole that is slightly larger than the root ball of the nursery container. You should handle the plant gently, as the succulent leaves and stems can be somewhat brittle and prone to breaking. If the plant is root-bound in its pot, lightly tease the outer roots to encourage them to grow outward into the new soil. Place the plant in the hole at the same depth it was growing in its original container.
Backfilling the hole should be done with care to avoid creating large air pockets around the root system. Gently firm the soil down with your hands rather than stepping on it, as excessive pressure can damage the delicate roots. It is often helpful to create a small depression around the base of the plant to help direct water toward the roots during the initial establishment phase. Once the plant is securely in the ground, give it a light watering to settle the soil.
Adding a thin layer of inorganic mulch, such as pea gravel or crushed stone, can be very beneficial for new plantings. This mulch helps to keep the foliage off the damp soil and prevents mud from splashing onto the leaves during rain. It also gives the planting bed a finished, professional look that complements the aesthetic of the succulent. Be careful not to pile the mulch directly against the stems of the plant to avoid trapping moisture.
Initial care after planting involves monitoring the moisture levels closely for the first few weeks. Even though the plant is drought-tolerant, it needs consistent moisture to develop a strong root system in its new location. You should water it whenever the top inch of soil feels dry to the touch, but never let it sit in a puddle. Once you see signs of new growth, you can gradually reduce the frequency of watering as the plant becomes more self-sufficient.
More articles on this topic
Propagation by stem cuttings
One of the easiest ways to create new plants is through the process of taking and rooting stem cuttings. This can be done at almost any time during the active growing season, but early summer is often the most successful period. Select a healthy, vigorous stem that is not currently flowering and cut a section about three to four inches long. Use a clean, sharp pair of scissors or a knife to make a clean cut just below a leaf node.
After taking the cutting, it is important to remove the leaves from the bottom inch of the stem to expose the nodes. You should then allow the cutting to sit in a shaded, dry spot for a day or two so the cut end can form a callus. This callusing process is a vital defense mechanism that prevents soil-borne pathogens from entering the stem and causing rot. Once the end feels dry and firm, the cutting is ready to be placed in a rooting medium.
For the rooting medium, a mixture of half sand and half peat or perlite works exceptionally well for succulents. Insert the callused end of the cutting into the medium and press it down firmly to ensure good contact. Keep the medium slightly moist but not wet, and place the container in a spot with bright, indirect light. You will know the cutting has rooted when you feel resistance when gently tugging on the stem after a few weeks.
Once a robust root system has developed, you can transplant the new stonecrop into its permanent home in the garden or a larger pot. This method allows you to quickly multiply your plants without any specialized equipment or expensive hormones. It is a great way to fill in gaps in your landscape or to share your favorite plants with friends and neighbors. Propagation is a core skill that turns a casual gardener into a true plant enthusiast.
Propagation by division
Division is another effective method for propagating Japanese stonecrop, particularly for older, established clumps that are starting to look crowded. This process involves physically separating the root mass into several smaller sections, each with its own stems and roots. The best time to perform this task is in the early spring before the plant has put too much energy into new foliage. Dividing the plant every three to four years helps to maintain its vigor and prevents the center from dying out.
Start by carefully digging up the entire plant, making sure to get as much of the root system as possible. Shake off the excess soil so you can clearly see where the different sections of the crown are connected. You can often pull the plant apart with your hands, but for larger or tougher specimens, a sharp garden knife may be necessary. Ensure that each new division has at least three or four healthy shoots and a good amount of roots.
Replant the divisions as soon as possible to prevent the roots from drying out in the air. Treat these new plants just as you would a newly purchased specimen, providing them with well-draining soil and a good initial watering. Because these divisions already have an established root system, they tend to grow very quickly and may even flower in their first year. This is the most efficient way to rejuvenate a tired-looking garden bed.
Sometimes, you may find that small sections of the plant have naturally rooted themselves where the trailing stems touch the ground. These “volunteer” divisions can simply be snipped away from the parent plant and moved to a new location. This natural layering process is a testament to the plant’s desire to spread and colonize new territory. By taking advantage of these different propagation techniques, you can enjoy a garden full of beautiful Japanese stonecrop for many years.