Taking a pair of shears to a prized shrub can feel like a daunting task, but it is one of the most beneficial acts of maintenance you can perform. For a plant known for its architectural form and large leaves, strategic pruning is essential to prevent it from becoming a tangled or leggy mess. By removing old or damaged growth, you encourage the plant to redirect its energy into producing fresh, vibrant foliage that maintains the shrub’s aesthetic appeal. A well-pruned specimen always looks more intentional and professional than one left entirely to its own devices.
The primary goal of pruning this species is to maintain a balanced shape and to manage the overall size of the plant within its given space. Because these shrubs can grow quite tall and wide, they may eventually begin to crowd other plants or obstruct walkways if not kept in check. Regular, light pruning is much better for the plant’s health than waiting years and then performing a drastic, heavy cut-back. This consistent approach keeps the plant looking its best while minimizing the stress of the pruning process itself.
Beyond aesthetics, pruning also plays a critical role in the long-term health of the plant by improving air circulation within the canopy. By thinning out some of the interior branches, you reduce the humidity levels that can lead to fungal infections and provide fewer hiding spots for common pests. This “opening up” of the plant allows light to reach the inner leaves, ensuring that the entire shrub remains green and productive from the base to the tips. It is a proactive form of pest and disease management that yields immediate results.
Proper timing and the use of the right tools are the final components of a successful pruning strategy for your greenery. Making clean cuts with sharp, sterilized equipment ensures that the plant heals quickly and reduces the risk of introducing pathogens into the open wounds. By understanding the plant’s growth cycle, you can choose the moment when it is best equipped to recover and push out new growth. Pruning is not just about cutting away the old, but about making space for the beauty of the future.
Principles of structural pruning and shaping
The first step in any pruning session is to identify and remove what gardeners often call the “three Ds”: dead, damaged, or diseased wood. These branches serve no purpose for the plant and can often act as a gateway for more serious problems if left in place. Use sharp bypass loppers or a pruning saw for thicker stems, ensuring that you cut back to a healthy node or the main trunk. Removing these unsightly elements immediately gives the shrub a cleaner and more rejuvenated appearance.
More articles on this topic
Once the health issues are addressed, you can focus on shaping the plant to fit your specific vision for the space. These shrubs have a naturally rounded or upright habit, but they can occasionally produce “wayward” branches that grow at odd angles. By cutting these back to a leaf node that faces in the desired direction, you can guide the future growth of the plant. This directional pruning is a powerful tool for creating a symmetrical and well-balanced specimen that looks great from every angle.
If your aralia has become too tall and “leggy,” with a lot of bare stems at the bottom, you can use a technique called heading back to encourage bushier growth. This involves cutting the main stems down to a lower set of leaves or buds, which stimulates the plant to produce multiple new shoots from that point. This process can be done gradually over a few seasons to avoid shocking the plant, eventually resulting in a much fuller and more compact shrub. It is the best way to restore the lush look of a plant that has been neglected for several years.
For older, very large specimens that have lost their shape entirely, you might consider a more radical approach known as renewal pruning. This involves removing about one-third of the oldest, thickest stems right down to the ground each year for three consecutive years. This encourages a constant supply of young, vigorous growth from the base while maintaining the overall size and presence of the plant. It is a long-term strategy that ensures your aralia remains youthful and vibrant for decades rather than becoming a woody, unproductive relic.
Choosing the ideal seasonal timing
The best time to perform any significant pruning is in the late winter or very early spring, just before the plant begins its main surge of new growth. At this time, the plant is still relatively dormant, which minimizes the loss of sap and allows the wounds to heal before the active growing season starts. By pruning just before the spring, you also take advantage of the plant’s natural energy to quickly cover the cuts with fresh, green foliage. This timing ensures the quickest recovery and the most spectacular display of new leaves.
More articles on this topic
Light maintenance, such as removing a single dead leaf or a small, broken twig, can be done at any time of the year without any negative impact on the plant. However, you should generally avoid heavy pruning in the late summer or autumn, as this can stimulate new growth that won’t have time to toughen up before the winter. These tender new shoots are very susceptible to frost damage, which can lead to dieback and unnecessary stress for the entire shrub. Respecting the plant’s natural preparation for dormancy is an important part of professional care.
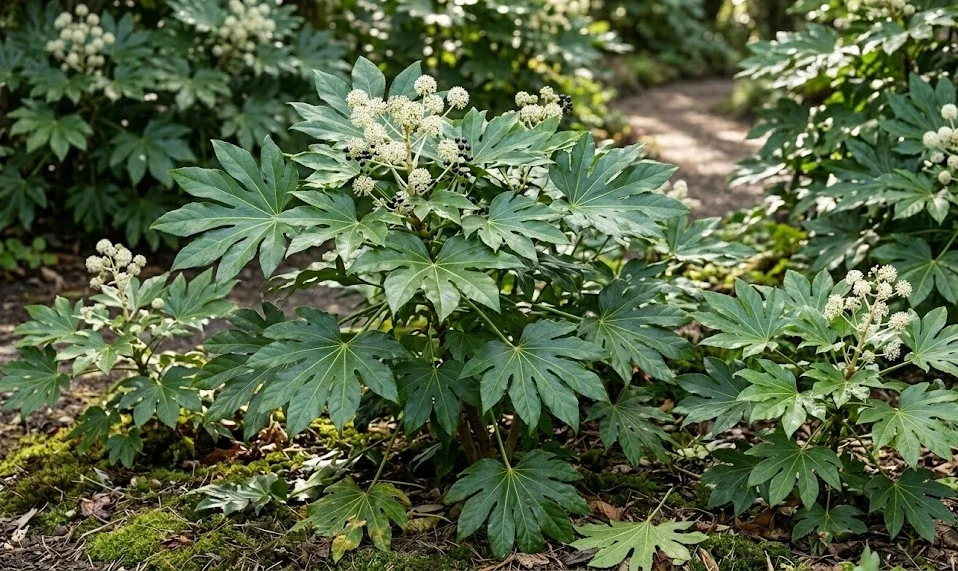
If your aralia produces flowers and you wish to enjoy them, you should wait until after the blooming period in early winter to do any major cutting. The white, globe-like flower clusters are a unique feature of the plant and provide valuable interest during the darker months of the year. Once the flowers have faded and the small berries have formed, you can perform your annual cleanup and shaping. This allows you to appreciate the full reproductive cycle of the plant before resetting its form for the coming year.
In cases where a plant has suffered severe damage from a storm or an unexpected frost, you should wait until the danger has fully passed before pruning. It can be tempting to cut away the brown parts immediately, but they can actually provide a small amount of insulation for the healthy tissue underneath during subsequent cold snaps. Once the weather has permanently warmed, you can clearly see what is dead and what is still alive, allowing for more precise and effective corrective cuts. Patience is often the best companion to a pair of pruning shears.
Essential tools and clean cutting techniques
Using the right tools is critical for ensuring that your pruning cuts are clean and heal properly without attracting disease. For most tasks on an aralia, a high-quality pair of bypass pruners is the best choice, as they act like scissors and provide a very precise cut. Avoid using anvil-style pruners, which can crush the relatively soft stems of this species instead of cutting through them cleanly. Keeping your blades sharp is perhaps the most important rule of pruning, as a dull blade will always cause more damage to the plant tissue.
Sterilization of your tools is a step that should never be skipped, especially if you are moving from one plant to another or dealing with diseased wood. A quick wipe with a cloth soaked in rubbing alcohol or a weak bleach solution is enough to kill any lingering pathogens or fungal spores. This simple habit prevents you from inadvertently spreading problems throughout your garden or indoor collection. Professional-grade hygiene is a hallmark of an expert gardener who truly cares about the long-term health of their botanical specimens.
When making a cut, always aim for a spot just above a leaf node or a dormant bud, as this is where the new growth will emerge. Do not leave long “stubs” of stem, as these will simply die back and can provide an entry point for rot or wood-boring insects. Conversely, be careful not to cut too close to the bud itself, which could damage the very tissue that is responsible for the plant’s recovery. A clean, slightly angled cut about a quarter-inch above the node is the gold standard for healthy pruning.
For very thick branches on an old outdoor specimen, you may need to use a pruning saw to achieve a clean result without straining your hand tools. When removing a large limb, use the three-cut method to prevent the weight of the branch from tearing the bark down the main trunk. Start with an undercut a few inches away from the trunk, then a second cut from the top to remove the bulk of the branch, and finally a clean finishing cut near the trunk. This professional technique ensures the structural integrity of the plant remains intact even after significant removals.