Starting a new plant from scratch is one of the most fulfilling experiences a gardener can have in their horticultural journey. Whether you are looking to expand your own collection or share a beautiful specimen with a friend, understanding the mechanics of reproduction is vital. This specific shrub offers several pathways for propagation, ranging from traditional seed sowing to the more rapid method of taking stem cuttings. Each approach requires a specific set of tools and environmental conditions to ensure the highest success rate for your new green additions.
Success in planting begins with selecting the right timing and the highest quality starting materials available. For most gardeners, the transition from winter to spring provides the optimal window when the plant’s internal energy is at its peak. This natural surge in vitality helps new roots and shoots establish themselves more quickly in their new environment. By working with the plant’s natural calendar, you significantly reduce the risk of failure and promote a more vigorous start.
Before you begin the physical process of planting or propagating, it is essential to gather all necessary supplies and prepare your workspace. Cleanliness is paramount, as young plants and fresh cuttings are particularly vulnerable to pathogens and fungal infections. Sterilizing your cutting tools and using fresh, pathogen-free potting soil will create a safe foundation for growth. Having everything ready at hand allows you to work quickly and efficiently, minimizing the amount of time the plant tissues are exposed to the air.
Patience is perhaps the most important ingredient in the propagation process, as new roots do not appear overnight. It can take several weeks or even months for a cutting or a seed to show tangible signs of successful establishment. Resisting the urge to constantly disturb the plant or check the roots is crucial for maintaining a stable environment. Trusting the process and providing consistent care will eventually reward you with a healthy, independent plant that mirrors the beauty of its parent.
Choosing the right planting location
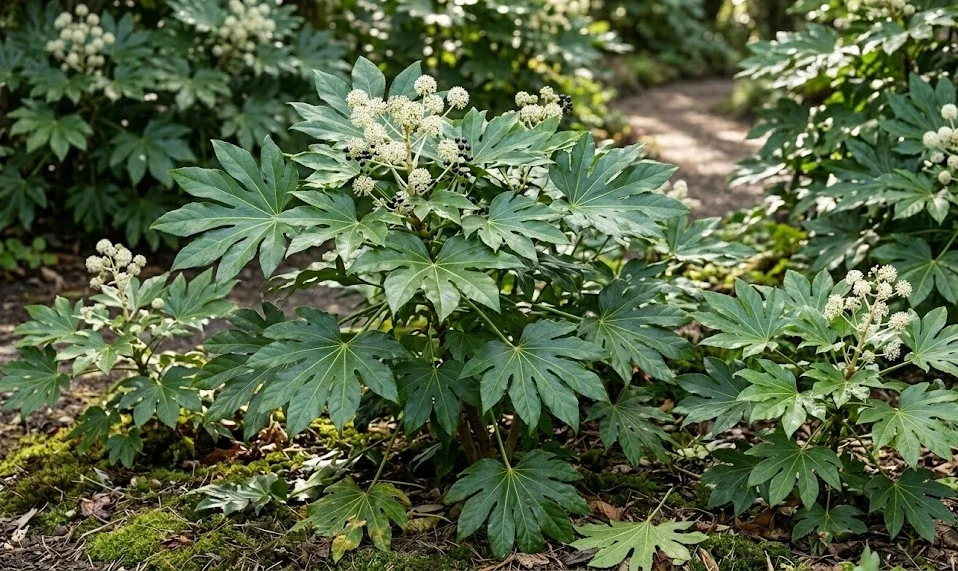
The long-term health of your shrub is largely determined by the specific spot where it is first placed in the earth. This plant thrives in areas that offer protection from the harsh midday sun, which can easily scorch its large, sensitive leaves. A location with dappled shade, such as under the canopy of a larger tree or on the north side of a building, is ideal. Such a position mimics the forest floor environment where the species evolved to grow in the wild.
More articles on this topic
Soil quality at the planting site must be carefully assessed and improved if necessary before the plant goes into the ground. These shrubs prefer a rich, well-draining soil that is high in organic matter to support their large foliage. If your garden has heavy clay, you should incorporate plenty of compost and perhaps some coarse sand to improve the drainage. Poorly drained soil can lead to waterlogged roots, which is one of the few conditions this resilient plant cannot tolerate.
Space is another critical factor to consider, as a young sapling can quickly grow into a substantial bush several feet wide. Ensure that the planting site is far enough away from paths, walls, or other plants to allow for its natural spread without constant pruning. Giving the plant enough room to breathe also improves air circulation, which helps prevent many common fungal diseases. Planning for the future size of the plant will ensure it remains a beautiful part of the landscape for many years.
Before digging the hole, consider the surrounding environment and how it might change throughout the different seasons. A spot that is shaded in the summer might be exposed to harsh winds or unexpected frost during the winter months. Look for a location that provides a consistent microclimate, shielded from the strongest gusts of wind. A well-chosen site reduces the amount of maintenance and protective care you will need to provide as the plant matures.
Propagation through stem cuttings
One of the most reliable ways to create a genetic clone of your favorite aralia is through the use of semi-ripe stem cuttings. This method involves taking a section of the current year’s growth that has started to firm up but is still somewhat flexible. The ideal cutting is usually about four to six inches long and taken from a healthy, pest-free part of the parent plant. Using a sharp, sterilized knife or shears will ensure a clean cut that heals quickly and roots more effectively.
More articles on this topic
Once you have your cutting, remove the lower leaves to expose the nodes where new roots will eventually emerge. It is often helpful to dip the base of the stem into a rooting hormone powder to stimulate faster and stronger root development. The cutting should then be placed into a small pot filled with a light, airy mixture of peat and perlite or a similar propagation medium. Firm the soil gently around the stem to ensure good contact and stability during the rooting phase.
To maintain the high humidity required for successful rooting, many gardeners cover the pot with a clear plastic bag or place it in a specialized propagation chamber. This creates a mini-greenhouse effect that prevents the cutting from drying out before it has developed its own root system. Keep the setup in a bright spot but away from direct sunlight, which could cause the temperature inside the plastic to rise to dangerous levels. Check the moisture of the medium regularly, ensuring it stays damp but never soggy.
After several weeks, you can test for root development by giving the cutting a very gentle tug; if you feel resistance, roots have begun to form. Once the root system is well-established, the new plant can be gradually acclimated to normal room conditions by opening the plastic cover a little more each day. This transition period is vital for preventing shock as the plant begins to rely on its own roots for hydration. Soon, you will have a vibrant new aralia ready for its first real potting.
Growing from seed techniques
While more time-consuming than cuttings, growing this shrub from seed can be a deeply rewarding scientific experiment for any plant lover. Fresh seeds are essential for success, as the viability of the embryos decreases rapidly once they are removed from the berries. If you are harvesting seeds from your own plant, make sure to clean away the pulpy fruit completely before sowing. This pulp contains natural growth inhibitors that are designed to prevent the seeds from germinating too early in the wild.
The seeds should be sown on the surface of a fine seed-starting mix and covered with only a very thin layer of soil or vermiculite. They require a consistent temperature of around twenty degrees Celsius to trigger the germination process effectively. Keeping the seed tray in a warm, brightly lit area will encourage the first sprouts to appear within a few weeks to a month. It is important to keep the surface of the soil consistently moist during this delicate phase of the plant’s life.
Once the seedlings have developed their first set of true leaves, they are ready to be moved into individual small pots. This first transplanting must be done with extreme care to avoid damaging the tiny, fragile root systems that are just beginning to grow. Use a high-quality potting mix that provides plenty of nutrients to support this initial burst of growth. At this stage, the young plants are still quite vulnerable and should be kept in a protected environment away from any harsh conditions.
As the seedlings grow, they will gradually begin to take on the characteristic leaf shape of the adult aralia. It is fascinating to watch the transformation from a simple green shoot to the complex, palmate foliage that defines the species. Be prepared to wait a few years before the plants reach a size where they can be moved into the garden or used as major indoor decor. Growing from seed is a lesson in patience that results in a unique connection between the gardener and the plant.
Repotting and initial root care
As your young plants grow, they will eventually outgrow their nursery containers and require more space for their expanding root systems. Repotting is best done in the early spring, just as the plant is beginning its new cycle of active growth. Choose a new pot that is only one or two sizes larger than the current one to prevent the soil from holding too much unused moisture. Using a pot that is too large can lead to “sour” soil conditions that are detrimental to sensitive new roots.
When removing the plant from its old container, be careful not to tear the delicate feeder roots that are responsible for nutrient uptake. If the plant is root-bound, you can gently loosen the outer roots with your fingers to encourage them to grow outward into the new soil. Fill the bottom of the new pot with a layer of fresh potting mix and place the plant at the same depth it was previously growing. This prevents stem rot that can occur if the base of the plant is buried too deeply in the new medium.
After the plant is situated in its new home, water it thoroughly to help settle the soil and eliminate any large air pockets around the roots. This initial watering is crucial for establishing good contact between the root system and the new nutrient-rich environment. You might notice a slight pause in foliage growth as the plant focuses its energy on exploring the new soil space. Do not be alarmed, as this is a normal part of the adaptation process following a move.
For the first few weeks after repotting, keep the plant in a slightly more shaded and protected area than usual. This reduces the stress on the foliage while the roots are recovering and adjusting to their new container. Avoid fertilizing immediately after repotting, as the fresh potting mix usually contains enough nutrients for the first month or two. Once you see new leaves beginning to emerge, you can resume your regular care routine with confidence that the plant is well-established.